Stitching Idyllic

Stitching Idyllic by Ann Bernard

  • Home
  • Blog
  • Spring Flowers
  • Summer Flowers
  • About Ann

31/01/2019 by Ann Bernard

“If Winter comes, can Spring be far behind”.

This famous quote helps us through the depths of the winter weather.

To help both you and myself, let us anticipate spring.  It is bitterly cold here in southern Ontario.  Today looks lovely but it the cold goes right through even the warmest coat and gets into ones bones.

It is a day to stay indoors and dream of Spring Flowers.

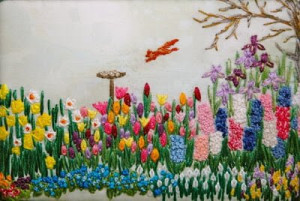
Here are some hand stitched spring flowers which are based on chain stitch.  It is amazing what one can do with the most basic and best known stitches if one plays around with them a little.   One never knows what will happen.  To achieve flowers that are  recognizable it is important that the proportion of plant height and flower size be correct and that the colours of both foliage and the flowers also be correct.  Otherwise, our eyes do not recognize them.  They become generic, rather than specific.

Snowdrops.  Except for celandines, these really are the first flower of spring.  One can have both snow and blooms in the same flower bed. Use a white Perlé thread to give the flowers some sparkle.  In nature, they really do sparkle.

Crocus also bloom in early spring.  DMC floss thread in the correct colours gives us a good rendition of these popular and fragile blooms.  Note that the foliage colour of all three plants is different.

Tulips are both taller and much later in the season.  These flowers bloom in a multitude of different colours.

My good friend, Mary, created card inserts using the instructions for tulips.  I would love to receive such a card for a birthday or to wish me well if I had been sick.  It is such a personal gift to, or from, someone important in ones life.

[do_widget id=arpw-widget-2]

You will find the instructions on how to stitch these flowers together with the DMC floss colour numbers in this ebook.

Hand Stitch Recognizable Spring Flowers published by ebookit.com

The book contains the instructions for 23 different flowers, bushes and trees.  It also contains, and this is important, information on setting up a frame with fabric that is taut.  Basic, ‘how to stitch’ information is included plus finishing and mounting ones completed work.  As most books assume that everyone knows the basics, they do not cover this vital information.  Because it is not widely know, I have included it in mine.  It saves beginning stitchers falling into  potholes and embroidery is full of them.  The experience is more enjoyable if one knows where the potholes are and is able to avoid them.

The book is published in ebook format because of the high cost of colour printing.  You can print it on your printer for your own personal use.  We have proved many times that the instructions are complete and you will not need other assistance.

Have fun with this and enjoy anticipating Spring.

Ann

17/11/2018 by Ann Bernard

“Blocking Embroidery” to professional standards. A tutorial.

The process of “blocking” removes all the wrinkles, distortions, twists and unevenness’s making your stitching look amazing. This process is well worth the time and effort spent doing it. It is logical and easy. Especially when you follow the directions!!! I mean that. Omit all the shortcuts that you can think of.

SUPPLIES
A piece of wood, i.e. plywood that is at least 3” larger in all directions than your embroidery.

Heavy Duty Foil to cover one side of the board completely, plus the edges.

An old white sheet, towel, or flannelette. This should be larger than your embroidery but not as large as the board.

A tape measure, ruler, set square and a pencil.

A hammer.

Four short lengths of masking tape.

A clean spray bottle for cold water.

Another larger piece of old sheeting to lay over your embroidery while it is drying.

A horizontal place to lie your “blocked” piece of embroidery and leave it there for at least 2 days. It may take several days longer if it is a tapestry or crewel piece of embroidery.

If your embroidery has some dirty marks on it such as from a hoop, use a Tide pen on the marks. Or wipe them gently with a damp cloth with a minute amount of detergent on it. Hopefully, neither of these will be necessary.  Be very conservative with any spot cleaning you have to do.

Do not wash and iron it. This may be necessary for white work but is not advisable for crewel embroidery or for any other densely stitched piece of embroidery.

METHOD
1. Cover the board with Heavy Duty Foil. This keeps any chemical or wood sap from oozing up into your embroidery and staining it.

2. Measure each of the four sides of the wood and place a piece of masking tape at that centre point.

3. Mark the exact centres of the sides of the board on the tape with a clearly visible pencil mark.

4.Mark the exact centre of each of the four sides of your embroidery using a short pencil mark on the edge of the fabric.

5. Lay two wrinkle free layers of cotton fabric or flannelette or, one layer of thin, old towel on top of the foil. The area that this covers should be larger than your embroidery but not cover the marks indicating the centres of the sides of the board.

The next point is variable and you have to use your judgement on which one is appropriate for your embroidery.

–Work with it dry. This is suitable for light weight fabrics with minimal distortion and puckering.

–Work with it slightly damp. Spray it all over, back and front, with clean, cold water. This piece needs some more major restoration. It is puckered, has hoop marks and looks messy.

–Work with it really wet. This is for tapestry work on canvas which is severely distorted.  Spray it thoroughly back and front, or put it in cold water and let the excess water drain off it.

Fix your Embroidery to the covered board.

It must be — right side of the embroidery facing you. The reverse side is the side goes next to the layers of fabric padding. After the stretching process is completed, your embroidery will appear to be embossed.

6. Position the embroidery so that the marked centre points of the board and the marked centre points of the embroidery are lined up.  The line of dash marks indicates the edge of the stitching design.

7. Place a temporary pin or nail in the centre of each of the four sides to fix the embroidery to the board. The pins or nails are close to the outside edge of the fabric and not near the embroidery. (Red dots).

Corners next. Stretch each corner of the fabric out towards the corner of the board and position these four pins or nails temporarily. You now have your embroidery centred and positioned so that the warp and weft fabric grain are positioned at right angles to each other. Check this with a ruler or set square

8. Go back to those temporary mid points pins/nails again. Remove them replace them accurately on those mid line markers but stretch your embroidery in the same way as you did the corners.

Go to the half way point between a corner and a central mid-point on one side. Stretch the embroidery fabric outwards so that the edge of the fabric is straight. Hammer in a temporary pin .Repeat for the other half of that first side. Repeat for all four sides.

Continue in this manner placing pins or nails about ½” apart round all four edges of the fabric.  Only one edge has all the pins/nails in position in the diagram.

Check that —  That the fabric is taut and that the warp and weft threads are at exact right angles to each other. The edges of the fabric should be straight.
Make adjustments to the stretching and pin/nail positions as necessary.

9. When you are satisfied with the stretching part of this job. Go round and hammer in all the pins or nails more securely. Do not hammer them in so far that they will be hard to get out on completion.

10. Spray the entire piece of fabric with cold water so that it is uniformly and evenly damp or wet.

11. Place the board in a horizontal position on a table. Cover with a loose but clean white cloth especially if you have pets, children or anyone doing messy work on your house. Do not stand it against a wall as it will drain and not dry evenly

12. Check it every 6 – 8 hours and respray any areas that are drying faster than others. It needs to be kept uniformly damp so that when it is finally dry, it has all reached that state at the same time. (Do not even think of using a hair dryer on stubborn areas; or an iron).

Leave it to dry. this could take several days.

This procedure will remove all the wrinkles, distortions, twists and unevenness’s making your stitching look unbelievably amazing. It is well worth the time and effort to do this. It is also easy despite the long instructions.  If it is not perfect, repeat the process.

When it is completely dry – leave it a bit longer if you are not sure.  It will not hurt if it remains on the board until you have time for the next stage.

Remove the pins/nails carefully.

Your embroidery should now look fantastic.Do not fold it as the fold will not improve your embroidery. Rolling it with a towel for a short time will not damage it.

Mount it on Acid Foam Core board which is available at Art Stores and at Picture Framers. You can do this yourself. No framer will give your work the time and attention that you will give it. Having done an excellent job of stitching, give the same attention to finishing it by doing it yourself.

[do_widget id=arpw-widget-2]

You could have avoided all this if you had worked your embroidery on a Slate Frame or on a square or rectangular frame. The puckering and distortion occurs when you stitch on a hoop. The hoop leaves marks, bends in the fabric, distorts the fibres in the fabric and your stitches get pulled out of alignment. To stitch on a frame with the fabric fixed into position and taut is the the way to produce stitching that exceeds your ability and expectations. The instructions for this are included in my books which are published in ebook format.

Stitching on a hoop is appropriate for a design that is within the area of the hoop.  It is moving the hoop around to different areas of the design that is not advisable.

Hand Stitch Recognizable Spring Flowers 2nd edition

Hand Stitch Recognizable Summer Flowers

Although both books contain the information, in Spring Flowers, it is more fully explained.

PS: I trained at The Royal School of Needlework and really do know what I am talking about. Using the instructions for preparation and finishing will express your stitching ability into the fast lane and improve your finished product by several hundred percentage points.

All good wishes for a life time of happy stitching.

09/09/2013 by Ann Bernard

Burden Stitch – Part Two: a Tutorial

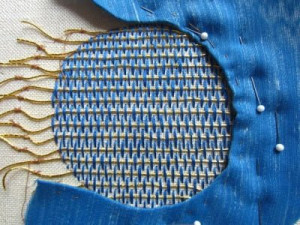
If you are using Burden Stitch as part of a design, you will have already decided on how you plan to complete the surrounding areas. On this sample, which is going nowhere except onto this blog, I had to decide on completion. The decision was a solid blue background around the area on the right and a section without blue fabric on the left.

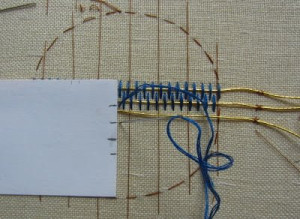
Burden Stitch Finishing Stages

Burden Stitch Finishing Stages

Burden Stitch Sinking The Thread Ends

Burden Stitch Sinking The Thread Ends

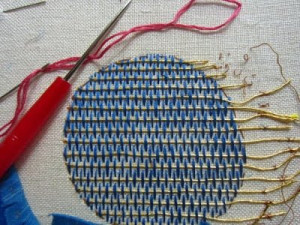
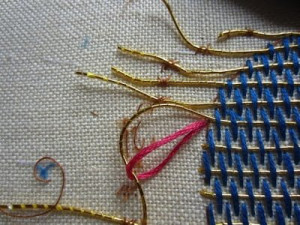
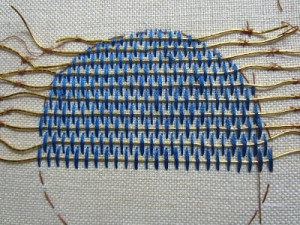
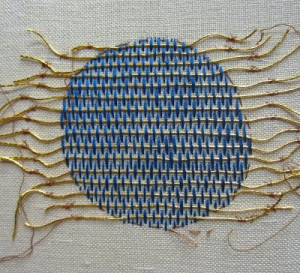
The next step was to sink, or plunge, the ends of gold thread in the left area. Make yourself a lasso using a length of Perle thread or DMC, fold it in half and thread the two thicknesses into the eye of a Chenille or Tapestry needle. Make a hole with your awl in the spot you wish to take the gold thread through to the reverse side of your fabric. The lasso goes into that hole. Place the far end of the gold thread into the loop of the lasso. Gently ease the lasso and the gold thread through to the reverse side of your work. If you catch the gold thread too close to the stitching, it will not go through the fabric smoothly, The gold wrap will get stripped off its core and you will be unhappy with it and probably have to restitch that row.

Burden Stitch Threading the Lasso

Burden Stitch Threading the Lasso

Lassoing /plunging can be useful in other situations. It can be used for starting a thread or finishing cord that is too thick to go though any needle. If you have reached the end of some stitching and the last bit of thread is too short to finish off normally, then lasso it to the reverse side of your embroidery. It can also be useful in weaving threads into the reverse side of your work.

For the covered area on the right, I also lassoed the gold thread but placed the holes away from the edge of the circle where they will be covered by the blue fabric. Then, using a length of dressmaking thread, I whip stitched the ends of these threads to the the backing fabric. I do not always do this but felt that securing them was necessary in order to maintain the correct alignment of the gold thread on the front of the work.

Burden Stitch From The Bottom

Burden Stitch From The Bottom

Next step was to couch a single line of gold thread to the left side of the circle. I tried using one thread of gold with six threads of DMC along side but the DMC has a lower profile and slid under the gold. Unsuccessful and abandoned.

The blue fabric is a sample of drapery fabric from my stash backed with one layer of felt. I trimmed the inner edge of the fabric to about 1/4″ and nicked it so that it would lie flat. Then I pinned it and basted it into position.

Burden Stitch Finished

Burden Stitch Finished

Using one thread of blue, I catch stitched around the inner edge of the blue fabric.

To complete the sample and to secure the blue fabric and felt to the background, I couched two threads of gold as a pair a specified distance from the inner edge. Once again, I used the reverse side of the very helpful business card to help me maintain an even distance from the edge.

And that is that. Completed. I hope that this tutorial has been helpful by taking the mystery out of working with this stitch and by making it simpler and less prone to hazard and unwelcome surprises.

[do_widget id=arpw-widget-2]

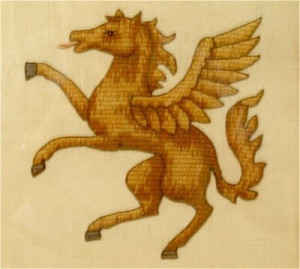
The Flying Horse is stitched in Burden Stitch which is used as a solid filling stitch. It is part of my Metal Thread Sampler from RSN. The photo is not as good as I would have wished because it was taken through glass. The framed sampler is too large and heavy to move easily so we used the available light in our hallway.

Flying Horse Burden Stitch

Flying Horse Burden Stitch

Wishing everyone Happy Stitching.

02/09/2013 by Ann Bernard

Burden Stitch – Part One: a Tutorial

Burden Stitch is exactly that, a burden to stitch but I think that Burden is meant to be a noun and not an adjective. Barbara Lee Johnson’s recent post on August 13, 2013 of the Couched Oak Leaf is a good example of Burden Stitch stitched on canvas. It is a stitch that can be used either very simply or you can set yourself a challenge. It really is a technique and not a stitch.

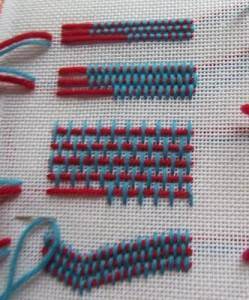
Trammed Upright Gobelin Bricking

Trammed Upright Gobelin Bricking

In a nutshell, this is a canvas work stitch called Trammed Upright Gobelin Bricking (Canvas Work by Jennifer Gray, pages 53 – 55). Worked on canvas or on even weave linen is the simplest way to use this stitch. It produces a solid ground cover or an interesting texture. Barbara Lee’s example is an excellent sample of this.

When used on other fabrics, both planing and experimenting in stitch size and spacing is essential.

Number One Hint is to get organized. Back your fabric with a suitable weight of cotton fabric. This helps keep the tensions of your piece of work stable while you stitch and afterwards. It is also handy to for ending threads. I used Japanese Gold thread Number 12 with DMC Floss four threads which I stranded. Reading Mary Corbet’s Blog, I see that it is called Striping. I have never heard this referred to by name and used Stranding instead. By either or both names, separate the six strands of floss thread into single strands and then put them back together. You can mix shades and create your own colours or, this time, use four threads of pure colour: DMC Blue 825.

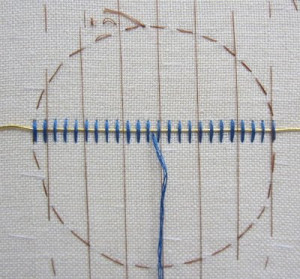
Having marked your design on the background fabric, Hint Number Two: Baste in some horizontal and vertical lines to create an accurate grid that will help you keep your stitching accurate. This is specially necessary when working on a fabric where threads are not countable. This piece of fabric proved to be even count linen but even in this fabric, the threads vary in size.

Stitching Grid

Stitching Grid

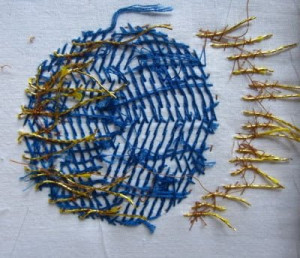
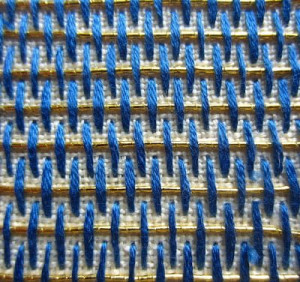
Hint Number Three: Make a decision on the spacing of the couched thread (gold) and the length of the couching stitch. The gold thread is held in place by the spaces between the gold thread and the vertical couching stitches. I made the decision on this demonstration piece to place my vertical stitches four fabric threads apart. The second row of vertical stitches is centred between the previous row; that is, two threads on either side. Leave a tail of gold thread 1″ or even 1 1/2″ at each end of every row. This is necessary for sinking the ends of the gold thread. Any less length will cause you problems.

Spacing The Couched Thread

Spacing The Couched Thread

Hint Number Four: Use the blank, reverse side of a business card. Mark the spacing on the edges with a sharp pencil which will help give you the most accurate of templates. A ruler is OK but you will find your self constantly having to not read most of the marks on it. The blank card is a simpler solution.

Mark: a) the spacing between the horizontal gold threads and b) the length of the vertical couching threads.

Mark this spacing on two different edges of the card.

Use it on every row to set the spacing and length of the stitches. This is essential.

The straight edge is handy for checking the alignment of your stitches.

Hint Number Five: Using a length of dressmaking thread, anchor the ends of the gold thread out in another part of the design with some small stitches. This does not have to be totally accurate but it serves to anchor the gold thread leaving you free to focus on the stitching. The waves in the gold will disappear during the completion of this stitch. The gold thread that I used was from someone’s stash. It had been wound on a small spool which made it exceptionally wavy. Japanese Gold Thread usually comes wound on a largish reel like dressmaking thread or as a hank. In this form, it is fairly straight.

Hint Number Six: Start in the centre of the widest point of the area being stitched. Work to the circumference in one direction and then return and stitch the other half of that row. The first line is by far the hardest to stitch. After that, you just have to follow your planned spacing and keep it all accurate. Use as small a needle as you are able to thread comfortably and insert it into the fabric vertically to establish an accurate stitch as possible. A needle entering the fabric at a slant will not give you the accuracy you need for this stitch.

Stitch From The Middle

Stitch From The Middle

Notice that on the right side, my stitches were off by one thread and I had to take them out.

Stitch Off By One Thread

Stitch Off By One Thread

Closeup Of Burden Stitch

Closeup Of Burden Stitch

Hint Number Seven: It is necessary to concentrate on what you are doing. It is totally easy to make an error in stitch placement and it shows up unbelievably clearly. Keep checking yourself and reverse stitch to where you went off course and correct it. Remember to stitch the necessary half and quarter length stitches.

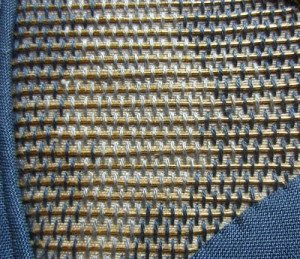
And lastly, a quick look at an example of Burden Stitch in this piece of embroidery that I stitched a few years ago. The shading is not that satisfactory but I wanted to try it.

Burden Stitch

Burden Stitch

Notice the different spacing and threads. That looks to be two strands of DMC Floss.
Burden Stitch would look totally special if stitched with silk thread. It would gleam and not retreat into the background as a texture. It depends on the look you want to achieve as to what threads and spacing you use.

[do_widget id=arpw-widget-2]

You can use different threads to achieve the result you require. A coloured Perle thread would work well instead of the gold and the couching thread can be anything you choose. You could choose to use beads as the couching thread but be wary. Beads can have a mind of their own and not lie as accurately as you would wish. You may discard a lot of beads in the process. Another possibility is to use Metallic Gilt and cut it into the desired lengths for the vertical stitches. Now that is a way of using this technique that will add grey hairs to your head for sure.

That is all for today. I will complete this demonstration piece in my next Blog Entry.

11/04/2013 by Ann Bernard

An Antique Standing Frame and Protecting Your Embroidery

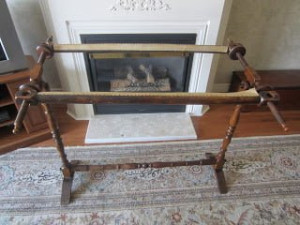
In the 1940’s, I inherited an antique embroidery frame. Probably made in the late 1700’s, the roller bars are 36″ long and the vertical posts are 32″ high. The frame will pivot on the hinge at the top of the vertical posts allowing the frame to be tilted to a comfortable angle for stitching. The fabric to be embroidered is stitched to the edge of the tape on the roller bars and then lashed to the side bars with string in the same manner as setting up a slate frame. Although I have not used it very much, it has been used extensively in the past. This is evident as this is the third tape replacement. It was used to stitch English Country Garden and, currently, to assemble Creative use of Stitches.

Antique Standing Frame

Antique Standing Frame

When embroidering on fabric mounted on a standing frame, a slate frame on trestles or using a stretcher bar frame supported by the edge of table, the following procedure is recommended to keep your embroidery both clean and undamaged during stitching. This is how the professionals do it.

First, place clean white cotton fabric on the surface of your fabric for embroidery and roll both of them together around the roller bars. If your piece of embroidery is too wide for you to be able to reach the centre comfortably while stitching, this is how it is narrowed enough for it to be functional. You will have deduced that an unstitched section is rolled onto the rollers initially and that later, the completed part is rolled onto the other roller exposing the unstitched section. The completed portion in particular needs this protection.

While actually stitching on embroidery mounted on a standing frame, a slate frame or a stretcher bar frame, I always protect both fabric and completed stitching in the following manner. Place one or more pieces of clean white or pastel coloured cotton or pillow cases over the fabric on the frame.

[do_widget id=arpw-widget-2]
Protecting Your Stitching

Protecting Your Stitching

And here are the reasons:

Protection from you
1) Protects your completed area of your embroidery
2) Prevents any wear from your arm resting on the embroidery
3) Prevents thread snags from buttons, a watch strap, rings or bracelets
4) Prevents any grease or oil from your skin getting onto the embroidery

Convenience for you
5) Provides a convenient place upon which to keep threads and stitching equipment
6) Helps to locate needed items which tend to get lost on the stitched surface
7) Ability to lift the cover with threads and tools off easily thus keeping them together
8) Covers completed work allowing you to focus on the section you are working on
9) The cotton surface feels cool and comfortable under your forearm

Protection from others
10) Keeps pets off your work
11) Prevents others from touching unless you are there showing it to them
When not stitching
12) Cover the whole setup with a large piece of clean cloth or a towel
13) When you return, nothing will have been disturbed
14) If you are away from your work for a period of time, it is a dust excluder
15) Habit

Protecting When Not Stitching

Protecting When Not Stitching

The frame is light and I can hook my foot under the base bar and move it right or left thus repositioning the stitching for easy access. Or, when necessary, I can sit at the end of the frame. I use a height adjustable office chair with good back support.

There is a delay in researching and writing about the student experience at RSN. RSN is trying to find for me some specific 1951 press photos and this may take some time. The story will continue as soon as possible.

30/03/2013 by Ann Bernard

Spring is a Promise

In the northern hemisphere, we are more than ready for spring this year. In Canada, we have had months of snow and cold but it has not been anything like as difficult as it has been in the United Kingdom. Right now, the snow drops are up but have been eaten by the rabbits. Aconites are just through the ground. Hyacinths have their noses up to sniff the air. They are still undecided.

To encourage spring’s arrival, here is a spring garden project for you. Look at the garden carefully and see how many of the flowers you are able to recognize. Gardeners have an advantage with this.

Stitching Spring Flowers

Stitching Spring Flowers

Yes, here is a book that tells you how to stitch recognizable spring flowers. Published as an eBook, you can have it in your computer within minutes of reading this. If you are more comfortable with a printed copy, you can print it and put it in a binder. This is a convenient way to acquire it, it is inexpensive and you will be the owner of the first book on embroidery written and published electronically. As such it is a landmark though I expect there will be more embroidery books in the future. For the author especially, and for the publisher, it was a huge technical challenge.

[do_widget id=arpw-widget-2]

Stitching Idyllic: Spring Flowers uses only four basic stitches: Straight, Detached Chain, Buttonhole and French Knots. But these stitches have been adapted in new ways to achieve the results needed to portray recognizable plants and flowers. Written with a novice stitcher in mind, the section on preparation will tell you how to bond two layers of fabric to make one stable piece of fabric for the background. It explains how to mount the bonded fabric drum tight on a stretcher bars frame. Stranding and mixing thread colours to achieve the correct colour for each specific flower is included. There is also a simple way of planning the layout of your garden as not everyone feels comfortable drawing a design.

What more can you ask? Make this your Easter gift to yourself or for a friend. If I had not written it, I would be buying one for myself.

To see this book and browse the contents, go to annbernard.com. If you should then decide to purchase, the directions on how to do so are included.

01/02/2013 by Ann Bernard

Satin Stitch – Padded, Shaded and Stitch Rotated

As I wished to include all the above features in this Tutorial, my design motif is unbalanced right and left sides. It is 3″ across and 1/2″ wide. This width is about as long as it is feasible to make Satin Stitches without them becoming unstable. 1/8″ is about the narrowest or else it is too pokey.

The fabric I used is 28 count cotton Monaco by Charlescraft. The higher the thread count the easier it is to work this stitch and the result is better, too. I mounted it on a Grip-n-Stitch frame by Fabric Flair and am reviewing this new type of frame in a separate entry. It is essential that the fabric be really taut and mounted grain perfect when undertaking Satin Stitch.

Satin Stitch - Drawing The Shape

1. Draw the shape on the linen, in this case it is cotton, using a pen that will make a very fine line.

2. I used DMC Floss and chose a range of thread colours that were close in shade. It is much harder to shade when there is a marked difference between the threads.

If the final layer of Satin Stitch is to be a silk thread, I would still use DMC Floss for padding for reasons of economy.

[do_widget id=arpw-widget-2]

Preparation is vitally important
Unless this is perfect, the appearance of your final stage of Satin Stitching will not turn out as you had hoped. Do not short change yourself on this.

Satin Stitch - Preparation

3. Using three threads of the floss, split stitch all round the motif on the marked line. As Mary Corbet has said, using two threads means that they divide when split stitched instead of behaving as split stitching. These stitches must be small i.e. 1/4″ in length. Start and finish threads within the body of the motif. This outline needs to be as solid and immovable as the Great Wall of China. After just a few stitches, test this by going picky, picky with a finger nail to see that the line is solid and immovable. Reduce your stitch size if there is any give in this line of stitching.

4. Padding
All Satin Stitched projects need at least one layer of padding which is usually worked in long Split Stitches within the shape. This padding should cover all the space within the the outline. It will support the Satin Stitches and prevents them from collapsing into the middle of space. Totally unpadded Satin Stitch has a ‘hollow’ look to it.

Satin Stitch - Padding

Padded Satin Stitch has a raised look and needs three or more layers of padding stitches.
Use six strands of Floss for this. The first line is lengthwise. Note that it does not extend to the outline leaving a space. The second line is stitched crosswise. I used the palest of the colours so that this would be visible for you. Normally, I would use the same colour as the other layers. The third layer is also lengthwise and fills the entire space within the outline. Take the shortest route between padding stitches so that the reverse side does not also become padded,

Organize the padding layers so that the final one lies in the opposite direction to the Satin Stitches.

Satin Stitch - Layers #1

Satin Stitch – Layers #1

Satin Stitch - Layers #2

Satin Stitch – Layers #2

Satin Stitch - Layers #3

Satin Stitch – Layers #3

5. Satin Stitching
Make a decision on which edge of your stitched shape will be more noticeable. This is usually the outer edge of the petal of a flower or the edge which is better lit for the viewer. This is the dominant edge and the one that the needle goes down through the fabric.

The needle will come up on the less visibly noticeable edge which is usually towards the centre of the flower. Use one strand of thread only.

Satin Stitch - Dominant Edge

This may seem like an unnecessary amount of stitching but is quicker in the long term.
Two threads, or even three threads will twist and will not give attractive or professional results.

Try stitching with two threads just for the experience. You will find that you will have to separate those threads every stitch and it will make it slow. Slow and frustrating, actually.
One thread is the quick and easy way to go.

Also use the smallest needle you can manage to thread such as a Crewel size 9 or 10. This will help the ease and accuracy of the stitching though some Crewel 9 or 10 can be hard to thread. Bohin needles do not have this problem. The eyes are properly formed and much easier to thread.

Start with a knot (or not) and make a small waste stitch within the body of the padding.

In the centre of the motif bring the needle to the front on the less dominant side of the motif. Take it down to the back on the dominant side of the motif.

This is when your preparation will pay you dividends in ease of stitching and results.
Let the needle find the spot that is closest to that Great Wall of China and make sure that it goes through the fabric absolutely vertically.

And this, my fellow stitchers, is the secret to perfect Satin Stitch. Excellent preparation, stitch with one thread only and make sure that your needle entry and exit is always vertical.

If it is a straight shape, just continue until you reach the other end.

Shading
Shading is a question of getting organized as you move from one shade to the next. Thread another Crewel 9 or 10 needle with one thread of the next colour. Look at the photos to see how the colour change is achieved.
One stitch on the new colour, three of the old,
two stitches of the new, three of the old,
two stitches of the new, two of the old,
three stitches of the new, one of the old,
and then you will likely be ready to use all of the new colour.
These ratios are changeable as appropriate for your project.

Satin Stitch - Shading

Continue stitching maintaining the vertical and parallel orientation to the stitching, changing colours to achieve the shading you wish until you reach the end or the pointed end of the motif. I seem to have lost some of that perfect angling but you will not do that I am sure.

6. Points
If possible, organize your design motif and stitching plan so that the stitches at the point retain their vertical orientation. This creates a far more satisfactory result than trying to place tiny and short stitches across the point. There is nothing like a photo enlargement to show imperfections.

7. Rotating Satin Stitching
That means stitch direction which follows the curve of the motif. As you can see, in this shape, if the stitches remained vertical and parallel, they would become rather longer than the practical maximum of approximately 1/2″. However, the stitches are remaining at right angles to the outer edge of the motif. The dominant outer curve is also considerable longer than the inner curve.

Satin Stitch - Rotating Satin Stitching

Satin Stitch – Rotating Satin Stitching

Here is how
Watch the shape and make an extra stitch every so often so that there are more stitches going down into the fabric on the outer edge than there are on the inner curve. Come up through the padding about halfway across the width of the motif and then go down on the outside edge as usual. The next stitch will be a normal stitch that covers the whole width of the motif. This second stitch will cover the start of the shorter stitch making it undetectable. That half way point can instead be 1/3 or 2/3 of the way across the width. This depends on the shape and curve of the motif.

Watch the shape and the stitch angles and add these extra stitches as needed but always have about three normal stitches between the shortened ones. I apologize for missing taking a photos of this and I am not computer literate enough to add an arrow as an indicator. I am also regretful that the photos are dark on one side.

The point at this end had to be stitched across with several really tiny stitches. I would have been wiser to continue the shape of this half of the motif in a gentle curve to the right which would then have let me finish it with longer stitches like the other end of the motif.

Satin Stitch - Pattern Finished

Leaf Shape with one layer of padding

This leaf is stitched in Perle 5.

1. Plan the shape and the stitch direction making sure that you will be able to complete both the rounded end and the point easily.
2. Split stitch on the line around the leaf using one thread of Perle 5 and ensuring that this line is solid and immovable (Great Wall of China). Use an appropriate sized Crewel needle which is the thinnest you are able to thread.
3. Using two threads of Perle 5, place long split stitches in the opposite direction to the planned Satin Stitch and fill the entire space within the leaf.

Satin Stitch - Leaf Planning

Satin Stitch – Leaf Planning

4. Decide on the designated primary and more visible edge of the leaf and arrange that your needle enter the fabric on that edge and come up through the fabric on the secondary edge. Remember to let the needle find the spot closest to the split stitch edging and that the needle enters and leaves the fabric at exact right angles to the fabric.

Start Satin Stitching in the centre and widest part of the leaf shape placing the stitches at right angles to the padding stitches. This is as you planned in the diagram.
Work towards the base of the leaf first making sure that the final stitch that completes the curve is short in length. This final stitch supports the previous longer one and prevents it ‘falling off the curve’.

Satin Stitch - Falling Off The Curve

Satin Stitch – Falling Off The Curve

5. Continue vertically placed Satin Stitching until you reach the pointed tip. Place the final shortish stitch so that it forms the point. Take the needle down very close the the previous stitch so that this last entry point is not visible.

Satin Stitch - Last Entry Point

Satin Stitch – Last Entry Point

Padded Satin Stitch Small Circle
6. For a small shape, use three threads of DMC Floss to split stitch the outer line.
Use six threads of Floss to form a Double Cross Stitch or Quadruple Cross for the padding.

7. It is your choice to Satin Stitch with one thread of either DMC Floss or Perle 5.
Some circles, such as berries, become too small for the Perle 5 thread. Try Perle 8.

My circle is definitely not round. If you wish for an exact circle, use a template as suggested by Mary Corbet.

Satin Stitch - Circle

This completes this Tutorial.

Hope that you will enjoy and have success with Padded Satin Stitch.

04/12/2012 by Ann Bernard

Coral Stitch

Coral stitch is featured as an outline stitch in the Queen Anne corner of the Crewel Work Sampler stitched at the Royal School of Needlework during the early 1950s. I have never seen this stitch featured in a Stitch Dictionary which has motivated me to share it with you. Coral Knot stitch is often referred to as Coral Stitch but this is different.

Place your fabric in a hoop so that it is taut. DMC Perle 5 was used for this demonstration.

1. Work from right to left. Bring the thread to the front at the start of the line. Take the needle to the back above the line with the thread in a loop as shown.

Coral Stitch #1.  Take the needle to the back above the line with the thread in a loop.  @StitchIdyllic

Coral Stitch #1. Take the needle to the back above the line with the thread in a loop.

2. Bring the needle back to the front an equal distance below the line and within the loop as shown.

Coral Stitch #2. Bring the needle back to the front an equal distance below the line and within the loop. @StitchIdyllic

Coral Stitch #2. Bring the needle back to the front an equal distance below the line and within the loop.

3. Pull the thread vertically up towards your nose.

Coral Stitch #3. Pull the thread vertically up towards your nose. @StitchIdyllic

Coral Stitch #3. Pull the thread vertically up towards your nose.

4. And here is the tricky bit. Adjust the length of the arms by pulling the thread away from you in a horizontal direction and then towards you horizontally until the length of the two arms of the stitch are equal.

Coral Stitch #4. Adjust the length of the arms by pulling the thread away from you in a horizontal direction and then towards you horizontally. @StitchIdyllic

Coral Stitch #4. Adjust the length of the arms by pulling the thread away from you in a horizontal direction and then towards you horizontally.

Worked in the traditional manner this is a ‘squared stitch’ meaning that the space between the stitches is equal to the width of the stitch.

Coral Stitch #5. this is a 'squared stitch' meaning that the space between the stitches is equal to the width of the stitch. @StitchIdyllic

Coral Stitch #5. this is a ‘squared stitch’ meaning that the space between the stitches is equal to the width of the stitch.

Also, it is preferable to use a thicker thread and decrease the size of ‘the square’ so that the black line is completely covered. If you look at the Queen Anne sampler, you will notice that the squares are so tight that it is hard to see the construction of the stitch.

[do_widget id=arpw-widget-2]

Here are some examples of using the stitch in a more relaxed and contemporary manner. These are far easier to stitch than the traditional style where it really shows if the stitches are not an even size and spacing. I like the circular placement and think that it would nice alternative to Buttonhole Stitch and is much easier to control.

Coral Stitch #6. Coral stitch in a more relaxed and contemporary manner. @StitchIdyllic

Coral Stitch #6. Coral stitch in a more relaxed and contemporary manner.

Coral Stitch #7. Circular placement and think that it would nice alternative to Buttonhole Stitch. @StitchIdyllic

Coral Stitch #7. Circular placement and think that it would nice alternative to Buttonhole Stitch.

Coral Stitch #8. S Shaped Coral Stitch. @StitchIdyllic

Coral Stitch #8. S Shaped Coral Stitch.

What will this stitch do for you?

Search

Recent Posts

  • Laid Work – Introduction.
  • How to stitch Snowdrops. Quick and Easy!
  • Inspirations, All Stitched Up! from Australia
  • Newsletter Märchenhaftes Sticken – Jessica Grimm
  • Cotton Quartet 1: Preliminaries & First Stitches

Recent Comments

  • Ann Bernard on Prepare your embroidery for the framers – Mount on Foam Core Board
  • SGibau on Prepare your embroidery for the framers – Mount on Foam Core Board
  • Louise Desmarais on Prepare your embroidery for the framers – Mount on Foam Core Board
  • Katherine & Malcolm Bell on Embroideries that Record History
    Queen Mary’s Carpet
  • Ann Bernard on Embroideries that Record History
    Queen Mary’s Carpet

Pretty Chic Theme By: Pretty Darn Cute Design