Trestles or Easels can be made at home if you have the tools. They are an effective support for large sized rectangular or square stitching frames and for slate frames. Mine were made in a long time ago by the staff and patients in a chronic care hospital. At that time, although I knew what I wanted, I could supply neither picture nor measurements but they turned to be perfect. I will add as many photos as possible so that you can see how they are constructed and you can alter the construction as you wish. I was 5’8” tall at the time, somewhat less now, but the size continues to be satisfactory.
1) The uprights and lower cross bars are 2″ square lumber which is the finished size. The edges are bevelled and well sanded.
2) The front post is 29″ high and the back post is 31″ high. The lower cross bar is 30″ long and the lower edge is 9″ above the top of the foot.
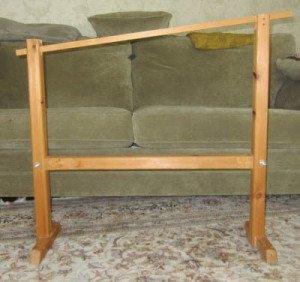
Easels Specifications Side View
3) The upper end of the front and back posts have a trough chiselled into them all of which are 2″ deep and 3/4″ wide. It would be preferable if they were 1″ wide in that the upper cross bars would not then be wedged in place.
4) The upper cross bars are placed within these troughs and they support the stitching frame itself. They are made of a wood that does not warp and are 3/4″ wide, 3/4″ inch deep and 37″ long. The sloped surface for the frame is efficient and comfortable for stitching.
5) The feet are each 12″ long and 1 1/2″ wide. Each of them has two extra pieces of thin wood added to their under surface to lift them off the ground a little and to level them. They are stable on carpet.
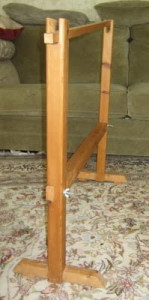
Easels Specifications End View
6) To return to the upper cross bars, at RSN these were thin pieces of wood like haberdashery yardsticks. The outer ends had holes drilled in them at regular intervals. The sides of the troughs in the uprights also had holes drilled into them. A cotter pin could be placed through the three holes thus allowing for the upper cross bars to be height adjustable. The cotter pins were tied to the trestles with string preventing them from being frequently lost!!

Easels Specifications Cross Bar
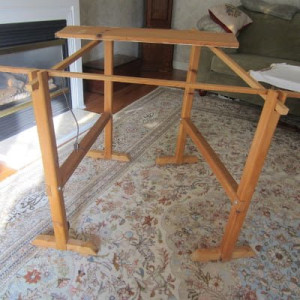
Easels Specifications Full View
7) The front support for the stitching framed is 3/4″ wide, 1/2″deep and 42″ long. This is really longer than is necessary and it is likely something shorter would suffice here. Though, if your frame was really wide you would need longer support bars to accommodate the width.
8) The lower cross bars are held in place by a long screw, washers and a wing nut. The wing nuts are on the outside of the frame where there is no question of scraping a leg on them. This means that the frames could be dismantled but I have never done this.
9) The wood has never had any finish put on it. I wipe it with a damp cloth occasionally.
10) Then I added a couple of extra items which I find to be really useful.
The first is the addition of a piece of old lumber that is 8″ wide, 3/4″ thick and 33″ long. I place it across the far end of the trestles/easels where it serves as a shelf and supports the far side of the frame. On it I place a stitching light. I have one with two adjustable arms with a light shade and bulb on each arm. One arm has a Daylight bulb in it and the other has a regular 100 watt bulb. The dual bulbs eradicate shadows and give me a good working light. This light fixture is decades old and you might now need two separate lights for the same benefit.
Supplies and tools can live on this shelf where they are handy but not in the way. It would be even better if the shelf was covered with a non slip surface such as felt.
The second addition is an electric socket attached to one of the upright posts. This means that the cord for the table lights does not get pulled and that I can attach the whole setup to an extension cord. I sit on a comfortable, height adjustable office chair with good back support but without arm rests. A footstool adds to comfort and eases any pressure on the nerves and circulation in the back of the leg. I find this whole set up to be extremely satisfactory and very comfortable. We have cats and they can decide that my stitching frame is a comfortable place for a nap. I place crossed yardsticks on top of the covered (using a towel or sheeting) surface of my stitching. This seems to be an adequate deterrent.
If you would rather purchase trestles/easels already made, Mary Corbet knows of a supplier.
If you visit the following website, the Unbroken Thread by Kathy, you will find an entry in the Older Entries entitled Friends at RSN. The fifth photo in this entry shows the details of modern easels. You will notice that the front posts are high and are drilled to allow for height adjustment. This is not necessary if you will be the only person using the trestles. You will also notice that the frame is placed directly on the side bars without the addition of the far shelf for a light and tools and also without that front bar that supports the edge of the stitching frame that is nearest to you. This means that the width of the setup is controlled by the width of your stitching frame. With the addition of the front bar allows the space to be as wide as you wish or is convenient for you.
http://www.theunbrokenthread.com/blog/
And one final photo which I hope will explain everything!

Easels Specifications Finished
Have fun and wishing you Happy Stitching.
Please email me if you have questions or comments.


