Stitching Idyllic

Stitching Idyllic by Ann Bernard

  • Home
  • Blog
  • Spring Flowers
  • Summer Flowers
  • About Ann

13/06/2018 by Ann Bernard

“Take a Peek Inside” Stitching Idyllic Spring Flowers Second Edition

When available, I always like to “Take a Peek Inside” a stitching book that I am contemplating purchasing.  Then I know if the information duplicates what I already know or if it new for me.  This book is technically relevant for new stitchers in that it includes basic information that I have not seen in other books.  It is also good for experienced stitchers in that there are unique adaptations and uses of stitches and a method of planing your very own garden.  An ebook is also inexpensive. and you can print your own personal copy

Carry on reading this blog entry and the next one to know why this book is a good investment for you.

A Summary On Hand Stitching Recognizable Spring Flowers Using Creative Surface Stitchery 2nd ED

An English Country Garden, as sung by Nana Mouskouri, was in my brain. Just to show you the mood I was in and how creativity came acalling, you can hear Nana Mouskouri sing this song.

To create any piece of stitching, it is necessary to first gather the materials and tools.

Fabric: The sample flowers are all stitched on a light green Batik cotton fabric.

Threads: DMC floss was used throughout for the stitching.  There are floss conversion charts on line.

Tools: Needles, scissors and other essentials are explained later in the text.

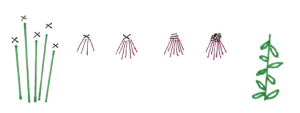
Stitch Directions: There are only four stitches plus some adaptations used in this book. Unbelievable! The stitches are –

Straight, Detached Chain, Buttonhole and French Knots.

This makes this an ideal book for a learner.  The flowers are stitched so as to be recognizable and identifiable. They are not as elegant as those created by Mother Nature but it is obvious what they are.

Stitching Frames: Ring or Hoop frames seem to be a favourite choice. Although the fabric is held at a tension, this tension is not always well maintained. Some functionally improved alternatives are

Q-Snap Frames and Grip-n-Stitch Frames. Stretcher Bars are available in Art and Craft stores and are very satisfactory. A Slate Frame is ideal if you should be so fortunate as to own one.

Grip-n-Stitch/Clip-n-Stitch frames can be found via www.fabricflair.com

Stitching on really taut fabric is a huge plus for all stitchers. It is an essential that one does not recognize until you experience it yourself. There are no issues of puckering and having to stretch the finished piece for framing. Also, the stitches lie on top of the fabric surface giving an embossed effect which is achieved by nothing more complex than the fabric being drum tight. If you can bounce a coin on it, it is tight enough. There are nothing but pluses to be gained by adhering to this principle.

Placing a backing fabric behind the front fabric has many benefits. It stabilizes and gives body to your stitching surface. It makes starting, ending, reverse stitching, plus long threads on the reverse side much simpler. It allows you to stitch on fabrics that are not always deemed suitable for embroidery.

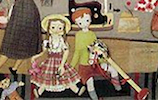
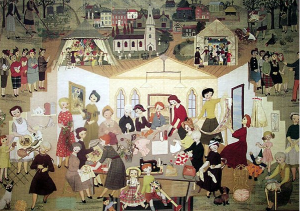
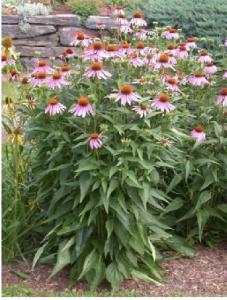
Each Spring Flower has a photo of the real flower. There is the thread recipe for that plant’s foliage and flower, a stitching diagram and a photo of the stitched flower included. There are no patterns to follow in this book. Instead, a way of planning a garden layout and then stitching it are shown. This establishes original creativity immediately. Chloe, for example, has already bypassed cross stitch and other kits in her first venture into textile creativity.

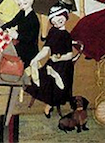
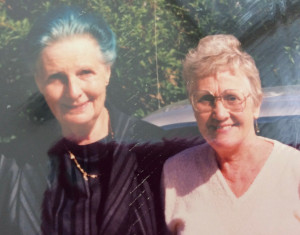
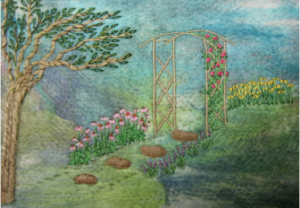
Right now, I would like you to meet Edna Mumford and to see the garden she stitched.

I can thoroughly recommend Ann Bernard’s Stitching Idyllic for Spring Flowers.  Ann brings her training at the Royal School of Needlework to the fore by devising a whole new way of embroidering spring flowers with ordinary cotton floss.

Her method of combining different hues of 4 or 6 strands at a time for flower stems and flower heads results in lovely raised effects which make the effort of stranding (which I originally thought tedious) very worthwhile, and gives the impression of many stitches whereas your one bold and stranded stitch is fully expressive by itself.  This technique for the flowers and stems – which aims for true colours in nature – at once gives a wonderful shaded and depth effect.

I’ve been an embroiderer for many decades and I was delighted with the results I achieved just doing a practice piece. Using only her techniques, I then embarked on an embroidery, of my own composition of spring flowers. Her directions ‘take you by the hand’ and lead you through flower sizes, growing habit, and colour to make them quite realistic. I completed my own piece of work without my usual agonies as a result, and I was very pleased to produce recognizable flowers.  The directions are thorough and the diagrams very descriptive.

I would recommend this book for any stitcher whether novice or experienced, as there is much to learn for very pleasing results.

Sincerely, Edna Mumford

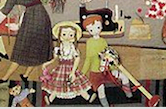
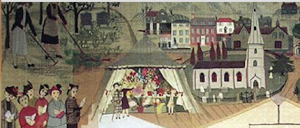
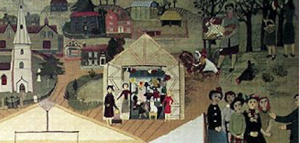
There are many examples of stitched gardens. They all use the same stitches and thread colours but each garden is totally different.

A way to plan your own garden is included. It is a well known method using a triangular positioning of colour. The viewers’ eye is comfortable with this. I was  looking at a painting by Monet and although the triangulation of colour was not obvious as I looked at it carefully, I found it. It is been a method of design for a long time and will be helpful to you in laying out your garden. This is how each garden becomes individual and unique.

Some smaller projects have been developed including name tags, artist trading cards, greeting cards, phone and eye glass cases. Every stitcher who belongs to a Guild needs a name tag and it is nice to have a new one occasionally. Try wearing your stitched name tag to another event and see what the reaction is. You can even wear the official tag and your spring flowers one too. Two are better than none and you will be flattered at how many people remember you the next time you meet. They are great conversation starters too.

Finishing and mounting are included. This process is quick and easy when you follow the directions in the latter part of the book.

You will have created a unique item that is specifically original to you. If you really are a beginner, your stitching career is off to a flying start. If you are already experienced, you will still find techniques and ideas in this book that you can blend into your repertoire and give you another mode of expression to add to your stitching portfolio.

Stitching freehand, but with guidance, is a wonderful experience. You can express your own ideas and there are no black lines or charts to follow. Your creation will be unique and totally your own. It is of continuous amazement to me that, using the same stitches, the same threads and the same information, that the results can be so infinitely varied.

[do_widget id=arpw-widget-2]

The creative use of these four basic stitches to express the spring flowers and plants in this book are entirely my own. I have not borrowed or been inspired by any influence other than the bounty and glory of nature. It has been a challenging process with endless trial and error.  I am happy with the final results.  They are different and have proved to be infinitely adaptable.

Welcome, and Enjoy.

Ann Bernard.

Reviews
Once in a lifetime, a keen student obtains an authoritative text which becomes a firm foundation for everything that follows. In the world of botanical embroidery – this is that text. It is not the fanciful embroidery of the Jacobean’s, nor the drooping coils of Art Nouveaux. This is the rendering of botanically correct images using embroidery thread with due attention to hue and colour. It uses the techniques artists use to create the infinite complexity of natural patterns. Follow the detailed instructions and the numerous illustrations and you will be exploring all the different yellows to contrast the daffodil with the crocus. Perhaps you will be making your first detailed observations of the arrangement of leaves on a plant stem. Others will then recognize the plants in the embroidery garden you have created.

With profuse illustrations of stitched gardens, real flowers, embroidered flowers as well as line drawings and how-to diagrams, Ann brings you a lifetime of dedication to embroidery and botany. Anyone who is new to embroidery (as I was) will be successful if they follow her detailed instructions on preparation, colour choice and methods for stitching flowers. Your garden will bloom!

Bridget O’Brien, Guelph ON

This book had me itching to start stitching. The level of detail is wonderful for new stitchers and great for experienced stitchers to help maintain good stitching habits.  She tells us how to do a certain operation and what not to do from her experience. I thought that was great for those of us who do not follow directions very well. Looking forward to your next book.

Marsha Fontes, Cambridge ON

Ann Bernard has written a wonderful instruction book on how to stitch miniature garden flowers. Ann’s instructions are so clear and precise I would have no difficulty in achieving excellent results.

It is plain this work is dear to her heart. The numerous illustrations of her exquisite flowers demonstrate her dedication to achieving extremely lifelike results. They almost look like garden photos that have been altered with special effects, not pictures painted with thread! The book is also very readable and it’s like having the charming, affable Ann in the room; I could almost hear her voice as I read it! Every embroiderer who loves flowers should have a copy of this book in their personal library!

Lilith Muramasa, Guelph ON

This 2nd edition of Hand Stitching Recognizable Spring Flowers is a good book to learn how to create and embroider spring flowers in an easy, free style manner. Included are wonderful, full coloured photographs and examples. Only four basic stitches are used. The beginner stitcher will feel a sense of confidence as she works through the very clear step-by-step instructions. This book is a good investment for the beginner but also for intermediate and other stitchers who may appreciate help in creating designs. The informal conversational style of the contents is engaging. It is, as if you are taking a class, one on one, with Ann in your own living room.

Ann Bernard is to be congratulated for the time and effort put into producing this extremely helpful book. Her teaching and stitching experience come through the words.

Alison Jackson, Cambridge ON

Hand Stitching Recognizable Spring Flowers by the talented stitcher, Ann Bernard, is a wonderful book full of inspiration and easy to follow instruction. As a fibre artist who is a novice to the more traditional embroidery techniques, I found this book provided all of the basics that many other books assume the reader will know.  But what really excited me was that Ann teaches you how to create truly unique embroidery! By learning some basic theory of colour and design, which is presented in an easy to read manner, Ann gives the reader, whether an experienced stitcher or a novice, the courage to ‘grow’ their own unique and beautiful Spring Garden without following a prescribed pattern.

Linda Kittmer Rockwood ON

10/06/2018 by Ann Bernard

The Country Wife Mural 6

Here is a comment from Jeri Ames referring to post 5.  Thank you Jeri.

If you cannot resist the urge (smile!), have the time (smile!) and want to learn glove-making (smile!), a book to locate that probably is out-of-print is: “How to Make Gloves – Step-by-Step Instructions for Beginners”, by Eunice Close, published by Charles T. Branford Company, Boston, 1950.  Close also wrote “Lace Making”, published by John Gifford, London, 1970.

To continue;

In the centre foreground are two more children,  The little girl has her hair in pigtails and appears to have a lace trimmed petticoat under her checked fabric skirt.  The little boy has a hobbyhorse.  Right behind the children is a hand operated sewing machine.

Finally, here are the family pets.  Notice how effectively the contours of the Siamese cat’s body are indicated with two lines of running stitches down his back.  This, and straight stitch  are useful embroidery stitches. Both are easy and infinitely adaptable.

The family Dacshound is another vivid portrayal of an animal. I wonder why a this breed of dog is featured instead of a sheep dog for instance.  Both these pets are more ornamental than are the women in the mural.  The portrayal of a metal chair or, is it a dog bed, to the right of the dog is worth looking at carefully.

These two last photos are better quality as they focus on a much smaller area.  The details indicated in the background add to the depth and the interest.  They also gives perspective and realism.  One does not notice them unless one looks really carefully at each cameo included in this huge piece of embroidery.

Finally, here is the entire mural again so that you can see how the sections fit together.  The skills featured were those used by the members of the Women’s Institute who have been the custodians of the mural for the last 60 years.  It is now in need of essential restoration.  It is a cameo of country life in the 1940s and earlier which makes it a historical record in 2018 and for future generations.

The designer, Constance Howard, was a textile artist teaching at Goldsmith’s College. She and her students were asked to create a mural that would extol the traditional skills of women.  They created a 3 Dimensional panel sized 4.5 metres x 5 metres (15 feet x 16.5 feet) approximately. It was so large that it was made in sections which were assembled on site.  It is also chock full of items and details that deserve a closer look.

To repeat, my contention is that Constance Howard, by designing this mural, started the movement of creating large textiles that record the history of peoples, places and history.  She was definitely innovative in textile design and the use if items such as wire, bark, tin cans which were prevalent in the decades following the creation of this mural.

Anyone interested in volunteering for the Country Wife project in any way should contact Wendy Hickson at the National Needlework Archive, preferably by email: countrywife@live.co.uk

I hope that you have enjoyed this chapter on Embroideries that Record History.  If you know of a historical embroidery that could/should be included in this record, please contact me at ann@annbernard,com

The photos need to be of good quality and there should be both technical and historical information for it to be interesting to readers.

………………………………

I hope that you have enjoyed this chapter on Embroideries that Record History.  If you know of one that could/should be included in this record, please contact me at ann@annbernard.com

The photos need to be of good quality and there should be both technical and historical information for it to be interesting to readers.

In the front and centre are this little boy and girl with their toys which are a hobby horse and a doll.  Behind them is a sewing machine which looks to me to be a non electric model.

Each little section contains so much detail.  It must have been both fun and challenging to create it.

This lady is darning socks which has got to have been one of that era’s most time consuming activity for women.  By then, commercially made socks would have been at least ten years old and would have been mended many times.  Women knitted socks, gloves and pullovers all through the war years.  My grandmother and her sister knitted all day every day of the week making warm clothing for service men.  The number of sweaters they made ran into the hundreds.

The slim young girl has her hair in bunches

This lady is making bobbin lace.  She looks so calm but preoccupied which is realisti

The faces of the ladies are each so individual.  Age and personality are well portrayed.  This is in addition to the specific style of portraying faces that was developed by Constance Howard.  I would love to see a close up of one of them.

[do_widget id=arpw-widget-2]

If you would like to be involved in this restoration project or make a financial contribution to the costs of the large undertaking, please contact Wendy Hickson at the National Needlework Archive.  She would prefer that you email her at countrywife@live.co.uk

These last cameos are of the cat and the dog.

They were both photographed individually and you can see the detail more clearly.  The eyes of the cat are so lifelike and I am impressed with the effect two lines of running stitch down her back.

I hope that you have enjoyed a photo tour of this iconic piece of textile art designed by Constance Howard.  She brought contemporary design to hand and to machine embroidery.  There have since been decades of innovative design and experimenting with new materials and threads.  I think that at this time, 60 years after this mural was created, that traditional and contemporary design coexist and we are able to enjoy both of them.

07/06/2018 by Ann Bernard

The Country Wife Mural 5.

The centre of the mural is very busy.  I imagine that it is a weekday afternoon and the ladies of the Women’s Institute are gathered in the Church Hall where they will enjoy each others company, catch up on the  news, discuss topics of interest while all the time, keeping their hands busy and being productive.  I do not see any signs of tea but it will happen at the right time.

The lady on the left wearing the brown hat is knitting. Moving to the right, the next lady is tatting.  This was a popular activity around 1950.  Everyone was doing it including myself and I still have a shuttle in my tool box.  I do not think that I remember how to make the double knot stitches.  The lady with the fly-away hair is making leather gloves which was not as popular as tatting but more useful.  The next lady is making slippers or shoes which was something else many women knew how to do.

In the centre of the table is a smart pink blouse.  This was made by Mary  Quant who was  a student at Goldsmiths College at the time.  She went on to fame and fortune as the designer and founder of Mini-Skirts.

I do not know what the lady in the dark red top is working on. Maybe it is she who is making the shoes.  The next lady appears to be doing some dressmaking and the last lady at the table is crocheting.

[do_widget id=arpw-widget-2]

The two ladies on the right might be making curtains. Despite 60 years passing by, there are people who continue to use the skills featured in this mural.  In fact, there has been a resurgence of many traditional skills.  I am thinking of hedge laying.  Churches and historical buildings have needed repairs and restoration and the old skills and trades have been resurrected because they have been needed.  The richness of talent out there is wonderful.  The skills are also being used in new and innovative ways.

The figures on the right hand side of the mural add more skills that were usual in country life.  The little girl, and my younger sister, has her hair in bunches which was fashionable for that time.   She is operating a marionette.  The lady in the front is making lace.  I find that the maid to be unusual for that time but maybe she is not a maid.

The next and final chapter will feature the foreground.  The children and the pets can be seen in more detail as they are smaller and easier to photograph.

04/06/2018 by Ann Bernard

The Country Wife Mural 4

The central area of the Country Wife Mural appears to be inside a Church Hall judging by the shape of the windows.  It is well lit and the ladies of the Women’s Institute are occupied with the skills that were normal activities for them.

Restoration of the mural is progressing.  The picture below gives us a better idea of the size of the figures and how they are 3 dimensional.  After 60 years, the mural needs cleaning and repairing.  This is being undertaken at the Old Chapel Textile Centre, Main Street, Greenham Business Park in Newbury. Professional Conservators are involved but experienced needlework volunteers are welcome to  participate.  This is a great chance to involved in an important project.  Their website is below.

www.nationalneedleworkarchive.org.uk/country-wife-mural.html

The red dress above is also in the forefront of the restoration picture and gives an idea of the size of the figures.  Although the mural was designed by Constance Howard and constructed by her and her students at Goldsmiths College, the Women’s Institute members provided  examples of the activities in which they were skilled.   Here, you can see embroidery in a hoop and canvas work being stitched loose in the hand.  The lady in the blue and green check dress has a tape measure round her neck.  The mural is full of details that one can miss unless one looks at it closely.

[do_widget id=arpw-widget-2]

Included is a better view of the lady in the red dress.  Apologies again for the quality of the photos which are screen shots of screen shots.

P.S. Constance Howard taught at Embroiderer’s Association of Canada Seminar in St Johns, Newfoundland in 1984. I think it was that year.  Did a reader of this blog attend Seminar that year? I was not in her class but I have some vivid memories of that week. It was May and it snowed. The University opened up the underground tunnels for us to go from one building to another as we had not come prepared for snow. We had a magnificent lobster dinner one night. A few of us took a side trip to St Pierre and Miquelon Islands. The weather was still un-seasonal and we could not get back to St Johns by boat so we flew out on a 9 seater plane. I got to sit in the co-pilots chair and the co-pilot got left behind on the island. It was days later before it occurred to me that could have been a very responsible chair to sit in. Constance went on to teach in London, Ontario.

01/06/2018 by Ann Bernard

The Country Wife Mural 3

The ladies choir is in full voice.  Look at their faces, their expressions, their hats and their clothes.  Fabric was in short supply in those post war years so that it is possible that the different fabrics came from available stashes.  Make do and mend was still prevalent at the time.  Note the shoes and the different leg shapes.  The lady in the pink dress is wearing stockings that are not her skin colour.  I do not know how tall these ladies in the mural are.  I have a lot more questions than I have answers.

The group of ladies on the right hand side of the mural are different to the choir ladies.  They seem to be a little younger and are dressed differently.  The conductor? is a man but do not know what this group are doing.  The two younger ladies are not wearing hats.

Another cameo from the left hand side of the mural.  This appears to be a scene from a kitchen with Grandma and a young child.  But I am not sure what the young lady is doing.  There is a fish (Dover Sole or Plaice?) in this area of the mural that was attached to the background with Velcro.  During the Festival, the fish disappeared several times and had to be replaced.  Judging by her facial expression, the young lady is absorbed in her activity.  We will meet the cat again later.

The central area in the Church or Village Hall is well lit and much easier to see details.  This is the next blog entry and is where the action is.

[do_widget id=arpw-widget-2]

Please send me comments and memories of Constance Howard.  She was very influential in the textile world and her design style was unique.  Note the shape and structure of the faces in this mural.  The facial expressions of the ladies are both graphic and full of character.  The mural is undergoing restoration at this time so it is not possible to go somewhere and see it.  It is possible to become involved either as a stitcher or a financial donor, or both.  There will be more information on this in another posting.

29/05/2018 by Ann Bernard

The Country Wife Mural 2

Starting at the top left hand corner of the Country Wife, the area is dark but, not empty.  It would seem to show women working in the garden.  It is unusual in my mind to have a dark area at the top of a piece of work but it works well here in that it does not detract from the central and well lit areas.  To the right of the garden is the village with the church, gravestones, and a barn in weathered wood.  The houses look large and grand.  The large tent would appear to feature a flower show.

The top right area is equally dark.  The church spire is included again for continuity.  There are more houses in the village plus farm animals and a horse jumping.  Maybe it is an orchard and the fruit is being gathered.   Although these areas contain a lot of detail they are still background for the main areas below.  I do not know what activity is happening in the second tent.  I look forward to a reply telling what is happening in this tent.

Included is another picture of the total mural so that you can place these sections in context.

The rest of the detail of the mural is much easier to see.

These photos are all screen shots, of screen shots, which affects the quality and the clarity of the pictures.  My apologies for this but it is the best option available to me.

There is a lot more to see in this huge mural.
Postscript: What I am always hoping for, has actually happened.  A reader has sent me extra information to share with you. Constance Howard visited with Peggy and Bernard Kimble at their home on Vancouver Island in 1989. This is a photo taken during that visit. Peggy is on the right and Constance, on the left. (You are not imagining it, Constance really did have green hair. It was that colour long before hair colouring became popular.)

[do_widget id=arpw-widget-2]

Those of you who read the Inspirations weekly Newsletter, will be familiar with the wonderful embroidery that Peggy has stitched. Visiting her home in Thornbury, Ontario, is a visit to a sumptuous textile gallery.  Peggy has also visited Constance in England and remembers The Country Wife well.

“It was impressive.”  Peggy says.

Constance Howard visited Canada many times. She taught at Embroiderer’s Association of Canada Seminar and at the Canadian Embroiderer’s Guild, London, Ontario.  I hope that further details/anecdotes will be sent to me so that they can be included here. These six segments about The Country Wife Mural are really a tribute to her.  Researching for information about her career, pictures of the textiles she designed, and her life brought up very little information.  This would be a good research project for a thesis.

16/04/2018 by Ann Bernard

The Country Wife by Constance Howard 1951

The Festival of Britain happened in the summer of 1951.  It was initiated  by the Labour government to showcase Britain’s industries, arts and science.  It featured the inventiveness and genius of British scientists and technologists.  Another goal was to boost the morale of the British people and to give a message of recovery to those living in the depressing post WW ll years.  Food was still scarce and it was cold.  We had some extreme weather winters in those post war years.  Many cities staged their own Festivals that summer creating jobs, entertainment and excitement.  Many overseas visitors came.  It was an opportunity to enjoy life again.  The Festival was a big success.

It was held on the south bank of the River Thames in an area that had suffered bomb damage and was slated for clearance and redevelopment.  The architecture and the layout were contemporary.  Today. the only remaining building is the Royal Festival Hall.  It was also the centenary of the the Great Exhibition of 1851.

Movies of the event show men wearing suits and ties and, women in dresses and hats touring the exhibits.  Nostalgia aside, it also looks formal and uncomfortable.  Those were the days when one dressed up to travel.  There  are several videos of the event on Google.  I found them interesting to watch as each one is quite different.

Historical background is now completed.

Constance Howard, the textile artist was teaching at Goldsmith’s College. She and her students were asked to create a mural that would extol the traditional skills of women.  They created a 3 Dimensional panel sized 4.5 metres x 5 metres (15 feet x 16.5 feet) approximately. It was so large that it was made in sections which were assembled on site.  It is also chock full of items and details that deserve a closer look.

I am including it now as it is my contention is that Constance Howard initiated the whole current movement of Embroideries that Record History with this textile mural.  That is, excluding the Bayeux Tapestry which preceded it by many hundreds of years.   Looking at dates, everything else that has been included in this series of blogs has been stitched later than The Country Wife.  It is not available for viewing at the moment as it is undergoing extensive restoration.  Thanks to computer technology, we can take an “up close” tour of mural.  I have not had the opportunity to see many of the historical embroideries that have been created in the ensuing years but in its concept and the techniques used, I think that this one is unique.

[do_widget id=arpw-widget-2]

I would be delighted to hear from readers who have any knowledge of the mural and its restoration.   Maybe, we will hear from a stitcher who was part of its creation.  Perhaps a member of your family worked on it and you have heard all about its creation.  It would be wonderful to hear from you and be able to share more information than is available online.

27/03/2018 by Ann Bernard

Happy Easter wishes to our friends in the southern hemisphere.

Summer must be fading for you with the late summer flowers and harvesting in progress.  To be seasonal for you, I am sending you the instructions for Purple Coneflowers from Hand Stitch Recognizable Summer Flowers.  The book contains many different flowers and plants as well as different ideas for backgrounds.  When you ‘take a peek’ inside the book (to be included on this site very soon), you will see how many and what a variety there are.  Dandelions are included in both Spring and Summer Flowers as they are universal.

I think they are fun but not everyone agrees.

Purple Coneflower

The Purple Coneflower grows in clumps and reaches a height between 2′ and 4′. It blooms from mid summer into the autumn. Each flower opens with pink/purple petals and a flat centre similar to a Shasta Daisy. As the flower ages and the seeds in the centre ripen, the petals droop down to become vertical and the centre becomes larger and domed, eventually becoming cone shaped. One plant can have flowers in different stages of development. The birds and bees love this plant.

It is important to use the correct DMC thread colours to achieve a plant and flowers that are obviously Purple Coneflowers. Clarks or Finca threads can be substituted.  Refer to a Thread Conversion Chart to identify the correct thread numbers. Remember to strand your threads; it makes a huge and improved difference to the appearance of your stitching.

Stalks: Green 987(6).

Leaves: Green 702 (2) + 988 (1) + 987 (1) = 4.

Petals: Pink 3609 (2), 3608 (3), 3607 (1). Explained in Petal directions.

Centres: Brown 433 (1) + 938 (1) = 2. Orange 721 (1 doubled in the needle) = 2.

Stalks: Using long Straight stitch for some stalks.  Indicate the  centres of each of the flowers with a small Cross stitch in either of the two brown threads.

Petals: Stitch a few Straight stitch petals in each bloom using 3609 (2). Add more petals using 3608 (3).

Note that the petals are uneven in length and that they are darker towards the centre of the flower. Overstitch the base of the petals with one thread of 3607.

[do_widget id=arpw-widget-2]

Centres: 433 (1) + 938 (1) + 721 (1) = 3. Overstitch a few horizontal Straight stitches across the central brown Cross stitch. Using 721 (1) doubled in the needle = 2, overstitch a few French Knots on the centres using a fine needle for this such as a Crewel 9 or 10.

Stitched size is 2″ wide x 2 1/4″ high.

Leaves: 702 (2) + 987 (1) + 988 (1) = 4. Detached Chain stitch with the catch stitch towards the stalks of the plant. The upper leaves are stitched with 702 (2) + 988 (1) = 3. The foliage on this plant is fairly dense with the leaves being an oval with a point at the tip of the leaf. The angles of the leaves vary considerably.

Briarwood Garden, stitched by Janet Sunderani

(original is 6 1/2″ x 5 1/2)

Wishing you happy stitching and a very Happy Easter.

25/03/2018 by Ann Bernard

These daffodils bring you good wishes for Easter

It is almost Easter weekend when I, and many other people in our northern climate, think that Spring really should be here or, appear very soon.  The Spring Equinox has happened and we hope that Mother Nature will cooperate.

To help you feel ‘springlike’, here are the instructions for stitching daffodils.  They are easy to stitch and make a good card insert.   It is important to have the colours exactly right so that the eye identifies them as daffodils. The DMC thread numbers are included with the instructions.  You can use Clarks or Finca instead but go to a Thread Conversion Chart to get the equivalent colour numbers. The Charts are available online.

You will also notice that ‘Take a Peek Inside’ is now available, or will be in a few days, for the ebooks – Hand Stitch Recognizable Spring Flowers    and   Hand Stitch Recognizable Summer Flowers.  I always like to leaf through a book I am interested in before adding it to my library.

Daffodils

The bright yellow of King Alfred Daffodils makes them the most familiar variety of the daffodils.

As our goal is to create plants and flowers that are instantly recognizable, we will stitch bright yellow daffodils. Note that a daffodil has long straight leaves and stalks, and that the flowers have six petals and a trumpet. We will stitch them frontal view for now. Later, we will return to daffodils and add curved and bent leaves and the flowers in side view. See Basic stitches for stitching techniques.

Green: 320, 987, 989, 895. Yellow: 444, or 307, or 973.

Gold: 972.

Leaves and Stalks (fig. 1 below): Use 2 threads each of 320 and 987 and 1 thread each of 989 and 895. These 6 threads of green are now stranded and mixed and make a blend of greens more like daffodil leaves and stalks than any one of them would be if used on its own. (to strand threads, separate them into single threads and then put them together again).  Stitch a few Straight stitches to indicate some stalks. The stalks need to be in proportion to the flowers and are about 1″ long in the sample pictured below. Start in the center and stitch stalks first towards one side and then stitch the other side. Take the short cut between the stalks on the reverse of the fabric as in the diagram (this is the procedure for all the stalks for every plant). Store that thread by bringing it to the front of the fabric a short distance away.

Flowers : Four threads of any of the yellow threads, stranded but unmixed, to stitch the flowers.

Triangle Stitch: Stitch the inside triangle first with stitches about ¼” long (Fig. 2). Add the second and third triangles outside the first one (Fig. 3). Overstitch a Reverse Triangle the same size as the last triangle (Fig. 4). Note that the points of the reverse triangles are midway along the sides of the first triangles. Increase or decrease the number of the triangles to alter the size of the flower.

[do_widget id=arpw-widget-2]

(Overstitch – stitch on top of previous stitching). Stitch a few flowers at the top of the stalks (Fig. 6). Store that thread and retrieve the green one. Add some more stalks to your plant or group of plants. Then, retrieve the yellow thread and add more flowers. Continue until you have enough flowers to please you. Using the same green thread, add more Straight stitches to fill out the plant with leaves. The leaves of daffodils grow taller than the flowers. Add a few short Straight stitches above the flowers to indicate this. The plant does not look correct unless you do this.  Add more Straight stitches to fill out the plant with leaves.

These diagrams make stitching Daffodils look difficult. It is not. Just place Straight stitches as indicated and you will have no problem. It does take a little practice to make the flower the size and shape you wish, but that is why you have tried them first on your sampler.

Centres: Gold 972 using 1 or 2 threads.

Overstitch a small reverse triangle in gold thread for the trumpet of the daffodil (Fig. 5). You can stitch them as diagrammed here or look at the flowers on the cover photo for an alternative.

Your sampler does not have to be a completed work of art.

Stitch enough of each plant and flower so that you know how the stitches work, the length of stalks and leaves, how the flowers are created, and how their size can be altered.

Once you know this flower, move on to the next plant, Narcissi.

Specially for our friends in Australia, the next posting will be Purple Cone flowers.  I hope that they grow in your area and that they are in bloom right now.

Wishing all readers, a very Happy Easter.

19/03/2018 by Ann Bernard

Embroideries that Record History
Queen Mary’s Carpet

This interesting embroidery does not record history; It is history

The photo shows you the content and the size of the embroidery.

The Queen Mother and Queen Elizabeth are looking at it. You will see a colour photo later.

Queen Mary’s Carpet is included here because, timewise, it is the next embroidery of note to be stitched after the Bayeux Tapestry. Before you tell me that there are other large embroideries created in the intervening centuries please note that these are ecclesiastical embroideries such as the Syon Cope, other copes and Altar Frontals. This was the glorious age of Opus Anglicanan and that is another subject. Also not included here are the Elizabethan tablecloths and bed hangings. Though all are amazing, we will never reach our destination if I sidetrack to everything larger than a pillowcase. I will admit to being category selective but I have found no large domestic or historical embroideries until World War II and subsequent years.

Queen Mary was the mother of King George VI and grandmother to our present Queen Elizabeth. She lived through two world wars supporting her husband and the nation through the first war and her son, his family and the nation through the second.

Queen Mary moved out of London to the western part of England for the duration of the second war. She stayed at the home of relatives and stitched the war away. At the end of the war, Britain had an enormous monetary debt to the USA. To raise money to help pay off the debt, Queen Mary donated her completed embroidery to be auctioned.

I believe that the 12 panels in the carpet were all designed to be firescreens. Their size would seem to be appropriate for this. They are stitched in gros point (large petit point) on canvas. Queen Mary purchased her embroidery supplies at the Royal School of Needlework. My guess would be that the staff prepared the canvases and supplied the wool. Another guess would be that on completion, the staff blocked the pieces and joined them together to make the carpet. It would appear from photos, that Queen Mary stitched with the canvas loose in her hands and not on a frame. This would make blocking essential. Can you imagine wearing a formal hat to sit in the garden and stitch.

See more photos in the blog entry on Hands Across the Sea Samplers.

One afternoon, while I was a student at RSN, we were called to come quickly and be totally quiet. Queen Mary had been visiting the store on the ground floor. We hung over the balcony railing overlooking the front entrance hall. Queen Mary walked slowly across the hall to the front door. She was wearing her trademark maroon coat and formal hat and was using a cane, or perhaps it was a long umbrella. The staff were standing around the hall with their backs pressed firmly to the wall thus leaving her lots of space. Her accompanying ‘lady’ was several paces behind her. She said something that I could not hear or do not remember. It struck me forcefully how lonely it was to be in her situation. Had it been any one of us, we would have been chatting about what we had seen, our purchase, our plans and would be looking forward to a cup of tea. None of that was available to her except, perhaps, the tea.

It is said that Queen Mary stitched the designs, and that her ladies stitched the backgrounds. I have also heard that she stitched both herself. Either way, one panel would have been a lot of work; twelve panels overwhelms my mind. The fact that she donated all her work for auction to help pay the National Debt was wonderful. The debt was not paid off until the 1990s.

Bravo for Queen Mary.

What is a firescreen you ask? Before the days of central heating, houses were warmed by coal burning fireplaces. When not in use during the morning hours, or warmer weather, the fireplaces were not a pretty sight. An ornamental piece was placed in front of the empty fireplace and the lady of the house made sure that it enhanced her living room. The size of each of the twelve panels in the carpet would have been approximately 26” x 20” which would be an appropriate size for a firescreen. The completed embroidery was mounted onto a piece of sturdy wood and framed. Feet, set at right angles to the frame, were mounted on the lower edge.

Not even a palace needs twelve firescreens. Combining them into a carpet was a great solution and helped pay off a piece of that monstrous debt.

[do_widget id=arpw-widget-2]

There is a website that gives excellent information about Queen Mary and the carpet at the following: Hands Across the Sea Samplers. The information here is incomplete but adds to their record.

Are you wondering who purchased it and where it is right now? Nicole and Sandra’s website will answer those questions. It also includes good photos.

This is a brief video of Queen Mary.

If you would like read more on what it was like to be a student at RSN I have a few older blog posts.

  • « Previous Page
  • 1
  • …
  • 7
  • 8
  • 9
  • 10
  • 11
  • …
  • 17
  • Next Page »

Search

Recent Posts

  • Laid Work – Introduction.
  • How to stitch Snowdrops. Quick and Easy!
  • Inspirations, All Stitched Up! from Australia
  • Newsletter Märchenhaftes Sticken – Jessica Grimm
  • Cotton Quartet 1: Preliminaries & First Stitches

Recent Comments

  • Ann Bernard on Prepare your embroidery for the framers – Mount on Foam Core Board
  • SGibau on Prepare your embroidery for the framers – Mount on Foam Core Board
  • Louise Desmarais on Prepare your embroidery for the framers – Mount on Foam Core Board
  • Katherine & Malcolm Bell on Embroideries that Record History
    Queen Mary’s Carpet
  • Ann Bernard on Embroideries that Record History
    Queen Mary’s Carpet

Pretty Chic Theme By: Pretty Darn Cute Design