Stitching Idyllic

Stitching Idyllic by Ann Bernard

  • Home
  • Blog
  • Spring Flowers
  • Summer Flowers
  • About Ann

21/09/2019 by Ann Bernard

The Toronto Historical Embroidery – A Gift to the Citizens of Toronto

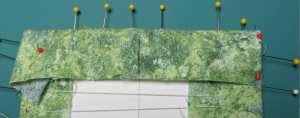
This multifaceted embroidered tapestry was gifted to the City of Toronto on March 4, 1984 by the Toronto Guild of Stitchery on the occasion of the 150th (Sesquicentennial) Anniversary of the founding of Toronto.  I cannot give you a photo of the whole piece as it is just too large.  Here is the first pair of environment panels and the beginning of the frieze. They show that the city was once forested.  The aboriginal tribes met here between the mouths of the rivers that empty into Lake Ontario.  In fact, Toronto is ‘meeting place’ in Mohawk.

You can see the Indians in the frieze and the first settlers cutting down the trees for a settlement.  The end panels are a stylized design of the coats of arms of the city of Toronto.  They are worked on canvas using a wide variety of stitches. (The white circle is a paper punch hole).

Let us start at the beginning.  Two of the members, Ivy Clark and May Horn had been on a trip to England where they saw the Hastings and the Bristol Embroideries.  They came home with a bright idea.  With a big anniversary coming up for their city, they suggested the guild members create a tapestry telling the history of Toronto.  In their honour, it is dedicated to Ivy and May.

Little did any of the members realize what they were undertaking.  A design competition was held which was won by Barbra Gordon, a student at the Ontario College of Art. She was the winner of the Gold Medal that year.

Barbra Gordon. 1984

Members did historical research and their findings were incorporated into the design.

This was 1977 which is now 42 years ago.  The guild members had 6 years to complete their gift.  Assistance with the funding came from The Trillium Foundation but the membership raised half the cost of the materials and other essentials.

You can see this embroidery for free. The Cafe on the Square is located on the ground floor of City Hall.  Behind the cafe, you will find a corridor.  A curved staircase goes down to the lower level.  The Toronto Historical Embroidery is hanging at the base of those stairs. It has its own lighting system and is protected by a clear plexiglass cover. There is also an audio presentation.

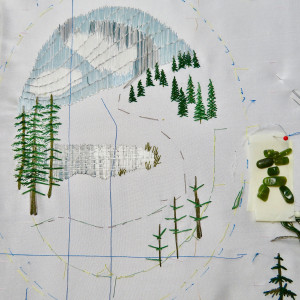
These first panels show the forest that was there in 1793 and has now become the city of Toronto. The elliptical shapes echo the clamshell architecture of City Hall which was completed in the early 1960s.

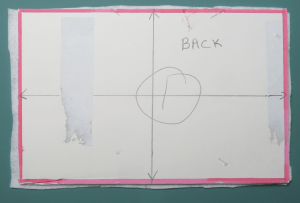
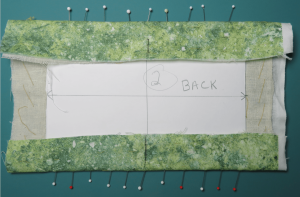
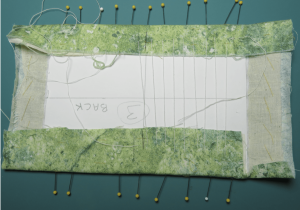
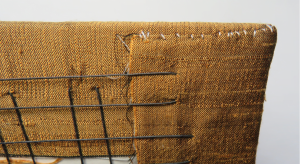
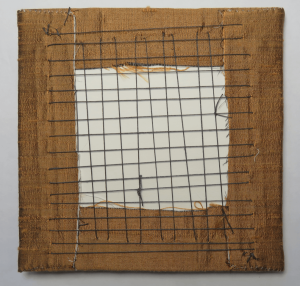
Once the maquette was complete and coloured by the designer, the members formed teams to focus on the many facets of the undertaking.  They had to make a master tracing.  The tracing was then copied and patterns were made for each piece of fabric in the upper and lower panels. There were many hundreds of pieces.  Each one was numbered, balance marked and a grainline arrow added so that the fabric was cut grain perfect. Look back at the panels and note the complexity of the design.  Each piece of fabric had to be the correct colour and positioned exactly in place. The upper and lower panels were assembled using machine embroidery and it was a big job.  Marie Fenwick, was the organizer for making the panels and also did a considerable amount of this embroidery.

To give a concept of the size. the section you have seen is under 3 feet wide and 6 feet high.  The whole Embroidery is 24 feet long and 6 feet high.

This is the first of a series about the actual creation and stitching of the Toronto Historical Embroidery.  As such, it is rare.  We see completed pieces of embroidery but have no idea of what was involved in creating them.  Happily, there are photos and, despite it being 40 years ago, there are a few survivors to share the experience with you.

Please share these blogs with friends, other stitchers and those who would be interested. Let me know if you would like to be directly on the mailing list.

Postings are planned for every two days.  Enjoy!

Comments are welcome.

26/08/2019 by Ann Bernard

Prepare your embroidery for the framers – Mount on Foam Core Board

After the weeks, months and all the creative energy you have invested in your embroidery, it is now time to finish it for framing.  Now that I am old, and have experienced the work of many framers, I will confidently say that “If you can do it yourself, then do it yourself”. No one will give your work the care or attention that you will.

Here is how to mount your embroidery ready for framing. Read all the instructions before beginning any part of the procedure.

Use Acid-Free Foam Core Board which is available from an art store or framers.  It comes with a matt surface and in two thicknesses – the lighter one is adequate for most embroideries. Choose the heavier one if your embroidery is large – such as over 12 inches in any direction. The  Foam-Core Board from the Dollar Store or Office Suppliers has a shiny surface and is not acid-free. It will rot your fabric over time.

Part One.  Cut and cover the Board.

  1. Measure and pencil mark the size of the board.  Measure twice!
  2. Cut once.  Place your ruler (preferably with a metal edge) on the piece you are cutting out.  If your knife slips, it will not damage the piece you are removing.  I use an exacto knife or a quilting wheel both of which I keep just for board cutting.  You will need to make several cuts, at least three, to go completely through the board.
  3. If you already have a frame, cut a sliver off two sides of the board so that it fits loosely in the frame.  The felt and fabric will make the board a little larger which can make it too big to fit within the frame. It should fit in comfortably and not be tight.
  4. Cover one side of the board with felt.  Preferably white or the same colour as the background fabric. Place a length of Double Sided Tape along each side of the board to fix the felt in place. Check and remove all wrinkles.  Double-Side Tape (DST) is a scrapbooking item.
  5. Cutaway excess felt leaving about 1/8″ extra to cover the cut edges of the board.  Trim a tiny triangle away at the corners to reduce bulk.
  6. Mark the centres of all four sides with a pencil and join as in the photo below.

The edges of the board in this photo are marked in pink for clarity only. The felt has been trimmed on three sides – the left side is not trimmed.  Small triangles of felt are trimmed away on the right-hand side corners.

Part Two.  Position and fix your embroidery to the front of the board.

  1. Place a clean cloth on your working surface as you will now be working on the back of the board with the embroidery face down on the table.
  2. Place the felted side of the board on to the reverse side of your embroidery. The felt cushions and protects the stitching. Knots and fastening threads sink into the felt where they are safe and invisible.
  3. Centre your embroidery by matching the midpoints of all four sides to the horizontal and vertical lines on the board.  Place a pin through the fabric and into the thickness of the board at those centre points.
  4. Pull the fabric secure and place pins at both ends of all four sides. Adjust as necessary.
  5. Put in pins about 1/2″ apart along all four sides.
  6. Check the front side of your work.  Are there any wrinkles?  It should be smooth, perfectly centred and show your stitching to perfection.  Adjust as necessary.

The backing fabric is now visible.  The midline points of the fabric are lined up with the centre lines on the back of the board.  All four edges are pinned. At this stage, it looks like a porcupine and thread gets tangled in it very easily.

Part Three.  Lacing the long sides together.

  1. Use Buttonhole or linen thread, crochet cotton or Dental Floss. These all have the least tendency to stretch and will hold the fabric in place the best.
  2. Your choice – Start in the centre or at one end.  Right-handed – work right to left – left-handed, start at the left end.  I prefer to use straight stitching as in the photo but herringbone is an alternative.
  3. You will need a very, very long length of thread.  To start in the centre, measure off two or three yards, thread the end in a needle, take a stitch as indicated in the photo, pull the thread through and then, take another stitch directly opposite on the other long side. Continue until about 1/2″ from the end of the board.
  4. Note how much thread you have used, measure that amount off the reel you will need for the other half and cut the thread.  Thread the needle, reverse the fabric and board and repeat lacing the other half of the long sides stopping 1/2″ from the shorter edge of the board.
  5. Take the slack out of the lacing thread for the first time.  You will be amazed at how much extra thread you pull up.

Part Four.  Corners.  Follow the photo above.

The lacing thread is hard to see in this photo.   It is preferable to use a neutral coloured thread rather than a contrast.  I started at the top right and laced it to halfway across. Try to have one continuous thread length.  Having to knot in a new length is a pain. The knot is always in the wrong place and causes problems.  Complete the lacing of the two long sides.

Take out the slack for the second time and secure the ends of the thread by taking a few small stitches into the fabric.

In the photo above, note the bottom right corner where the fabric has been cut.

On the long side, that is being laced, cut the fabric about 1/4″ inside the edge of the board.  Note that the cut stops about 1/4″ before the long edge of the board and the fold in the fabric. Place a short piece of DST under the cut edge to keep it in place.

  • 1. Continue cutting to remove a square of fabric from that corner.  This next cut is 1/4″ from the fold as indicated in the diagram below.
  • 2. Turn the fold over to create a hem that is wider than 1/4″.
  • 3. Pin in place. The redheaded pins on the right side show where the hem is turned under. You may want to use your awl to tuck in any extra fabric at the point of the corner.  The left corner has not yet been trimmed and turned.
  • 4. Repeat for all four corners.  Hemstitch the fold in place as indicated in the photo below.

Completion.

  1. Lace the short sides. Take the slack out of the lacing threads twice. The thread should be firm but not so tight that it warps the board.
  2. Fasten off the lacing threads.
  3. Remove all the pins if you have not already done so!

Describing how to do this is more complicated than it is to work.  Actually, it is fairly quick and easy to do.  It is also possible to fold and cut the fabric diagonally on the corners in the traditional ‘mitre’ method.

This method is easier, gets rid of the fabric bulk on the corners and produces a neat and flat finish

If your piece of stitching is small; ie, 6″ x 4″, the size of a postcard, you do not need to do any lacing.  Use DST instead.  But do follow this procedure for the corners.

It is now ready to install in a frame or take to the framers.  Make sure they notice what a good job you have done.!

Enjoy,  Ann

19/07/2019 by Ann Bernard

The Lisbon Treaty as printed here, recanted.

Apologies my friends.  I gather that the interpretation of the Lisbon Treaty I circulated is a scam.  False and unnecessary information.

The contents have been worrying me for months and I am glad that it is incorrect.

Next blog will be about????  I do not know yet but it will not be on this subject.

Thanks,    Ann

18/07/2019 by Ann Bernard

The Lisbon Treaty. Reprinted from an article written by Kevin Saunders.

Kevin Saunders               The contents of thhttps://www.facebook.com/Caligular/posts/10157119871393987e Lisbon Treaty

February 14 at 2:24 PM

I just got through reading theLISBON TREATY.OMG!!!!!!

WHY IS NOBODY TALKING ABOUT THE LISBON TREATY, THE TREATY THAT COMES INTO FORCE 2020, ITS WORSE THAN THE SO CALLED DEAL, IF 99% OF THE BRITISH THINK TERESA MAYS DEAL IS BAD, JUST LOOK AT THE LISBON TREATY. PEOPLE NEED TO KNOW, LEAVERS AND REMAINERS.

..“What will actually happen if we stay in the EU” is a question no remainer will ever answer but here it is warts and all.

Check it out if you wish ——>>

1: The UK along with all existing members of the EU lose their abstention veto in 2020 as laid down in the Lisbon Treaty when the system changes to that of majority acceptance with no abstentions or veto’s being allowed.

2: All member nations will become states of the new federal nation of the EU by 2022 as clearly laid out in the Lisbon treaty with no exceptions or veto’s.

3: All member states must adopt the Euro by 2022 and any new member state must do so within 2 years of joining the EU as laid down in the Lisbon treaty.

4: The London stock exchange will move to Frankfurt in 2020 and be integrated into the EU stock exchange resulting in a loss of 200,000 plus jobs in the UK because of the relocation. (This has already been pre-agreed and is only on a holding pattern due to the Brexit negotiations, which if Brexit does happen, the move is fully cancelled – but if not and the UK remains a member it’s full steam ahead for the move.)

5: The EU Parliament and ECJ become supreme over all legislative bodies of the UK.

6: The UK will adopt 100% of whatever the EU Parliament and ECJ lays down without any means of abstention or veto, negating the need for the UK to have the Lords or even the Commons as we know it today.

7: The UK will NOT be able to make its own trade deals.

8: The UK will NOT be able to set its own trade tariffs.

9 The UK will NOT be able to set its own trade quotas.

10: The UK loses control of its fishing rights

11: The UK loses control of its oil and gas rights

12: The UK loses control of its borders and enters the Schengen region by 2022 – as clearly laid down in the Lisbon treaty

13: The UK loses control of its planning legislation

14: The UK loses control of its armed forces including its nuclear deterrent

15: The UK loses full control of its taxation policy

16: The UK loses the ability to create its own laws and to implement them

17: The UK loses its standing in the Commonwealths

18: The UK loses control of any provinces or affiliated nations e.g.: Falklands, Cayman Islands, Gibraltar etc

19: The UK loses control of its judicial system

20: The UK loses control of its international policy

21: The UK loses full control of its national policy

22: The UK loses its right to call itself a nation in its own right.

23: The UK loses control of its space exploration program

24: The UK loses control of its Aviation and Sea lane jurisdiction

25: The UK loses its rebate in 2020 as laid down in the Lisbon treaty

26: The UK’s contribution to the EU is set to increase by an average of 1.2bn pa and by 2.3bn pa by 2020

This is the future that the youths of today think we stole from them?

They should be on their knees thanking us for saving them from being turned into Orwellian automatons!

Forget Deals. no deals It is time for remainers and brexiteers to unite and see what is coming before its too late. This is the whole reason they are dragging brexit out. So we can get to 2020 then we have no choices anymore.


18/07/2019 by Ann Bernard

The conversation has led back to the Bayeux Tapestry! Now why does that keep happening?!

The conversation regarding washing fabrics, marking the design on fabrics both now and historically has led to some ‘THINKING”.  Thinking is not a bad idea, in fact, it is a good habit and can be productive.

Heather Grief tells us there are no indications of design lines on the fabric of the Bayeux Tapestry.  There will be holes in the fabric and damage to the threads caused by the needles and wool, but under that, there are no black, blue, brown lines or any other indication of how the embroiderers knew where to place their stitches.  With its size, detail and complexity, I cannot believe that a large number of people were able to stitch the Tapestry without the input of a gifted artist/ designer and guidelines on the fabric.  My mind and my stitching experience cannot accept this.

Sheila McCoy has entered this debate with an excellent article which you can read for yourself.

https://www.historyextra.com/period/norman/bayeux-tapestry-where-make-how-long-who-when-stitch-penises-visit/

Here are my thoughts on the Bayeux Tapestry for those who are as increasingly perplexed by it as I am.  There has been a lot of research on it over a large number of years.  It is hard to know the truth about something that was stitched so long ago.  It is hard to know the truth about something stitched only a few years ago unless the stitcher has left notes to tell us.

This is what I think!  I am not a historian.  I am a stitcher and I write this blog.

The Bayeux Tapestry was stitched in France.  This was the age of Opus Anglicanen in Saxon England.  Those professional embroiderers were unbelievably skilled. They would have not easily or willingly reverted to the basic embroidery skills used in the Bayeux Tapestry.  Please don’t shout at me about this observation but there is no comparison in the skills required.

It chronicles the defeat and colonization of their country.  Why would the Saxons do that?  William the Conqueror was a cruel and absentee ruler. There were riots and civil unrest. He built prisons and castles instead of Churches. He built the Tower of London.  This speaks of slave labour.  Saxon England had been rural and prosperous.  It fed itself with enough to export.  William took over Saxon owned land and gave it to his Norman followers.   He wiped out the Sazon culture and language in a generation and that takes determination. The Domesday book was an inventory for taxation purposes.

My belief is that he was a horrible and vindictive man.  When he died, no one wanted to bury him.  His body lay around until, finally, it exploded.  Do you really think that good ladies of England or the male professionals would have created the Bayeux Tapestry under these circumstances?  I think that the takeover of Saxon England by the Normans was so traumatic that the English/British grew an extra gene which has been particularly evident in the last century. In both World Wars, the country was determined to not allow a foreign invader onto English/British soil.  Brexit is another example.  Have you read the text of the Lisbon Treaty?  The future for Britain as outlined in this document is appalling.  If you have not read it, you should.  My next posting will be the article I have about the Lisbon Treaty.

The Bayeux Tapestry is a record of the events that led up to the battle, the battle and of victory. A Norman-French victory.  It is not a story of defeat.  Just to add a little background, Edward the Confessor died without an heir.  This created the opportunity for the Vikings and the Normans to try to take over a peaceful and prosperous country ripe for the picking.  The Viking invasion of York sent half of the Saxon army north to fight the Battle of Stamford Bridge which the Saxons won.  This was only a few weeks before the Battle of Hastings.

Returning to marks on fabric.  Is it possible that there was a herbal extract or product that could have been used to mark the design on the fabric for the Bayeux Tapestry?  Something that would have faded over time and not damaged the linen fabric, the wool threads or the natural dyes.  I have no idea if there is, or is not.

If a naturopath or a herbalist should read this, do you have any suggestions on what could have been used to mark the stitching lines on the Bayeux Tapestry?  We would love to hear from you.

Sorry, no pictures!

17/07/2019 by Ann Bernard

Jeri Ames started a conversation. I love it. Thank you readers.

First, a reply from Ruth Briffett.  She and a group of ladies work at repairing and making ecclesiastical linens in Toronto.

I have removed the brown stain from blue pens used on church linens by dipping a Q-tip in hydrogen peroxide and dabbing it gently on the stain. The stain usually disappears fairly quickly and a quick rinse will wash out any remaining peroxide.

Another comment is from Heather Grief.

As a fan of the Bayeux Tapestry, I have been considering the possibility that the embroiderers did not transfer the design by marking the linen cloth, before stitching – no sign of any lines have been found.
It is possible to use tacking stitches to mark the main points (corners of buildings etc) and fill in the rest by hand.  In the Middle Ages, the design would have been drawn on parchment (prepared animal skins) – tougher than modern paper – and a needle could be pushed through to mark the relevant spots.
I suggest this as a means of avoiding the use of marking substances in modern work – you simply remove the tacking stitches as you do the embroidery, filling in the gaps by eye.

Heather, Thank you for your reply. I have never given any thought to how the design was placed on the Bayeux Tapestry linen. There are no visible lines you say. Umh!! Curious and curiouser. I cannot think that all that intricate design was stitched freehand.

Prick and pounce is the historical method of transferring a design onto fabric.  When a student at RSN,  we rubbed powdered charcoal through the prickings on the paper pattern to make a temporary line on the fabric.  Having blown away any excess charcoal, we painted the lines using blue or black watercolour paint. We used ultra fine sable brushes to make a very fine line.  It was easy to cover those fine lines with stitching.  Marking pens make such thick lines in comparison.

Maybe they had some disappearing watercolour paint they were able to use on the Bayeux Tapestry.

Let us ask the readers what they think.

In the past, since RSN, I have marked the design lines (reversing the design) on the backing fabric.  Then, I have basted the lines through to the front.  It works but is not very accurate.

Ann B.

16/07/2019 by Ann Bernard

Jeri Ames adds information on water impurities and pre-washing fabrics for embroidery.

There was a time when rainwater fell through clean skies and was regarded as the best water to use when laundering very fine needlework.  That is no longer the case.  Also, washing instructions in old embroidery and lace books are completely out-of-date.  Even new books, authored by people who should know better, neglect to specify distilled water.  Please mentally remember that I really – really – mean distilled.

Let us think about textiles made of natural materials.  This means linen, cotton, silk, and wool.  Not synthetics.  When preparing for stitching, I pre-rinse them in hot distilled water which is as hot as used when laundering.  This removes the stiffening put in by the manufacturer as well as pre-shrinking it.  The water looks cloudy.  That is how you know that the stiffeners have been removed.  I usually line/back with lightweight semi-sheer cotton, and that definitely must be pre-shrunk before you attach it to cotton, linen, silk, or wool.

Why a backing?  Because dark-coloured threads sometimes cast a shadow that can be seen when viewing embroidery from the front.  A backing prevents this and gives an extra place where you can anchor thread ends.  It will/can be of a tighter weave, so if you are using counted techniques or a loose weave fabric, your stitches will not slide around.  If you are an embroiderer, you know exactly what I mean.

I always, always, always back my embroidery fabrics usually with cotton batiste or well-washed cotton fabrics.  Embroidery fabrics used to be of good quality but now they are so flimsy that there is little substance to support the stitching. Ann

[do_widget id=arpw-widget-2]

It must be noted that you should not line/back table napkins and linen towels.  When you place an embroidery face down on a fluffy towel to iron, it is the cotton lining that will first feel the heat.  It gives scorching protection to the fabric below.

Pre-shrinking the embroidery fabric can make it more difficult to stitch.  If you choose to not preshrink it, you absolutely must pre-shrink the lining.  If you do not, the first time you wash the item you will have to cut out the lining.  Reason:  Different textiles from different manufacturers will shrink at different rates.  In the worst case scenario, you can salvage embroidery without a lining, but not without the embroidery!

Professional conservationists and restorers often have access to de-ionized water.  You will have to improvise and use distilled water that can be made at home.

Distilled water can be purchased in grocery stores, but becomes expensive in large quantities.  Do not confuse distilled with spring water.  To distil, you have to convert water to steam, and then back to water.  I have a one-gallon Kenmore Countertop Distiller from Sears 25 years ago.  Computer search “countertop water distillers” and you will find several manufacturers and videos.

Fill the canister with tap water.  Boil it at a high temperature so that the steam rises into an upper chamber.  It will then return to water that comes out a spout.  A separate container is set below the spout to collect the distilled water.

City water contains added chemicals meant for other purposes that will lodge in textile fibres.  This water is from lakes and reservoirs fed by acid rain.  Well water may be heavily “laced” with iron particles (which are not visible to the human eye).  These remain inside textile fibres and might appear as rust spots years later. Water may also contain manganese (which is what turns white household linens yellow).  The liquid that remains at the bottom of the canister is –  My best description is: it looks like a Coca Cola syrup!

Jeri Ames in Maine USA (81)
Lace and Embroidery Resource Center

Jeri,  My thanks, and OUR thanks for all this information.  Many people are unaware that they should consider the additives in fabric and the chemicals in marking pens.  We all appreciate your words gained from experience.  The world and the goods available to us have changed radically over the last few decades.  What used to be reliable and works, no longer does.

15/07/2019 by Ann Bernard

From Jeri Ames. Please read and become wise. She knows what she is talking about.

We used to buy needlework supplies in privately-owned needlework shops.  Owners attended a variety of professional and personally-rewarding events (seminars, classes, etc.), shared what they knew about old and new products, and provided support to local guilds.  Now, they have been driven out of business by national crafting chain stores that are open day and night.  Clerks in these stores usually have no experience using the products they sell.  By demanding deep discounts, they have driven down the quality of supplies we use.  It is up to us to research products before we shop, and to seek suppliers who carry items of better quality.

Let’s start by thinking about the blue vanishing pens with different names used to transfer designs to cotton and linen fabrics we intend to embroider.  Commercial products in this category may not have been time-tested for the long-term survival of items we create.  It is nearly impossible to check the quality standards of manufacturers.

It was well over 30 years ago when the first vanishing blue marking pens became available.  They now have several different commercial names.  Teachers and designers loved using them when making embroidery kits for classes because they could use a Q-tip dipped in cool water to erase incorrect blue marks.  We experimented at the time, and if I remember correctly – when the blue was left on the fabric and ironed, it changed permanently to beige or brown.

Testing of these and all chemical products (including glue) is needed because manufacturers are never held responsible for what happens to art.  Future conservators and restoration experts will have no idea what chemicals these pens have left behind that may become a permanent blemish in needlework art.  Manufacturers may have changed formulas over the years, and we have been told nothing.  Chemicals may cause something drastic over time, like rot and stains.

Another example would be what happens to plastics after 20 years or so.  That means any product used for needlework that contains petroleum should be avoided, including some synthetic textiles.

Be very wary of adhesives and glues (mentioned above), including backings that have adhesives that are sold for framing needlework.  Think.  In addition to chemicals, these contain ingredients that very tiny organisms like to eat.  We know this because they leave tiny traces of their presence behind.

[do_widget id=arpw-widget-2]

Glue/paste and starch were/are sometimes made at home, using flour and/or potatoes.  These are also attractive to tiny critters.  When you put needlework away in storage, it is wise to soak out old starches made from potatoes.  Not only are you dealing with food, but with one that will cause oxidation and turns textiles brown.

Jeri Ames in Maine USA (81)
Lace and Embroidery Resource Center

I remember tales of altar frontals that had been stiffened with flour and water. The mice loved to eat the paste and destroyed many textiles.  A.B.

Jeri Ames is, or has been, a member of The Embroiderers’ Guild of America 50+ years, American Needlepoint Guild 47 years, Embroiderers’ Guild (England), International Organization of Lace 40+ years, The Lace Guild (England), International Bobbin & Needle Lace Organisation (OIDFA) 22 years, Costume Society of America,  Arachne (internet  lace correspondence), plus several local guilds.  She owns an up-to-date library containing 4,000+ books about embroidery and lace, another room devoted to needlework magazines and bulletins going back 150 years, and a studio.

Fellow stitchers.  Please taken Jeri’s good advice to heart.  It comes from knowledge and experience.

12/07/2019 by Ann Bernard

Framing – The Caribou that went ‘thataway’.

Creating an embroidery is an expression of our soul.  Whether it has been easy, complex, a challenge or a joy, each one of our creations is important to us.  We labour over them and when they are completed, we want to launch them into the world with as much finesse as we can muster.  Although we can mount them ourselves, the framing part of cutting mattes, glass and frames someone else has to do.  We just do not have the stock or the equipment to do it.

First, embroideries should be mounted on acid-free foam core board. They need to be mounted grain perfect and secured firmly over the mounting board.  I have covered this process in detail in my ebook, Hand Stitch Recognizable Summer Flowers which is published by ebookIt.  This is not an expensive book and is worth buying just for the instructions on how to do this correctly and easily.  Plus, there is a lot else in the book that you will find useful.

“The Caribou that went ‘that away'” was completed and mounted in the method detailed in my book.  I took it to well-known framers.  First, I was surprised at the limited choice of both mattes and frames but we then made a selection together.  When it came back, the embroidery was not mounted straight within the oval matte.  It was twisted/tilted.  The vertical and horizontal laid work thread lines were not vertical, or horizontal.  It was disappointing to say the least.  I forgot to take a picture of it for you.

Then I took it to a private framer.  She suggested a much darker matte and frame with forest green tones. This works a lot better.  The embroidery now appears as if you are looking out of a window and can see the caribou trail with the trees and the wind blowing the sky and clouds.  She found though, that she could not do a perfect job.  The first framers had glued the mounted embroidery to a backing board and that she was unable to remove that backing board.  She included the light green matte from the first framing.,  You will note that the surrounding 1/2″ to the embroidery is not even.  And that is the way it is and, this is why it is that way.

The embroidery itself is not in good camera focus here because of the depth of the matting.

Why do I tell you this?

Because you need to know and be aware that all framers are not equal.  When you have done your ultra best work, you want to locate someone who will treat you, and your work with the respect that it deserves and do the best they are able for you.

I remember a few years ago that Mary Corbet completed an intricate and difficult piece of gold work.  The framers left a visible fabric pucker on the front of her work.  Her perfect piece was marred.  It had been treated disrespectfully.

[do_widget id=arpw-widget-2]

I stitched an intricate and difficult piece of white work when I was in my 40s.  The framers made it look good but when we took it apart for reframing with acid-free materials, I found that the edges of the fabric had been stapled to a piece of ordinary and dirty white cardboard.  I was horrified.  I washed the embroidery to remove any destructive particles and remounted it on acid-free foam core board.  It was then framed properly and has been donated to the San Francisco School of Needlework and Design together with my samplers from The Royal School of Needlework.

Be wise. Respect yourself and your achievement. Mount your embroidery yourself which is the only way you will be sure it has been done properly.  It is also cheaper than having the framers do it.  Find the very best framer in your area and make sure they understand how important your work is to you.  Yes, it is expensive.  But after you have put your heart and soul into that embroidery, it is better not to get a second-rate framing job.

P.S.  I think that this embroidery has an atmosphere.  I get a feeling of cold, of spring being around the corner, of something about to happen.  The scene is not static.  How did this happen?  I have no idea.  It just happened! It was a tough one to stitch and I like it better now it is completed and properly framed.

See you again sometime soon.   Ann


11/07/2019 by Ann Bernard

The Caribou went ‘thataway’. The stitching of this piece.

This is an experiment.  The background fabric is a fine and lightweight white silk backed with white cotton and all the threads are silk.  I do not usually have the luxury of stitching with silk, but being on the elderly side of life, I wondered what I was saving them for.  Also, my ambitions are greater than energy and this took a very long time. Being experimental, there was also a lot of trial, error and reverse stitching.

Without any lines on the fabric, it was necessary to mark the grain directions with basting threads to give me some sense of space and direction.  The design is made to fit an oval frame with a 1/2″ space between the stitching and the frame.  I became desperate for some stable markings and used a blue ink pen on the right-hand side to mark the frame position.  This was a big mistake.  The marks would have been visible if I had used the original frame.  To cover this ‘ink error’, the framing had to be rethought.  More about mounting and framing later.

The sky is laid work technique using flat silk. The long threads in the sky are vertical and for the frozen pond, they are horizontal.  Both are grain perfect.  The flat silk threads were a gift and I had a limited range of colour as well as a very limited length, ie, barely enough.

[do_widget id=arpw-widget-2]

The long threads are characteristic of laid work and must be secured with crossing threads.  The direction of these security threads show that the wind is blowing which is normal in the north.  There is some frozen water, the start of the trees and the Inukshuk is laid out on masking tape.  He proved to be too tall and out of proportion for the landscape.

The trees are all stitched with a twisted silk thread which is much easier to work with.  Casual use of fishbone stitch achieved the effect of northern evergreens.  Note the blue in marks!

The Inukshuk is made of jade fragments that were in a bracelet I purchased in Victoria, British Columbia.  The holes through the stones are in any direction making it difficult to attach them to the background as intended.   This one was at least the fourth attempt.  There is a limit on reverse stitching before the fabric is damaged and this damage becomes visible.  The trees generally are stitched unevenly and this was intentional.  The northern forests withstand harsh weather and growth is erratic and the trees are wind sculptured.

The caribou tracks are running stitch which has been whipped in some places.

The next entry will be on the framing of this piece.  It has much to tell us all.


  • « Previous Page
  • 1
  • …
  • 3
  • 4
  • 5
  • 6
  • 7
  • …
  • 11
  • Next Page »

Search

Recent Posts

  • Laid Work – Introduction.
  • How to stitch Snowdrops. Quick and Easy!
  • Inspirations, All Stitched Up! from Australia
  • Newsletter Märchenhaftes Sticken – Jessica Grimm
  • Cotton Quartet 1: Preliminaries & First Stitches

Recent Comments

  • Ann Bernard on Prepare your embroidery for the framers – Mount on Foam Core Board
  • SGibau on Prepare your embroidery for the framers – Mount on Foam Core Board
  • Louise Desmarais on Prepare your embroidery for the framers – Mount on Foam Core Board
  • Katherine & Malcolm Bell on Embroideries that Record History
    Queen Mary’s Carpet
  • Ann Bernard on Embroideries that Record History
    Queen Mary’s Carpet

Pretty Chic Theme By: Pretty Darn Cute Design