To give you more of an idea on content, here are two examples of the many individual plants and flowers that are included in this ebook. After these, you will find the books’ Contents List. Enjoy!
If you have started reading this book here at Daffodils, you have cheated yourself out of a wealth of information. The earlier sections include the ‘tricks of the trade’. This is a short cut to being an experienced stitcher without spending years to actually become one.
Daffodils
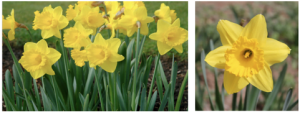
The bright yellow of King Alfred Daffodils makes them the most familiar variety of the daffodils. As our goal is to create plants and flowers that are instantly recognizable, we will stitch bright yellow daffodils. Note that a daffodil has long straight leaves and stalks, and that the flowers have six petals and a trumpet. We will stitch them frontal view for now. Later, we will return to daffodils and add curved and bent leaves and the flowers in side view. See Basic stitches for stitching techniques.
Green: 320, 987, 989, 895. Yellow: 444, or 307, or 973. Gold: 972.
Leaves and Stalks (fig. 1 below): Use 2 threads each of 320 and 987 and 1 thread each of 989 and 895. These 6 threads of green are now stranded and mixed and make a blend of greens more like daffodil leaves and stalks than any one of them would be if used on its own. Stitch a few Straight stitches to indicate some stalks. The stalks need to be in proportion to the flowers and are about 1″ long in the sample pictured below. Start in the centre and stitch stalks first towards one side and then stitch the other side. Take the short cut between the stalks on the reverse of the fabric as in the diagram (this is the procedure for all the stalks for every plant). Store that thread by bringing it to the front of the fabric a short distance away.
Refer to Basic Stitches for directions and stitched examples for daffodil stalks, leaves and flowers.
Flowers : Four threads of any of the yellow threads, stranded but unmixed, to stitch the flowers.
Triangle Stitch: Stitch the inside triangle first with stitches about ¼” long (Fig. 2). Add the second and third triangles outside the first one (Fig. 3). Overstitch a Reverse Triangle the same size as the last triangle (Fig. 4). Note that the points of the reverse triangles are midway along the sides of the first triangles. Increase or decrease the number of the triangles to alter the size of the flower.
(Overstitch – stitch on top of previous stitching). Stitch a few flowers at the top of the stalks (Fig. 6). Store that thread and retrieve the green one. Add some more stalks to your plant or group of plants. Then, retrieve the yellow thread and add more flowers. Continue until you have enough flowers to please you. Using the same green thread, add more Straight stitches to fill out the plant with leaves. The leaves of daffodils grow taller than the flowers. Add a few short Straight stitches above the flowers to indicate this. Add more Straight stitches to fill out the plant with leaves.
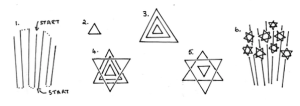
These diagrams make stitching Daffodils look difficult. It is not. Just place Straight stitches as indicated and you will have no problem. It does take a little practice to make the flower the size and shape you wish, but that is why you have tried them first on your sampler.
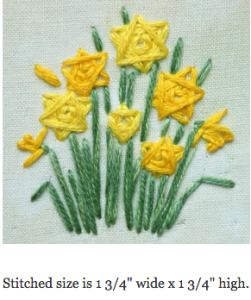
Centres: Gold 972 using 1 or 2 threads.
Overstitch a small reverse triangle in gold thread for the trumpet of the daffodil (Fig. 5). You can stitch them as diagrammed here or look at the flowers on the cover photo for an alternative. Your sampler does not have to be a completed work of art. Stitch enough of each plant and flower so that you know how the stitches work, the length of stalks and leaves, how the flowers are created, and how their size can be altered.
Once you know this flower, move on to the next plant, Narcissi.
Magnolia Blossom
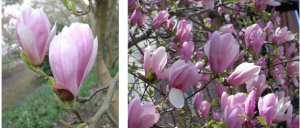
Ancestors of the magnolia tree have been on earth for millions of years. They even predate bees and were pollinated by beetles, which continues to this day. They can live for 100 years and are popular almost everywhere for their blossom, perfume, and shade. They are shallow rooters and can be relocated if they are not too old. The opportunity to do the research on all these plants and trees has been one of the pleasures of this enterprise.
Trunk and branches: Follow the directions for bare trees and branches including the thread numbers.
Blossoms: Cream 746, 3865. Pink 3350.
Place magnolia buds on the branches using Detached Chain stitches, making sure that the buds connect with the branches. Some of the buds can be a little crooked as you can see. The dark pink part of the bud is a short Straight stitch entirely within the Chain stitch or a longer one that overstitches the catch stitch and connects the bud to the branch. Refer to Basic Stitches for more information on this.
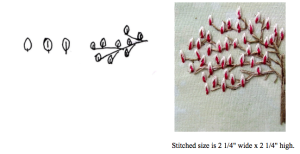
Mix the 2 shades of cream thread together to form a blend consisting of 3 threads. Place Detached Chain stitches on the branches of the tree using that cream thread. The catch stitch should blend with the branch or twig. Using a short Straight stitch, place a dark pink stitch (3 threads) within the cream stitch. Alternatively, place the Straight stitch so that it fills the central space and also overstitches the catch stitch. Refer to Basic Stitches, item 6.
CONTENTS
Preparation is Important
Pages 1 – 18
Supply list, Fabric Preparation, Straight of grain, Bonding front and backing fabric together.
Frames and mounting fabric on a frame, Tools, Threads: Stranding, Mixing and Saving,
Needles, Threading the needle, Knots, Starting and finishing threads.
Tips for tightening fabric tension and supporting the frame on a table.
Stitches: Basic and Adapted and The Essential Sampler
Pages 19 – 28
Straight stitch, French Knots, Detached Chain stitch and Buttonhole stitch.
The Essential Sampler.
Growing Spring Flowers
Pages 29 – 72
Daffodils, Narcissi, Snowdrops, Crocus, Muscari or Grape Hyacinths,
Bluebells, Tulips, Iris – Tall, Dwarf Iris, Forget-me-nots, Hyacinths, Aconites,
Primulas, English Primrose, Star of Bethlehem, Pasque Flower or Prairie Crocus,
Crown Imperial Fritillaria, Dandelions, Daffodils side view, Concealed stitching,
Forsythia Hedge or Bush.
Trees: Bare Branches, Distorted Straight stitch, Blossom Trees, Magnolia Blossom.
Planning and Stitching Your Garden or How to Get There From Here
Pages 73 – 86
Planning Your Garden, Stitching Your Garden, Helpful hints, Broiderers Gardens,
Finished but Dissatisfied, Learning goals You Have Achieved,
One is never too young to start stitching.
Suggestions for other Projects and More Gardens Pages 87 – 100
Name Tags, Artist Trading Cards, One Black Sheep, Happy Valentines Day,
Greeting Cards, More Gardens, Mobile Phone Covers.
The Cover Story: Come Stitch with Me Pages 101 – 110
Planning, colours, part finished, changing plans and completed.
Mounting your Stitching on Foam Core Board
Pages 111 – 118
Removing staples and thumb tacks, Cutting the board, Covering with felt, Centreing, Lacing,
Mitreing the corners and completing, Framing.
Finally!
Pages 119 – 126
Research needed for other plants, Charts, colours, threads, Other Fabrics for Backgrounds, Teachers and Group Leaders
Charts
Pages 127 – 135
Thread Colour Conversion Chart Blank Planning Chart,
Completed Planning Chart for Daffodils.
Leave a Reply