Stitch leather down securely and almost invisibly. This is not difficult – it just takes a bit of know-how.
For leather without padding: Trace the shape onto the reverse side of the leather using a ball point pen or, preferably, a fine black ink marker. If it is white or a light colour, use a pencil. If it is an irregular shape, take care to not get the pattern reversed during this process. Use sharp scissors and cut right on the marked line. Check the cut out piece on the right side for any bumps or nicks along the edge. If it is a straight line use a metal ruler and a quilting fabric cutter or exacto knife.

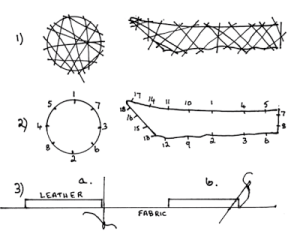
Lay the piece of leather in position and attach it to the fabric background with long stitches over the top of the leather. These stitches go from top to bottom and from side to side and securely attach the leather in its correct position so that it will not shift while being stitched. Use dressmaking thread. Diagram 1: The piece of leather in the shape of a row boat for instance is just to show how to apply leather that is an odd shape. It would be preferable to stitch 1 and 2 at the centre first and then the stern and then the prow and come back and add some more in between. Odd shapes need some forethought.
Attach the leather piece to the fabric permanently as follows. Take a longish piece of thread that matches the colour of the leather. Wax it for strength. I use Gutermann’s Polyester Thread in that the thread is fine in diameter and strong. All Purpose thread is OK too but it does need to be fine. Thread it into as fine a needle as possible – hopefully a Crewel size 9 or 10. Place a stitch at the centre top of the piece of leather, then at the centre bottom, next, midway down the right hand side and then, midway down the left hand side. Diagram 2: The basting threads are all still in place at this time but are no longer shown in the diagram. Guttermann’s thread is fine for our use but we are not working on commissioned projects which are meant to last hundreds of years.
Bring the needle to the front of the fabric immediately outside the leather with the needle vertically straight. Diagram 3a..
To take the stitch through the leather from the front of the leather, position your needle on a diagonal as close to the edge of the leather as you are able to enter and still secure it. The angle of the needle means that the stitch on the surface is very short and becomes much longer as it goes through the leather to the underside and through the fabric. This is what fixes it securely and almost invisibly. Diagram 3b.
The next four stitches are placed midway between the previous four stitches, And the next eight stitches are midway between the all the previous ones. This will prevent the leather rotating and skewing itself out of position. Continue placing some stitches in each of the spaces and proceed around the leather in a clockwise direction. Remove the basting threads as they get in your way.
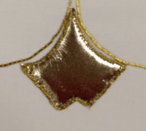
The stitches should be about 1/8″ to 1/4″ apart. Watch that there are no humps in the edge of the leather which means that your stitch spacing is too far apart. Remember, with every stitch that your needle enters the leather diagonally; short on top and long as it gets to the lower surface of the leather and through the fabric. If the earlier stitch, number 2 on the diagram for instance, is not in the right place, snip it out and replace with a more correctly placed stitch. Marsha did a perfect job of applying this piece of leather including getting the points sharp. It is padded.

Padded leather: Use felt of an appropriate colour such as gold or yellow. Decide on how many layers of padding is appropriate. One layer stops it looking flat. Two layers gives it a contour. Three layers is a definite protrusion and four makes it high rise. Cut out two or more patterns of the shape in paper. Use one pattern to cut the correct shapes in felt. The largest is a almost the full size of the shape. The second and third ones are each smaller and the last one is a lot smaller. Lay them in position in sequence, smallest first to largest and check that they will pile up on top of each other and finish up the correct size and shape for the padding. Stitch the smallest one down first with one or two stitches, The second and third layers need enough stithes to secure them accurately without moving. The largest one should be stitched in position following the directions above making sure that the edges are just within the marked line of the shape. Trim if necessary..
The leather: Using the second paper pattern piece, draw around the pattern on the reverse side of the leather as above. Cut it out leaving 1/4″ all around. Lay it in place and check the exact finished size you will need. Usually, cutting just outside the marked line edge of the marked line obtains an accurate size but you may need to cut it slightly larger than that. See above on how to stitch in place. It is essential to baste the leather in place first with the long vertical and horizontal stitches.

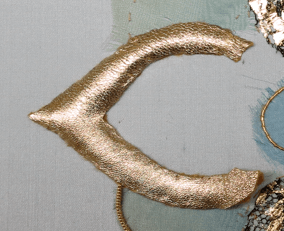
Gail has attached gold leather to this complex shape very well. It is highly padded. She left the points on the right to last and then trimmed them to fit. This design has four of these golden horseshoes and each of then should look identical – which they do.

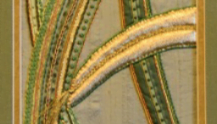
Frances did something quite different with the leather. She applied two sets of padding leaving the vein area unpadded. She cut the leather wider than you would think normal, basted it into position and then stitched through the central vein with a back stitching. She then followed these directions and trimmed the leather as and where necessary while stitching it in place.
This method is also appropriate for fabric applique especially when it is padded.
Wishing you happy stitching. As always, Ann B.
To Diane Cadd – Bunka is a Japanese method of hooking thread through fabric. The kits and supplies come from Japan.
Leave a Reply