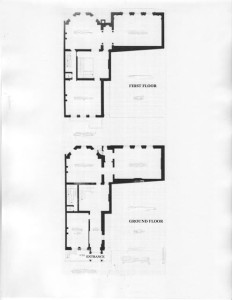
It is more than time to return to my account of being a student in the 1950s at the Royal School of Needlework. Part Two is dated March 25, 2013 and available for you to establish continuity.
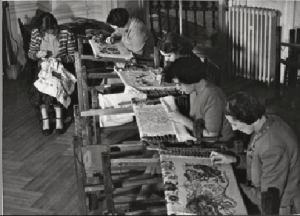
On Friday, April 6, 1951, The Times Educational Supplement published a full page article called the Tradition of “Opus Anglicanum”. After a brief historical review, the article continues to describe the syllabus and experience of the course and then mentions employment opportunities. A press photographer took some photos and three were published. This first photo was not one of those published but is the only one that I have in my possession. Efforts to obtain better quality prints of the others have been unsuccessful so we have done the best we could with a scan of a 60 year old newspaper page.
Royal School of Needlework
This first photo was staged and is thus not a realistic scene. For instance, we did not sit in a row. The first stitcher on the right and the furthest stitcher were older and had started a few months before the other three of us. This is evident in that they are working on the third sampler which was Crewel work. The nearer of the two young ladies stitching their second sampler is Gillian Cox and to her right is Carmel Leibster. The student stitching the sampler loose in her hand is me. And no, I do not recognize myself either! Both Gillian and Carmel are stitching on their own frames while I was given the work of an unidentified student to give the photos more variety. In reality, I was at that time stitching the same sampler as Gillian and Carmel. And we all hated that tedious piece of applique on which we learned to stitch accurately and with totally even spacing. And we also learned to stitch fast. If you watch the videos made by Erica Wilson, you will see how quickly she works. Note that our trestles (or easels) are ancient. We stitched with our work covered (like a surgeon) and not uncovered as is indicated. Carmel’s protective cloths are folded and hanging on her trestle. Gillian has hers protecting the edge closest to her which is the part most likely to be snagged by leaning on it. Old white cotton sheeting is ideal for protection cloths. It does not need to have finished edges but it is desirable to launder them occasionally. Gillian now lives in the eastern USA, I am in Canada while Carmel remained in London. The parquet floor and panelled wall are original but the hot water radiator is probably a more recent addition as the house was built in the 1850s.
Royal School of Needlework Classroom
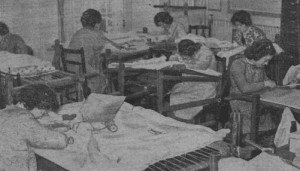
This is a general view of the classroom. Note that the students are sitting in a random manner, the normal layout. What is not normal and staged for the photographer is that the frames are uncovered. The student on the left is stitching on her goldwork sampler. Note how much larger is the frame and fabric when compared with our beginner samplers. Many types of embroidery can be rolled around the roller bar using extra fabric for padding and protection. Because of the padding within the motives and the desirability of not disturbing the gold thread in any way it is not possible to do this with goldwork hence the frame gets larger and larger.
Royal School of Needlework Student Working
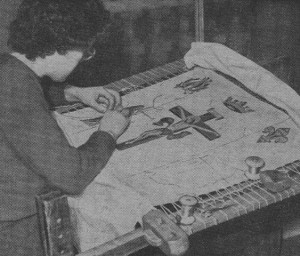
A closer view of the student working on her goldwork sampler. All students first stitched the three emblems at the top – a pomegranate, crown and fleur de lys. The remaining three to six items on the sampler were our own design. This was a third year project and demanded a lot of time and skill to complete the technically demanding designs that we were inspired to create. Note the size of the frame and fabric when compared with our beginner samplers. She would have stitched the upper three motives with the extra fabric rolled onto the roller bar at the base of project. Having completed these, the fabric would have been unrolled giving access to the middle of the design. When that was completed she would have unrolled the rest of the design. Many types of completed embroidery can be rolled around the roller bar using extra fabric (such as sheeting) for padding and protection. It is not possible to do this with goldwork hence the frame gets larger and larger. Notice, too, that she has two spools of gold thread. Japanese gold is couched down in pairs. Having two spools means that the twist on both threads is the same allowing the gold thread to reflect light in the same way. As goldwork is all about light reflection this is the correct way to do this and it does make a difference to the finished piece. It would appear that she has included some silk shading in this dramatic and ambitious piece. I wish I knew her name.
Goldwork or Metal Thread Embroidery as it is often called, is a wonderful medium in which to work and I am glad that I had just enough time to include this in my studies. I do have my sampler but it is simple compared with the one in this photograph. I had three weeks to complete the whole thing before leaving to move on to college. It had to be simple and manageable in terms of the number of stitches needed. I love teaching goldwork though my students are encouraged to choose designs that are more contemporary than traditional. Even so, we all continue to use the techniques and skills that have been used since medieval times and even before. Goldwork had reached a high standard of technical expertise several centuries ago as is evident in Opus Anglicanum found in the Syon Cope and other works located in such places as Durham Cathedral and museums.
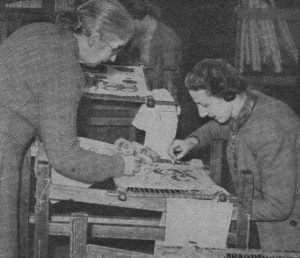
Royal School of Needlework Teacher and Student
Our principal and senior teacher was Marguerite Randell. She is indicating a detail to the student who is one of our two older stitchers. Note that the protection cloths are hanging on her trestle and that she is stitching with one hand on the top surface and one underneath. Stitching this way is how the professionals do it and it helps with speed and accomplishing the project in a cost effective manner.
Marguerite Randell (1881 – 1955) was a superb teacher. She wrote three very detailed books on stitching: Simple Embroidery, More Simple Embroidery and Plain Sewing. All were published by Cassell and Company, Limited. These small, thin books contain a mass of information with detailed and accurate diagrams. I recommend them to serious stitchers for whom accurate information is more important than beautiful colour photography. I have originals but they have been reprinted and are available through AbeBooks.com. 1952 was her last year of teaching after which she worked in the workroom on commission pieces. She seemed very elderly to us young ones and she certainly did work long after normal retirement age. She was a gentle and gracious lady who knew exactly how to do everything. Erica Wilson acknowledged her as “my first teacher, who knew more about needlework than anyone I’ve ever known – the late Marguerite Randell”.
Both Gillian Cox and myself echo this sentiment wholeheartedly.