Stitching Idyllic

Stitching Idyllic by Ann Bernard

  • Home
  • Blog
  • Spring Flowers
  • Summer Flowers
  • About Ann

03/09/2018 by Ann Bernard

One simple thing – done by one person at a time………

Sometimes it is difficult to understand the power of one person living in a world of billions of others. Here’s a little exercise to help. Take a moment to think about the breadth and depth of the environmental disasters we face today. Think about the air pollution and the health effects we experience when we breathe that air. Think about the serious water issues we face: the pollution, the scarcity, the looming wars over water. Think about the deteriorating soil quality, the dying oceans, the endangered wildlife, the increasing occurrences of wild fires that each year are more severe than the last. And think about the critical issue of global warming and its ramifications for everyone and everything around the world.

Now think about this: Every one of these problems has been created by us humans over a relatively short period of time. By “us” I don’t mean large groups or global populations acting in concert. This disaster has been created by individuals acting independently. By “us” I am referring to you, me, our spouses, each of our children, our grandfathers, our grandmothers, our cousins . . . Our current crisis was created by each of us acting independently and establishing a personal and professional lifestyle that was environmentally deaf, dumb and blind.

[do_widget id=arpw-widget-2]

The needed coordination between governments and industry to turn this crisis around will never succeed if we as individuals don’t join in the efforts. If the same number of individuals who created the problem focused on what they need to do on the personal level to live an environmentally conscious life, we could turn the global problems around in an amazingly short time. I believe in the power of the individual and I believe in the importance of our acting responsibly as individuals without waiting for the right leader or group. In actuality, it’s the power of the individual that leads the way.

Now imagine what we individuals could accomplish if we teamed up with the greatest authority in the field of balance — nature — to help us personally to make the best decisions for improving our lives and our planet.

Reprinted with the permission of Machaelle Wright of Perelandra-ltd.com

29/08/2018 by Ann Bernard

More Summer Flowers – a Second Peek

Lavender  Lavender is featured in Water Garden and Briarwood Garden.

Lavender is a bushy plant with long, delicate stems and leaves. The blue/mauve flowers form long spikes with a knobby  texture. It looks to be related to Veronica but the structure and colour of the leaves are different.

Stalks and Leaves: Green 988 (2).

Flowers: Blue/Mauve 340 (1) + 210 (1) = 2.

Stalks: Stitch some stalks in Straight Stitch adding a few shorter straight stitches as leaves to fill out the base of the plant. Add some flowers to the stalks. Create bends or curves in the stalks by displacing the stalk to one side with the point of an awl or with another needle. This is done while the flower spikes are being stitched. Add until a lavender bush of the size and shape you wish is achieved.

Flowers: Use one thread each of the blue and light mauve. Stitch with Open Herringbone stitch. Start at the upper end of the stalk and cover the desired length of the stem. Note that the stitching is narrow in width and that the stem forms padding for the flower spike. Start stitching  just above the tip of the stem, or start slightly below the tip for a flower spike that is not yet fully open.

Water Garden, stitched by Ann Bernard (original is 4″ x 6″)

This garden  includes both Lavender and Veronica. These two plants are visually similar except for the colour of the blooms. Also, the leaves are different in both form and colour.  Start by stitching the green stalks and leaves of all the plants you wish to include in your garden. Leave the threads posted to the spare cloth border so that you can recapture the thread and add or make alterations easily. When you are satisfied on the placement in terms of position and balance, return to each group and complete the basic stalks and leaves.

The directions for stitching Alyssum are included in the book.  The plants need a base of green stitching behind the french knot flowers.

Contents:  Hand Stitch Recognizable Summer Flowers

Fabrics for your Garden: Batik, dyed fabric, photo print, paint the fabric, silk and wool rovings, silk fusion, machine embellishing, machine pieced quilting.

Backing fabric and back-basting : Straight of grain: Supporting your frame.

Frames: Dressing Your Frame: Staples, thumbtacks, Q-Snap Frames, Grip-n-Stitch Frames. Ring or hoop frames. Supporting your frame on a table

Threads: Stranding, Stripping, Mixing and Saving. Threading your needle, thread management, Resources such as Google, DMC  Thread Colour Cards, Tools.

Stitch Directions: Split, overstitching, seeding, stem, detached chain, enhanced chain, fly, feather, cretan, herringbone, woven spider web wheels, french knots.

Summer Garden Flowers:

Border Plants: Alyssum, dandelions, impatiens, lily of the valley, portulaca.

Daisy Family of Plants Stitch directions: Asters, black eyed susans, cosmos, english daisies, purple coneflower, pyrethrums, shasta daisies.

South African Daisies: Gazanias, gerbera daisies, osteospermum.

Herringbone Flowers: Delphiniums, lavender, liatris, veronica.

[do_widget id=arpw-widget-2]

Roses – Stitched with bullion knots, woven spider web wheels, stem stitch.

Tall Plants: Double Hollyhocks, lupins, peonies, sunflowers.

Small Projects: Coasters, card inserts. Distorted straight stitch.

Cover Story: Come Stitch With Me:

Silk Flower Conversion: Technique; Clematis, hibiscus, single hollyhocks, petunias, leaves.

Funtasy Flowers: Poppies, and creating. Coasters.

Mounting Your Garden Ready For Framing:

This book is published as an ebook.  Commercial colour printing is expensive and there are a huge number of colour photos and diagrams.  An ebook makes the price affordable.  You can print it on your printer for your own personal use.  Priced at $12.99, this is a bargain and the information included makes it a good investment for both experienced and new stitchers.

Go to eBookIt.com.  Bookstore is at the top of the home page.  Go down to Crafts and Hobbies, Select and proceed to Purchase.  Select the format that is compatible with your computer.  You can also download it onto a tablet or iPad.

If you have any problems with purchase or downloading, email ryan@ebookit.com

I hope that you enjoy this book, use the preparation strategies and try out the flowers.

Nothing, particularly stitching, is very difficult once you know how!!!

Thank you,  Ann B.

28/08/2018 by Ann Bernard

Summer Garden Flowers – Take a Peek

Hello Friends and Fellow Stitchers,

Lazy Daisy stitches and French Knots have been used forever for portraying flowers.  Using alternative but basic stitches was my mission when I developed and then published Hand Stitching Recognizable Summer Flowers.  After much experimentation and, many failures, here are the results.  You will not have to do what I had to do.  You can pick up your needle, the correct coloured thread and stitch up any of the flowers in this book knowing that the result will be as pictured or, your own personal interpretation of the information.   I am  including one if the 23 flowers in this ebook as more is content overload for one entry.

Purple Coneflower

The Purple Coneflower grows in clumps and reaches a height between 2′ and 4′. It blooms from mid summer into the autumn. Each flower opens with pink/purple petals and a flat center similar to a Shasta Daisy. As the flower ages and the seeds in the center ripen, the petals droop down to become vertical and the center becomes larger and domed, eventually becoming cone shaped. One plant can have many flowers in different stages of development. The birds and bees love this plant.

Stalks: Green 987 (6).   Leaves: Green 702 (2) + 988 (1) + 987 (1) = 4.

Petals: Pink 3609 (2), 3608 (3), 3607 (1). Explained in Petal directions.

Centers: Brown 433 (1) + 938 (1) = 2.Orange 721 (1 doubled in the needle) = 2

Stalks: Using long Straight stitch the stalks of the plant.  Indicate the centers of each of the flowers with a small Cross stitch in either of the two brown threads.

Petals: Stitch a few Straight stitch petals in each bloom using 3609 (2). Add more petals using 3608 (3). Note that the petals are uneven in length and that the petals can be darker towards the center of the flower. You can Overstitch the base of the petals with one thread of 3607 but this is not essential.

Centers: 433 (1) + 938 (1) + 721 (1) = 3. Overstitch a few horizontal Straight Stitches across the central brown Cross Stitch. Using 721(1) doubled in the needle = 2, Overstitch a few French Knots on the centers using a fine needle for this such as a Crewel 9 or 10.

Leaves: 702 (2) + 987 (1) + 988 (1) = 4.

Detached Chain stitch with the catch stitch towards the stalks of the plant. The upper leaves are stitched with 702 (2) + 988 (1) = 3. The foliage on this plant is fairly dense with the leaves being an oval with a point at the tip of the leaf.

The angles of the leaves vary considerably.

                               Stitched size is 2″ wide x 2 1/4″ high.

Briarwood Garden, stitched by Janet Sunderani (original is 6 1/2″ x 5 1/2″)

Briarwood Garden

This delightful garden reminded Janet of, and is named after, the garden she had to leave behind when the little used road next to her property became a four lane highway. All that noise would not suit this peaceful scene.

The background fabric was created using loose silk threads that were machine needle felted into a scrim background.  We generally used pale green batik cotton fabric for the backgrounds which is easy to stitch on. We also used photo prints on fabric for many of the gardens.  The directions on how to do this are included in the book.

The flowers in the above garden are Purple Coneflowers, Black Eyed Susan, Lavender and Roses.  You will find them all in the book Hand Stitch Recognizable Summer Flowers.    eBookIt.com   Go to Bookstore – Crafts and Hobbies and select this book and/or Spring Flowers.  Choose your download method and then go to purchase.  eBook format makes these books very affordable.

Learning by trial and error can be missed experience by those who follow the information in the section on preparation of fabric and threads.  Few embroidery texts include all this information which is why I included it. The assumption is that everyone already knows the whys and hows which is not always true.   You will jump ahead in embroidery skills and be delighted with improved results when you follow the directions that are included in both these books.  Knowing exactly how to do things can make learning the skill of embroidery enjoyable rather stressful.

Tune in tomorrow for the second part of this posting.

13/08/2018 by Ann Bernard

Stamford Bridge Tapestry Project 1066- updated.

Here is a new video that updates us on the progress made to the Stamford Bridge Tapestry.  I wrote about this project a few months ago.  The video will tell you and show you the embroidery in progress. Here is a repeat of  the historical background.

1066 was a bad year for England.  Very bad in fact.  King Edward the Confessor died in January.  There were three contenders to the throne of England which, at that time, was a prosperous agricultural country.  First, there was Duke William of Normandy to whom King Edward had promised the throne.  Secondly, there was King Hadrada of Norway who was a Viking and was eager to increase his territory.  Thirdly, there was Duke Harold of England who was a statesman for King Edward.  He had no royal blood in him but had run the country for many years.

In Duke Harold’s travels as chronicled in the Bayeux Tapestry, he vowed allegiance to Duke William and said that he would not make a claim to the throne in England.  Well; that was famous last words.  No sooner had King Edward died than Harold did just that.

It was a summer of unrest in England.  Duke William  in Normandy prepared an army and fleet to invade England and claim his throne.  He was ready to invade but had to wait for the tides and winds to be right.

In England, Duke/King Harold also prepared for battle.  They both waited. It also happened to be a very hot summer,

In Norway, King Hadrada of the Vikings took advantage of the weather and tides which happened to be favourable for him.  In early September, he landed on the Yorkshire coast and invaded the city of York and fought the English/Saxon army at the Battle of Fulford Bridge.  The Vikings won. This historical event has been recorded in the Battle of Fulford Bridge Tapestry.

The Norwegian/Viking army withdrew to the area of Stamford Bridge which is east of York. They were resting before proceeding to London to claim the throne for their king.  King Hadrada was abetted in this by one Duke Harold’s brothers.

Duke/King Harold was waiting in Sussex for the Norman invasion.  Upon hearing of the rout at Fulford Bridge, he took some/all of his army and rode north to Yorkshire.  This took him four days – which for the time, transportation available, and road conditions, was an incredible achievement.  The Viking army was taken by surprise.  What followed was the Battle of Stamford Bridge which is now being chronicled in the tapestry. It was a decisive victory for Duke/King Harold.  The Vikings retreated back to Norway and never invaded anywhere again.

The video will show this panel which now completed.

Meanwhile, the Norman army had landed on the coast of Sussex and were  preparing for battle.  This battle, the Battle of Hastings, together with the Norman preparations, are the subject of the Bayeux Tapestry.

Duke William and the Norman army won the the Battle of Hastings. Duke/King Harold and his brothers were killed leaving England without a leader.  Duke William had himself declared King of England and was crowned in the newly built Westminster Abbey.  The English population were not happy about this and only the participating officials were present at his crowning.  There was essential crowd control outside the Abbey.  King William built many fortresses and prisons around England including the Tower of London.

It is possible that, if King Hadrada of Norway had not invaded England and diverted the English/Saxon army north to Yorkshire, that the Normans would not have won the Battle of Hastings and history of the western world would have been different..

Interestingly, King William returned to Normandy and visited England infrequently during his reign.  He had a large number of children whom he married off all over Europe.  It is said that King William’s blood flows in all the royal families of Europe.

Chris Maudsley, videographer, has re-edited and added to the original video.    It is good to see the progress, the stitching up close, how well the colours all blend and contrast and, to hear how much more remains to be done.  It is going to be a fabulous Embroidery that Records History.  I hope that there will be more video updates in the future.

The Stamford Bridge Tapestry Project

Thank you Heater Cawte for posting the video and giving me permission to share it with you.

31/07/2018 by Ann Bernard

Just 70 years young and ready to travel to a museum.

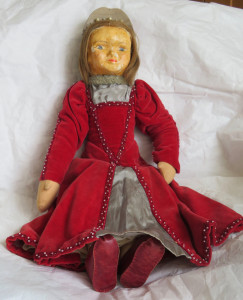
This glamorous young lady was made by myself in 1947/48 when I was about 14/15 years old.  She is 20″ tall/long.  She is sitting down in this photo and is able to sit unsupported.

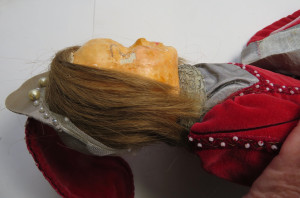
Yes she was a challenge to make as there was a lack of the necessary materials after the end of the war.  The red velvet was from an outgrown dress belonging to my younger sister.  The hair is real and also originated from my sister.  The doll has transparent underwear with red garters.  Her petticoat is in three layers and the hemstitching is so fine I am not able to see how it is stitched at my current age.  Her shoes are red leather decorated with pearl beads.

I created the pattern for her dress and, considering I knew nothing about pattern drafting at the time, I think that it turned out well.  The velvet ribbon edging matches the red velvet of the dress.  It is stitched with pearl beads and gold thread. The gold used to be quite vivid but has faded despite the doll being in storage. There are also pearl beads all up the center back which will open so that the dress can be removed.

I do not remember how I created her head and face but think that I may have used an existing doll’s head and covered it with starched or glued fabric.  It was then painted and varnished.  The whole head has been intact for many decades but has become damaged in very recent years.  It is now sensitive to being handled though the rest of her is strong and undamaged.

[do_widget id=arpw-widget-2]

The body?  I cannot remember how the pattern was created but suspect that it was made by myself. I subsequently made another doll wearing a pale blue dress. That one was from a Dryads pattern using the face and hair they supplied.  I was not enthusiastic about the result and never made another doll. The body fabric of both dolls is closely woven cotton stuffed with kapok. The limbs are jointed and the head of the blue dressed doll rotates.

Your interest and comments are always appreciated.  I look forward to hearing from you.

13/07/2018 by Ann Bernard

Embroideries that Record History – San Diego continued.

We noted that the hillsides around San Diego were arid.  Trees and grass were only in the city as they are dependent on irrigation.  I am sure that the residential areas now spread up the hillsides and that they are no longer as arid as when we saw them.  In November, the weather was lovely.  It was perfect for strolling and I remember that the blouse I wore was suitable both inside and out.  Now, in July 2018, the weather in California is sizzling hot with wildfires burning out of control.  Hopefully, not near San Diego.

The harbor area.

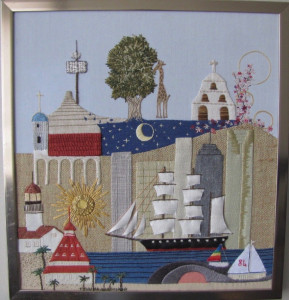
The sun always shines in San Diego.  It is stitched in a sorta Shishka technique with couched yellow sun rays.  The stitches used to add detail to the fabric applique are mostly the basic ones of stem, chain, satin and couching.

The Star of India, built in 1863, is permanently moored in the harbor.  Her hull is electrical tape applied to felt with added red ribbon. The portholes are french knots and the sails are white felt.  I replaced the original white felt sails a few years ago as they had become discolored and detached for their moorings.

On the left side you will see the lighthouse which is north of the city.  Next to it is the Hotel Coronado.  It is a hotel enjoyed by celebrities and many films have been shot on this location.  The central dining hall is octagonal and all wood.  I think that we were able to afford a cup of coffee there.

San Diego boasts a large and sheltered harbor which is the base of the Pacific fleet of the American Navy.  San Diego and Norfolk, Virginia are both naval bases which means to me, that the sun never sets on the American Navy. The grey object in the harbor is either a whale or a submarine and includes the setting sun.

The water in the harbor is stitched in parallel lines of stem stitch in the style of Hokusai, the Japanese artist.  Sailboats enjoy these sheltered waters.  Their sails are made out of morsels of ribbon.  That ribbon was springy and really hard to attach.  The shores of the harbor have great sandy beaches and it is all warm enough for palm trees.  Yes, it is a city I would love to live in, or at least, visit again, especially during the Canadian winter months.

[do_widget id=arpw-widget-2]

The fabric pieces all came from drapery samples.  In those long ago days, interior decorators would give you their out of date sample books.  I have made good use of those small pieces of fabric and continue to do so.

In 1984, I entered this piece into the competition at the Embroiderer’s Association of Canada’s annual Seminar.  It won the Enny Award – that is a piece of stitching in any technique, any color etc voted for by the members.  Even that is 34 years ago!  Where did all this years disappear to?

I hope that you have enjoyed this historical tour of San Diego.  Please share this with friends and family especially those who live in or have been to San Diego.  Corrections of the information included are also welcome.

12/07/2018 by Ann Bernard

Embroideries that Record History – San Diego

This is not a record of an historical event that includes people but rather a “Snapshot in Time” of the beautiful city of San Diego.  In 1983, my husband and I visited this most interesting city.  While there, I found a black and white line drawing poster designed by Chotre and dated 1979.  I knew that it would make a wonderful textile collage.  We spent most of the next few days driving around identifying the buildings in the poster.

Considering that this is a “snapshot” taken 39 years ago, I know that there will have been many changes in the city though the well known buildings will be much the same – I hope.

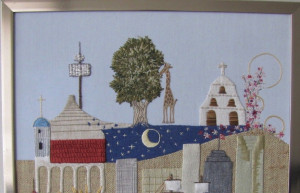
This is a fabric collage and most, but not all of the stitching techniques are applique.  Here is a guided tour of the top half of this time dated presentation of this magnificent city.

Starting at the top right hand corner firstly, there are two items of whose meaning I am uncertain.  The blossoms could be tropical and the yellow circles could be hot air.  The building is Mission San Diego de Alcala which was founded by the Spanish in 1769.  It is the oldest mission building in California as the Spanish gradually moved north from Mexico.

The giraffe is represents the San Diego Zoo.  Eucalyptus trees were imported from Australia.  They were intended to supply wood for railway ties but the wood proved to be unsuitable.  Instead, the leaves fed the koala bears in the zoo. I do not know if giraffes eat eucalyptus leaves.

[do_widget id=arpw-widget-2]

We think the tower is the lookout on the mast of a tuna fishing boat.  The brown roof is that of the Jewish Synagogue.  The Catholic University really does have a light blue dome as is illustrated here.

The five arches and red tiled roof represent the five museums in Balboa Park. The dark blue area, we think, represents the clear night skies where the stars are visible.  Is this the moon or a baseball for the San Padres Baseball team?

The central area includes the downtown skyscrapers. There will be many more of these buildings now. Remember that this was 39 years ago. A snapshot in time.  We enjoyed a wonderful few days there and I treasure the memories.

Please share this with your friends who live in California and know San Diego much better than I do.  I will happily include corrections of this information.

Bottom half of the picture will be posted tomorrow.

26/06/2018 by Ann Bernard

Chloe, an older cousin, is now a University student.

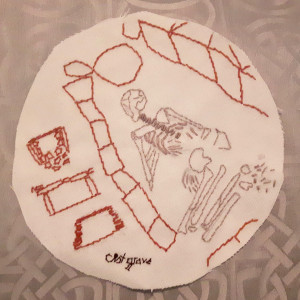
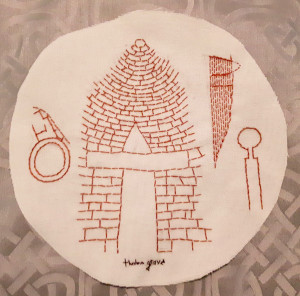
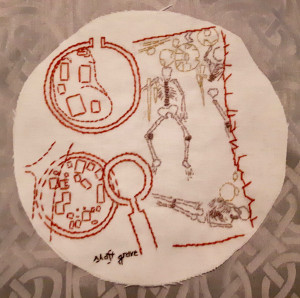
I study Classics and Archaeology at school so the study of burial practices is really important to my field because they’re the best preserved form of material culture that remains for us of ancient peoples and their society. Burials are how people respect and remember their ancestors so studying how they chose to bury their dead allows us to learn about what sorts of things ancient people valued.

This is a creative comparison project between the three main burial practices of Bronze Age Greece. I had the option to pick between writing an essay or a creative project so the choice was an easy one.   hahaha!

(Just thought I would include a little explanation there so it doesn’t seem quite so morbid to stitch skeletons).

[do_widget id=arpw-widget-2]

Grandma Marlene tells me that the professor was very happy with the creative media you chose for this subject.

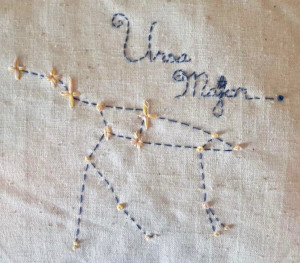
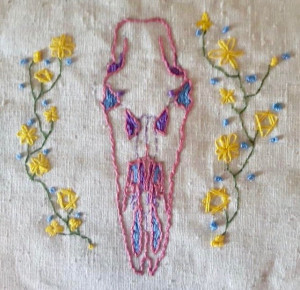
Chloe’s introduction to stitching was a few years ago through Hand Stitch Recognizable Spring Flowers.  As you will see from the examples of her work, spring flowers is not exactly her choice of subject.  She took the information and used it in her own way.  Which is wonderful!  I totally approve of her individual creativity.  Here are some more examples of her work.

The subject matter of these pieces are all very different.  The last one is an animal skull (I think) which is unusual subject for stitching.

Congratulations Chloe.  Your work is different and refreshing.  Best wishes to you from myself and the readers of this blog.  I hope that they will send in comments so that I can relay them to you.

26/06/2018 by Ann Bernard

Catching “The Itch to Stitch” at a very early age.

It is never too young to start a creative career:

In the Northern Hemisphere, summer vacation time will shortly be here.  If you have the opportunity, this is a great time to stitch (thus starting the “itch to stitch”) with the younger members of your family.

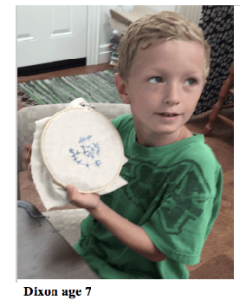
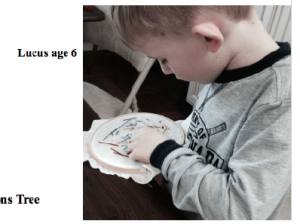
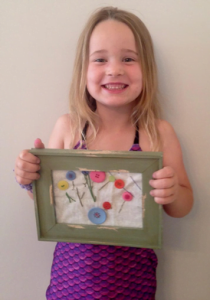
Grandma Marlene definitely had a great time introducing her grandchildren to stitching. The children had fun too and Meghan and Chloe have continued to stitch.

Meghan and Georgina both aged 3

The boys enjoyed it as much as the girls.

Marlene suggests that you prepare for each child a piece of suitable fabric and a 6″ – 8″ hoop.  Cut 30″ lengths (3 pulls from the skein) of several to many colours of Floss.  Thread each of them into a Chenille needle and knot both ends together so that the needle will not come un-threaded during stitching.  Place all the needles in a pincushion and let the children choose the colour they wish to work with.

This is how I caught the “Itch to Stitch”  About the age of 6 years, my grandmother was caring for me.  She provided fabric and threads and I made an eggcosy.  This is like a teacosy but is sized for a soft boiled egg.  When I was old enough to not lose it, she gave it to me.  The embroidery stitching and design were just like those of Marlene’s grandchildren.  At the age of 10 years, an aunt gave me a cushion cover kit.  It was a Jacobean design, good quality fabric, thick Penelope wool thread and instructions.  I stitched it; it turned out OK and won First Prize at the Adult Embroidery Section at Cartmel Fair.  I was hooked!  My father used that cushion for years until it was totally worn out.  Unfortunately, the eggcosy got lost in house moves or you would see a picture of it here.

[do_widget id=arpw-widget-2]

Meghan produced the following piece during her Kindergarten year.

Both she and her teacher were delighted with it.

Mary Corbett of Needlenthread.com is writing a series on embroidery classes for children.  There are three levels, ages 9 – 11,  12 – 13 and 13 – 15 years.  She is teaching the participants specific embroidery stitches.

The next post will show you Chloe’s  stitching career to date.

13/06/2018 by Ann Bernard

Daffodils and Magnolias: Hand Stitch Recognizable Spring Flowers

To give you more of an idea on content, here are two examples of the many individual plants and flowers that are included in this ebook.  After these, you will find the books’  Contents List.  Enjoy!

If you have started reading this book here at Daffodils, you have cheated yourself out of a wealth of information.  The earlier sections include the ‘tricks of the trade’. This is a short cut to being an experienced stitcher without spending years to actually become one.

Daffodils

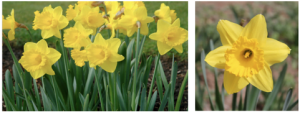
The bright yellow of King Alfred Daffodils makes them the most familiar variety of the daffodils. As our goal is to create plants and flowers that are instantly recognizable, we will stitch bright yellow daffodils. Note that a daffodil has long straight leaves and stalks, and that the flowers have six petals and a trumpet. We will stitch them frontal view for now. Later, we will return to daffodils and add curved and bent leaves and the flowers in side view. See Basic stitches for stitching techniques.

Green: 320, 987, 989, 895. Yellow: 444, or 307, or 973. Gold: 972.

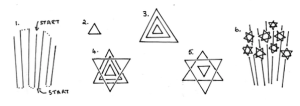
Leaves and Stalks (fig. 1 below): Use 2 threads each of 320 and 987 and 1 thread each of 989 and 895. These 6 threads of green are now stranded and mixed and make a blend of greens more like daffodil leaves and stalks than any one of them would be if used on its own. Stitch a few Straight stitches to indicate some stalks. The stalks need to be in proportion to the flowers and are about 1″ long in the sample pictured below. Start in the centre and stitch stalks first towards one side and then stitch the other side. Take the short cut between the stalks on the reverse of the fabric as in the diagram (this is the procedure for all the stalks for every plant). Store that thread by bringing it to the front of the fabric a short distance away.

Refer to Basic Stitches for directions and stitched examples for daffodil stalks, leaves and flowers.

Flowers : Four threads of any of the yellow threads, stranded but unmixed, to stitch the flowers.

Triangle Stitch: Stitch the inside triangle first with stitches about ¼” long (Fig. 2). Add the second and third triangles outside the first one (Fig. 3). Overstitch a Reverse Triangle the same size as the last triangle (Fig. 4). Note that the points of the reverse triangles are midway along the sides of the first triangles. Increase or decrease the number of the triangles to alter the size of the flower.

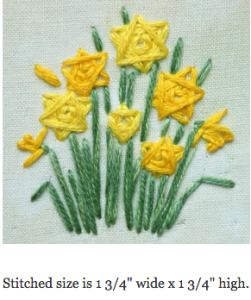
(Overstitch – stitch on top of previous stitching). Stitch a few flowers at the top of the stalks (Fig. 6). Store that thread and retrieve the green one. Add some more stalks to your plant or group of plants. Then, retrieve the yellow thread and add more flowers. Continue until you have enough flowers to please you. Using the same green thread, add more Straight stitches to fill out the plant with leaves. The leaves of daffodils grow taller than the flowers. Add a few short Straight stitches above the flowers to indicate this. Add more Straight stitches to fill out the plant with leaves.

These diagrams make stitching Daffodils look difficult. It is not. Just place Straight stitches as indicated and you will have no problem. It does take a little practice to make the flower the size and shape you wish, but that is why you have tried them first on your sampler.

Centres: Gold 972 using 1 or 2 threads.

Overstitch a small reverse triangle in gold thread for the trumpet of the daffodil (Fig. 5). You can stitch them as diagrammed here or look at the flowers on the cover photo for an alternative. Your sampler does not have to be a completed work of art. Stitch enough of each plant and flower so that you know how the stitches work, the length of stalks and leaves, how the flowers are created, and how their size can be altered.

Once you know this flower, move on to the next plant, Narcissi.

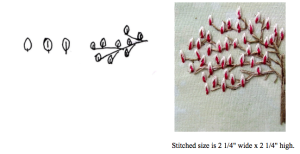
Magnolia Blossom

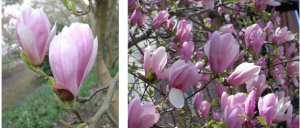
Ancestors of the magnolia tree have been on earth for millions of years. They even predate bees and were pollinated by beetles, which continues to this day. They can live for 100 years and are popular almost everywhere for their blossom, perfume, and shade. They are shallow rooters and can be relocated if they are not too old. The opportunity to do the research on all these plants and trees has been one of the pleasures of this enterprise.

Trunk and branches: Follow the directions for bare trees and branches including the thread numbers.

Blossoms: Cream 746, 3865. Pink 3350.

Place magnolia buds on the branches using Detached Chain stitches, making sure that the buds connect with the branches. Some of the buds can be a little crooked as you can see. The dark pink part of the bud is a short Straight stitch entirely within the Chain stitch or a longer one that overstitches the catch stitch and connects the bud to the branch. Refer to Basic Stitches for more information on this.

Mix the 2 shades of cream thread together to form a blend consisting of 3 threads. Place Detached Chain stitches on the branches of the tree using that cream thread. The catch stitch should blend with the branch or twig. Using a short Straight stitch, place a dark pink stitch (3 threads) within the cream stitch. Alternatively, place the Straight stitch so that it fills the central space and also overstitches the catch stitch. Refer to Basic Stitches, item 6.

CONTENTS

Preparation is Important
Pages 1 – 18
Supply list,  Fabric Preparation, Straight of grain, Bonding front and backing fabric together.
Frames and mounting fabric on a frame, Tools, Threads: Stranding, Mixing and Saving,
Needles, Threading the needle, Knots, Starting and finishing threads.
Tips for tightening fabric tension and supporting the frame on a table.

Stitches: Basic and Adapted and The Essential Sampler      
Pages 19 – 28
Straight stitch, French Knots, Detached Chain stitch and Buttonhole stitch.

The Essential Sampler.
Growing  Spring Flowers
Pages 29 – 72
Daffodils, Narcissi, Snowdrops, Crocus, Muscari or Grape Hyacinths,
Bluebells, Tulips, Iris – Tall, Dwarf Iris, Forget-me-nots, Hyacinths, Aconites,
Primulas, English Primrose, Star of Bethlehem, Pasque Flower or Prairie Crocus,
Crown Imperial Fritillaria, Dandelions, Daffodils side view, Concealed stitching,
Forsythia Hedge or Bush.

Trees: Bare Branches, Distorted Straight stitch, Blossom Trees, Magnolia Blossom.
Planning and Stitching Your Garden or How to Get There From Here
Pages 73 – 86
Planning Your Garden, Stitching Your Garden, Helpful hints, Broiderers Gardens,
Finished but Dissatisfied,  Learning goals You Have Achieved,
One is never too young to start stitching.

[do_widget id=arpw-widget-2]

Suggestions for other Projects and More  Gardens            Pages 87 – 100
Name Tags, Artist Trading Cards, One Black Sheep, Happy Valentines Day,
Greeting Cards, More Gardens, Mobile Phone Covers.

The Cover Story: Come Stitch with Me                                         Pages 101 – 110
Planning, colours, part finished, changing plans and completed.

Mounting your Stitching on Foam Core Board
Pages 111 – 118
Removing staples and thumb tacks, Cutting the board, Covering with felt, Centreing, Lacing,
Mitreing the corners and completing, Framing.

Finally!
Pages 119 – 126
Research needed for other plants, Charts, colours, threads, Other Fabrics for Backgrounds, Teachers and Group  Leaders                           

Charts
Pages 127 – 135
Thread Colour Conversion Chart  Blank Planning Chart,
Completed Planning Chart for Daffodils.

  • « Previous Page
  • 1
  • …
  • 6
  • 7
  • 8
  • 9
  • 10
  • …
  • 17
  • Next Page »

Search

Recent Posts

  • Laid Work – Introduction.
  • How to stitch Snowdrops. Quick and Easy!
  • Inspirations, All Stitched Up! from Australia
  • Newsletter Märchenhaftes Sticken – Jessica Grimm
  • Cotton Quartet 1: Preliminaries & First Stitches

Recent Comments

  • Ann Bernard on Prepare your embroidery for the framers – Mount on Foam Core Board
  • SGibau on Prepare your embroidery for the framers – Mount on Foam Core Board
  • Louise Desmarais on Prepare your embroidery for the framers – Mount on Foam Core Board
  • Katherine & Malcolm Bell on Embroideries that Record History
    Queen Mary’s Carpet
  • Ann Bernard on Embroideries that Record History
    Queen Mary’s Carpet

Pretty Chic Theme By: Pretty Darn Cute Design