I have just finished teaching a class on the Creative Use of Stitches and I promised to share the results with you. The students are all good and enthusiastic textile artists using mostly machine stitching. They wished to know basic hand embroidery stitches and their variations. They did wonderfully well and produced a wide diversity of creative results. I will be featuring their work, with their permission, but will share my own first.
Six classes each featured one or more stitches. I chose to use them for individual samples which meant that, at the conclusion, I had eight samples of totally different size and expression though the colour range was congruent. What to do with them? Some light mauve velvet seemed to be a unifying possibility.

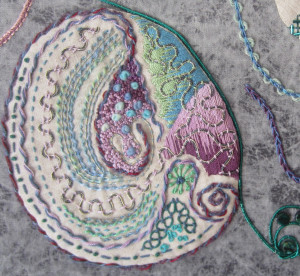
Stitching Class Trial Layout
This is the trial layout. Completed size is 31″ x 19″. And that is large! I had to mount it on my standing frame for assembly and stitching the final stages.
Our first lesson was Running Stitch and its many variations (bottom left). I included French Knots to give the students a nonlinear stitch to include. The Laid Work was added later and is shaded. The fabric for the samplers is dressmakers weight linen backed with an open weave fabric of undetermined fibre.
Threads are mostly DMC Perle 5, DMC Floss and various oddments of thread and wool. Better fabrics such as linen are not easily available in this area and backing fabric such as factory cotton has suddenly become scarce. DMC Floss is available as well as a limited range of DMC Perle. I had to supplement the colour range by ordering from the USA. Rejoice, all you fortunate stitchers who are able to access other and more interesting threads.
Running Stitch
Next was Stem Stitch and its variations. There are fewer variations though this stitch does create beautiful curves and adapts well for closely packed areas. We included Sorbello Stitch which is great for adding texture and interest. The bright turquoise metallic cord is a crafting item useful in this piece because of its colour and its brightness. Couching was one of the included stitches. Much of the time, I pierced the cord with a fine needle and stitched with a cotton dressmaking thread that matched the background. It adapted nicely to curves and loops. In some places, I did more interesting stitches which you will see in following blogs.

Stem Stitch
The next few blogs will continue the analysis of this project and will feature work done my students.


