Stitching Idyllic

Stitching by Ann Bernard

  • Home
  • Blog
  • Spring Flowers
  • Summer Flowers
  • About Ann

January 31, 2019 by Ann Bernard

“If Winter comes, can Spring be far behind”.

This famous quote helps us through the depths of the winter weather.

To help both you and myself, let us anticipate spring.  It is bitterly cold here in southern Ontario.  Today looks lovely but it the cold goes right through even the warmest coat and gets into ones bones.

It is a day to stay indoors and dream of Spring Flowers.

Here are some hand stitched spring flowers which are based on chain stitch.  It is amazing what one can do with the most basic and best known stitches if one plays around with them a little.   One never knows what will happen.  To achieve flowers that are  recognizable it is important that the proportion of plant height and flower size be correct and that the colours of both foliage and the flowers also be correct.  Otherwise, our eyes do not recognize them.  They become generic, rather than specific.

Snowdrops.  Except for celandines, these really are the first flower of spring.  One can have both snow and blooms in the same flower bed. Use a white Perlé thread to give the flowers some sparkle.  In nature, they really do sparkle.

Crocus also bloom in early spring.  DMC floss thread in the correct colours gives us a good rendition of these popular and fragile blooms.  Note that the foliage colour of all three plants is different.

Tulips are both taller and much later in the season.  These flowers bloom in a multitude of different colours.

My good friend, Mary, created card inserts using the instructions for tulips.  I would love to receive such a card for a birthday or to wish me well if I had been sick.  It is such a personal gift to, or from, someone important in ones life.

Enjoy a post from the past

  • The Country Wife Mural 5.
    The centre of the mural is very busy.  I imagine that it is a weekday afternoon and the ladies of …

You will find the instructions on how to stitch these flowers together with the DMC floss colour numbers in this ebook.

Hand Stitch Recognizable Spring Flowers published by ebookit.com

The book contains the instructions for 23 different flowers, bushes and trees.  It also contains, and this is important, information on setting up a frame with fabric that is taut.  Basic, ‘how to stitch’ information is included plus finishing and mounting ones completed work.  As most books assume that everyone knows the basics, they do not cover this vital information.  Because it is not widely know, I have included it in mine.  It saves beginning stitchers falling into  potholes and embroidery is full of them.  The experience is more enjoyable if one knows where the potholes are and is able to avoid them.

The book is published in ebook format because of the high cost of colour printing.  You can print it on your printer for your own personal use.  We have proved many times that the instructions are complete and you will not need other assistance.

Have fun with this and enjoy anticipating Spring.

Ann
ShareTweetGoogle +PinterestPocketMail

January 18, 2014 by Ann Bernard

Berlin Wool Work

The course of research does not always flow smoothly in the intended direction but often leads one to other destinations. But as all endeavours, including embroidery, are influenced by other factors, then one needs to take notice of the other players in the field. One major influence was Leek Embroidery. Another one is Berlin Wool Work.

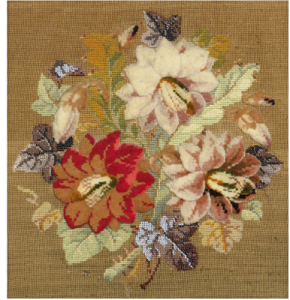
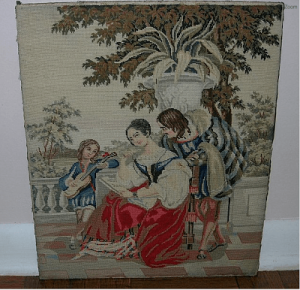
Not surprisingly Berlin Wool Work originated in Germany. It was enormously popular in the first half of the 19th century. Worked on a coarse canvas using a thick wool yarn, it was stitched in tent stitch or cross stitch. Other stitches were used but these predominated. The finished pieces became firescreens, cushions, upholstery, small rugs and pictures and some panels would be joined together to make carpets.

The Industrial Revolution created a larger middle class where more ladies had the leisure time for stitching. The creation of more wealth and more stitchers fostered a demand for canvas, wool and patterns. Public taste for increasing decoration in the home was part of the Victorian lifestyle.

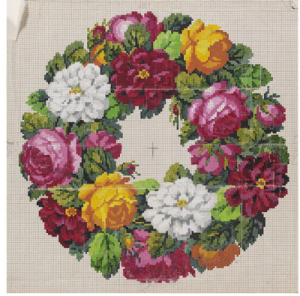
This chart (1825-1850) was hand coloured and is in the collection of the Victoria and Albert Museum in London.

The charts were initially coloured by hand until the printing industry developed the ability to print increasingly large and detailed charts and, eventually, they appeared in colour. The records state that the designers and printers circulated 14,000 different patterns. Although charts were plentiful, there were also hand painted canvases available. The designs were floral but also included animals, pets, children, religious subjects and reproductions of famous paintings.

Another achievement that helped fuel this boom was the invention of analine dyes. This process created wools of vivid colours hitherto unavailable though the range of shades was limited. The wool came from Merino sheep in Saxony, was spun in Gotha, both of which are in southern Germany, and dyed in Berlin. The production of Berlin wools was discontinued in the 1930s. Charts, wools and canvas were exported to Britain and the USA where they also became very popular. In fact, Berlin Wool Work became a craze and basically ousted all other sorts of embroidery in England. Berlin Wool Work was a major interest that kept the stitchers of the western world busy and excluded other styles of embroidery.

As well as tent stitch and/or cross stitch, beading and tufting work could be included. Tufting goes by many names including Turkey Stitch. The loops formed by the stitch are cut and the resulting pile is trimmed to contours and shapes. The sample above contains tent stitch, beading and tufting.

While searching for images to illustrate this style of embroidery I found that many charts still exist but the actual stitched pieces are harder to find. Also, many have become faded and discoloured and are not as visually appealing as are the charts.

Enjoy a post from the past

  • Was anyone else in London on VE Day?
    I was 11 years old.  In May, 1945, my Dad made the long train journey from London to the Lake …

Further information on this subject can be found in books with titles such as Berlin Wool Work and Victorian Canvas Work.

It would appear that this style of embroidery has had a lasting effect on the designs and stitches many enjoy today. I am sure we can all think of examples of types of embroidery influenced by Berlin Wool Work.

ShareTweetGoogle +PinterestPocketMail

November 25, 2013 by Ann Bernard

Dyeing and the Silk Industry During the Late 1800s

This article is an introduction to the next one which will be about Leek Embroidery

Thomas Wardle (1831-1909) of Leek in Staffordshire was an English dye chemist and printer who devoted much of his life to development of the textile printing industry employing both locally woven and imported fabrics. He had widespread interests, considerable energy and solved many problems associated with the dyeing of fabrics making many technological breakthroughs and innovations in the process.

Colour played a defining role in his life. He developed consistency between dye lots, colour fastness and also the variations of shades in colour ranges. His company printed small runs of fabrics using both natural and chemical dyes. He used wood printing blocks and, with over printing, created extra colours.

William Morris was a protégé, business partner and friend. Together they experimented with dyeing and printing using natural dyestuffs. Morris would create a design which was cut into woodblocks and which were used for short run printing. Morris and several other lesser known artists designed for the Arts and Crafts movement which was hugely influential in developing public taste as it moved forward from the tastes of the Victorian era. Prior to this time, the fashion had been for Berlin work where the colours are vibrant but there are few shades within a colour range. A look at the William Morris designs gives you an idea of their complexity, richness, balance and subtlety of colour.

Design Indain Poppy By Wardle & Co

A label reads:

Design Indian Poppy, c 1884-89, based on a woven French silk, Tussur silk cloth hand-woven in India. Block-printed by Wardle & Co, the Hencroft Works, Leek, stitched with Indian tussur silk yarn dyed with natural dyes by T & A Wardle, the Churnet Works. Leek Embroidery Society. (SMDC Collection)

The Wardle Company also dyed textiles for bulk orders such as for the Admiralty. And they dyed hanks of wool for the carpet industry as well as threads for sewing, embroidery and braids. He was the major supplier of printed textiles to Liberty’s on Regent Street as well as to Harrods in Kensington. And he had a store under his own name on Bond Street.

Tussur Silk became a huge part of the life of Thomas Wardle. Tussor Silk is the product of a large, wild silk moth native to India. The fibres are long and this length creates the sheen in the fabric and in the embroidery threads. Although it is a durable fibre, it is beige in colour and resistant to being dyed.

He spent many years experimenting with ways of processing the fabric and dyeing it to produce a jewel toned range of colours. This silk fabric became enormously popular and fashionable in England as well as France. The discarded (short) fibres were used to create Sealcloth, another invention. This fabric was water resistant and in high demand to make coats and cloaks.

Late in his life, he travelled to Kashmir (India) where there was a famine and the silk industry was failing. His knowledge and experience brought changes, revitalizing the industry and providing employment for thousands of Indians and lifting them out of poverty for decades to come.

The long silk fibres were made into embroidery threads with a range of shades within a colour. In 1879, Thomas took some of the threads home and gave them to his wife Elizabeth, an embroiderer, challenging her to find a good use for them.

Enjoy a post from the past

  • Keukenhof Gardens: Inspiration and Interpretation.
    Bev Malcolm is also a member of the Broiderers Group of Guelph.  Bev and her husband visited the Keukenhof Gardens …

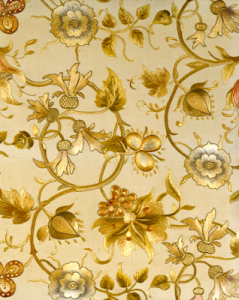
The accompanying photos are examples of Leek Embroidery. The design woven into the fabric was typical for its time. The embroiderer then used the Wardle dyed silk threads to enhance the woven design. Note the lustre of the silk thread and the good condition of the next piece. It is thanks to Joan Landon who had collected and stored it at her home, Sunnycroft (Blog dated September 15, 2013)

References: ISSUU – Who was Thomas Wardle.
Thomas Wardle and Tussur Silk

Thomas Wardle and Tussur Silk

ShareTweetGoogle +PinterestPocketMail

September 9, 2013 by Ann Bernard
Burden Stitch – Part Two: a Tutorial

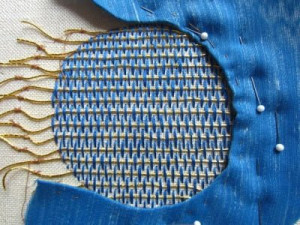
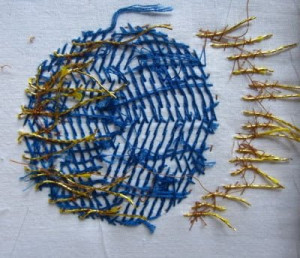
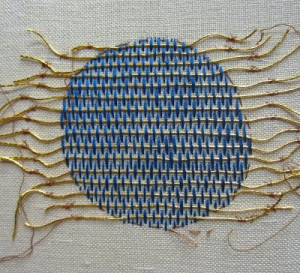
If you are using Burden Stitch as part of a design, you will have already decided on how you plan to complete the surrounding areas. On this sample, which is going nowhere except onto this blog, I had to decide on completion. The decision was a solid blue background around the area on the right and a section without blue fabric on the left.

Burden Stitch Finishing Stages

Burden Stitch Finishing Stages

Burden Stitch Sinking The Thread Ends

Burden Stitch Sinking The Thread Ends

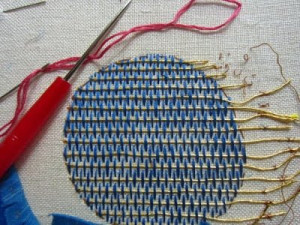
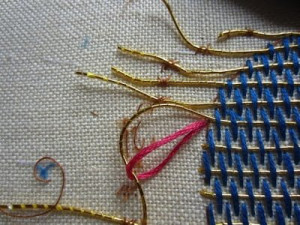
The next step was to sink, or plunge, the ends of gold thread in the left area. Make yourself a lasso using a length of Perle thread or DMC, fold it in half and thread the two thicknesses into the eye of a Chenille or Tapestry needle. Make a hole with your awl in the spot you wish to take the gold thread through to the reverse side of your fabric. The lasso goes into that hole. Place the far end of the gold thread into the loop of the lasso. Gently ease the lasso and the gold thread through to the reverse side of your work. If you catch the gold thread too close to the stitching, it will not go through the fabric smoothly, The gold wrap will get stripped off its core and you will be unhappy with it and probably have to restitch that row.

Burden Stitch Threading the Lasso

Burden Stitch Threading the Lasso

Lassoing /plunging can be useful in other situations. It can be used for starting a thread or finishing cord that is too thick to go though any needle. If you have reached the end of some stitching and the last bit of thread is too short to finish off normally, then lasso it to the reverse side of your embroidery. It can also be useful in weaving threads into the reverse side of your work.

For the covered area on the right, I also lassoed the gold thread but placed the holes away from the edge of the circle where they will be covered by the blue fabric. Then, using a length of dressmaking thread, I whip stitched the ends of these threads to the the backing fabric. I do not always do this but felt that securing them was necessary in order to maintain the correct alignment of the gold thread on the front of the work.

Burden Stitch From The Bottom

Burden Stitch From The Bottom

Next step was to couch a single line of gold thread to the left side of the circle. I tried using one thread of gold with six threads of DMC along side but the DMC has a lower profile and slid under the gold. Unsuccessful and abandoned.

The blue fabric is a sample of drapery fabric from my stash backed with one layer of felt. I trimmed the inner edge of the fabric to about 1/4″ and nicked it so that it would lie flat. Then I pinned it and basted it into position.

Burden Stitch Finished

Burden Stitch Finished

Using one thread of blue, I catch stitched around the inner edge of the blue fabric.

To complete the sample and to secure the blue fabric and felt to the background, I couched two threads of gold as a pair a specified distance from the inner edge. Once again, I used the reverse side of the very helpful business card to help me maintain an even distance from the edge.

And that is that. Completed. I hope that this tutorial has been helpful by taking the mystery out of working with this stitch and by making it simpler and less prone to hazard and unwelcome surprises.

Enjoy a post from the past

  • The Country Wife Mural 2
    Starting at the top left hand corner of the Country Wife, the area is dark but, not empty.  It would …

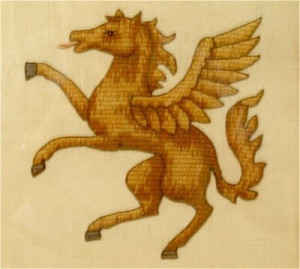
The Flying Horse is stitched in Burden Stitch which is used as a solid filling stitch. It is part of my Metal Thread Sampler from RSN. The photo is not as good as I would have wished because it was taken through glass. The framed sampler is too large and heavy to move easily so we used the available light in our hallway.

Flying Horse Burden Stitch

Flying Horse Burden Stitch

Wishing everyone Happy Stitching.

ShareTweetGoogle +PinterestPocketMail

September 2, 2013 by Ann Bernard

Burden Stitch – Part One: a Tutorial

Burden Stitch is exactly that, a burden to stitch but I think that Burden is meant to be a noun and not an adjective. Barbara Lee Johnson’s recent post on August 13, 2013 of the Couched Oak Leaf is a good example of Burden Stitch stitched on canvas. It is a stitch that can be used either very simply or you can set yourself a challenge. It really is a technique and not a stitch.

Trammed Upright Gobelin Bricking

Trammed Upright Gobelin Bricking

In a nutshell, this is a canvas work stitch called Trammed Upright Gobelin Bricking (Canvas Work by Jennifer Gray, pages 53 – 55). Worked on canvas or on even weave linen is the simplest way to use this stitch. It produces a solid ground cover or an interesting texture. Barbara Lee’s example is an excellent sample of this.

When used on other fabrics, both planing and experimenting in stitch size and spacing is essential.

Number One Hint is to get organized. Back your fabric with a suitable weight of cotton fabric. This helps keep the tensions of your piece of work stable while you stitch and afterwards. It is also handy to for ending threads. I used Japanese Gold thread Number 12 with DMC Floss four threads which I stranded. Reading Mary Corbet’s Blog, I see that it is called Striping. I have never heard this referred to by name and used Stranding instead. By either or both names, separate the six strands of floss thread into single strands and then put them back together. You can mix shades and create your own colours or, this time, use four threads of pure colour: DMC Blue 825.

Having marked your design on the background fabric, Hint Number Two: Baste in some horizontal and vertical lines to create an accurate grid that will help you keep your stitching accurate. This is specially necessary when working on a fabric where threads are not countable. This piece of fabric proved to be even count linen but even in this fabric, the threads vary in size.

Stitching Grid

Stitching Grid

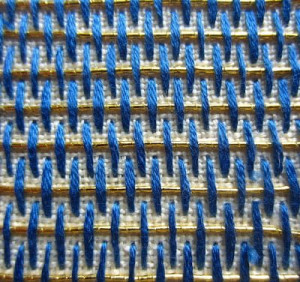
Hint Number Three: Make a decision on the spacing of the couched thread (gold) and the length of the couching stitch. The gold thread is held in place by the spaces between the gold thread and the vertical couching stitches. I made the decision on this demonstration piece to place my vertical stitches four fabric threads apart. The second row of vertical stitches is centred between the previous row; that is, two threads on either side. Leave a tail of gold thread 1″ or even 1 1/2″ at each end of every row. This is necessary for sinking the ends of the gold thread. Any less length will cause you problems.

Spacing The Couched Thread

Spacing The Couched Thread

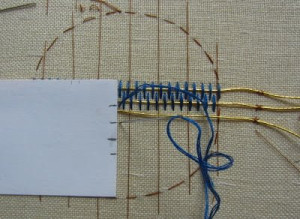
Hint Number Four: Use the blank, reverse side of a business card. Mark the spacing on the edges with a sharp pencil which will help give you the most accurate of templates. A ruler is OK but you will find your self constantly having to not read most of the marks on it. The blank card is a simpler solution.

Mark: a) the spacing between the horizontal gold threads and b) the length of the vertical couching threads.

Mark this spacing on two different edges of the card.

Use it on every row to set the spacing and length of the stitches. This is essential.

The straight edge is handy for checking the alignment of your stitches.

Hint Number Five: Using a length of dressmaking thread, anchor the ends of the gold thread out in another part of the design with some small stitches. This does not have to be totally accurate but it serves to anchor the gold thread leaving you free to focus on the stitching. The waves in the gold will disappear during the completion of this stitch. The gold thread that I used was from someone’s stash. It had been wound on a small spool which made it exceptionally wavy. Japanese Gold Thread usually comes wound on a largish reel like dressmaking thread or as a hank. In this form, it is fairly straight.

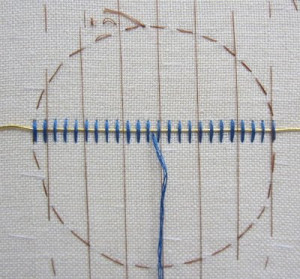
Hint Number Six: Start in the centre of the widest point of the area being stitched. Work to the circumference in one direction and then return and stitch the other half of that row. The first line is by far the hardest to stitch. After that, you just have to follow your planned spacing and keep it all accurate. Use as small a needle as you are able to thread comfortably and insert it into the fabric vertically to establish an accurate stitch as possible. A needle entering the fabric at a slant will not give you the accuracy you need for this stitch.

Stitch From The Middle

Stitch From The Middle

Notice that on the right side, my stitches were off by one thread and I had to take them out.

Stitch Off By One Thread

Stitch Off By One Thread

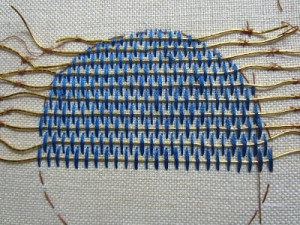
Closeup Of Burden Stitch

Closeup Of Burden Stitch

Hint Number Seven: It is necessary to concentrate on what you are doing. It is totally easy to make an error in stitch placement and it shows up unbelievably clearly. Keep checking yourself and reverse stitch to where you went off course and correct it. Remember to stitch the necessary half and quarter length stitches.

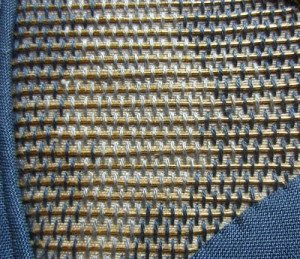
And lastly, a quick look at an example of Burden Stitch in this piece of embroidery that I stitched a few years ago. The shading is not that satisfactory but I wanted to try it.

Burden Stitch

Burden Stitch

Notice the different spacing and threads. That looks to be two strands of DMC Floss.
Burden Stitch would look totally special if stitched with silk thread. It would gleam and not retreat into the background as a texture. It depends on the look you want to achieve as to what threads and spacing you use.

Enjoy a post from the past

  • Meet Adeline Atkins, artist and stitcher. This is a mysterious piece of embroidery.
    Adeline, if I may call her that, rather than Mrs Willian Roseborough, lived in Owen Sound which is a small …

You can use different threads to achieve the result you require. A coloured Perle thread would work well instead of the gold and the couching thread can be anything you choose. You could choose to use beads as the couching thread but be wary. Beads can have a mind of their own and not lie as accurately as you would wish. You may discard a lot of beads in the process. Another possibility is to use Metallic Gilt and cut it into the desired lengths for the vertical stitches. Now that is a way of using this technique that will add grey hairs to your head for sure.

That is all for today. I will complete this demonstration piece in my next Blog Entry.

ShareTweetGoogle +PinterestPocketMail

August 17, 2013 by Ann Bernard

Beryl Dean Panels

One idea or a question from the Blog triggers another Blogwrite.

I found, and would like to share with you, a website devoted to the magnificent panels embroidered by Beryl Dean and now in the care of St. George’s Chapel which is located within the walls of Windsor Castle. I first saw the panels in the ’70s and they were proudly displayed in a side Chapel of the Church. The next time, I was reluctantly allowed to see them after the the caretaker tried to deny their existence. The last time, about 10 years ago, my interest was unwelcome but I got a brief glimpse. The space had become a repository for extra chairs and pieces of furniture. I nearly cried that this had happened to these incredible pieces of ecclesiastical embroidery. On finding the following article on the web, I am relieved to see that they are now properly housed and hung. And treated with the respect they deserve.

The panels are large. A guess would be that they are between 3 and 4 feet wide, and 5 and 6 feet high. The colours are wonderful, and glowing. I think that she used silk threads as well as gold. Photographs do not do these masterpieces justice. I have enlarged the photos in the article but, even so, they only give an indication of their beauty. I do not know if Beryl did all the stitching herself or, if she had help, who else was involved. I wish that I had been one of them. And that says how much I admire them.

If you have a chance to visit Windsor, I heartily recommend that you see the Beryl Dean Panels.

From the College of St. George website:

http://www.stgeorges-windsor.org/about-st-georges/news1/news-archive/2011/beryl-dean-panels.html

2nd August (2011) marks the 100th anniversary of the birth of Beryl Dean. She died in 2001 but her remarkable work lives on at St George’s Chapel and other places in her embroidery and related work.

Between 1969 and 1974 Beryl Dean made five panels to hang in the Rutland chantry, one of the side chapels within St. George’s Chapel. On a background of especially woven linen and lurex she used a variety of techniques such as applique, drawn thread and pulled work. The five panels now hang in a special cabinet in the Ambulatory to protect them from too much light and dust. One panel is always on display and others can be seen on request to the Chapel staff. The work was commissioned by the Friends of St George’s and the Descendants of the Knights of the Garter to mark the Chapel’s quincentenary in 1975.

Enjoy a post from the past

  • Early Jacobean Embroidery Crewel Work Sampler
    Before getting into the Jacobean Embroidery, I thought you would like to see this piece of embroidery. It is labelled …

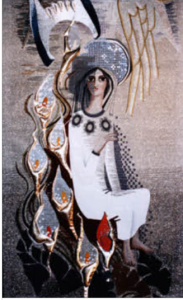
The five panels depict the Annunciation, the Visitation, the Adoration of the Magi, the Temptation in the Wilderness, and the Miracle at Cana.

Annunciation

Annunciation

Visitation

Visitation

Adoration of the Magi

Adoration of the Magi

Temptation in the Wilderness

Temptation in the Wilderness

Miracle at Cana

Miracle at Cana

ShareTweetGoogle +PinterestPocketMail
  • 1
  • 2
  • 3
  • Next Page »

Search the web site

stay up to date. Subscribe to our newsletter!

Name

Email


Connect with us socially

  • Facebook
  • Twitter
  • Instagram
  • Pinterest
  • RSS Feed

Hand Stitch Recognizable Spring Flowers Ebook

Stitching Spring Flowers

Hand Stitch Recognizable Summer Flowers

Stitching Summer Flowers

Recent Posts

  • Inspirations, All Stitched Up! from Australia
  • Newsletter Märchenhaftes Sticken – Jessica Grimm
  • Cotton Quartet 1: Preliminaries & First Stitches
  • Hand and Lock. London Craft Week. May 9 -15 2022
  • LONDON CRAFT WEEK 9 – 15 May 2022. Hand and Lock.

Recent Comments

  • Ann Bernard on September 20, 1066 The Battle of Fulford Gate
  • Mrs M Moverley on September 20, 1066 The Battle of Fulford Gate
  • Kathleen (Kate) Simeri on Stitches Sampler from The Royal School of Needlework
  • Ann Bernard on The Changi Quilts
  • Ann Bernard on Burden Stitch – Part One: a Tutorial

Archives

  • May 2022
  • April 2022
  • March 2021
  • February 2021
  • November 2020
  • October 2020
  • June 2020
  • May 2020
  • April 2020
  • March 2020
  • February 2020
  • January 2020
  • December 2019
  • November 2019
  • October 2019
  • September 2019
  • August 2019
  • July 2019
  • June 2019
  • April 2019
  • February 2019
  • January 2019
  • December 2018
  • November 2018
  • October 2018
  • September 2018
  • August 2018
  • July 2018
  • June 2018
  • May 2018
  • April 2018
  • March 2018
  • February 2018
  • December 2017
  • November 2017
  • July 2017
  • June 2017
  • May 2016
  • February 2016
  • January 2016
  • November 2015
  • June 2015
  • March 2015
  • January 2015
  • December 2014
  • October 2014
  • September 2014
  • May 2014
  • March 2014
  • February 2014
  • January 2014
  • November 2013
  • September 2013
  • August 2013
  • July 2013
  • June 2013
  • May 2013
  • April 2013
  • March 2013
  • February 2013
  • January 2013
  • December 2012
  • November 2012
  • October 2012
  • September 2012

Categories

  • Royal School Of Needlework
  • Stitching Colleagues
  • Stitching Equipment
  • Stitching History
  • Stitching Materials
  • Stitching Techniques
  • Stitching Tutorials
  • Uncategorized

Tag Cloud

Acid Damage And Mounting Canada 150 Chain Stitch Coral Stitch Couched Thread Crewel Designs Cross Stitch East India Company embroidery Jacobean Period Stitching Mary Corbet Masonite Medici Wool Queen Mary RSN Student Shading In Stitching Stem Stitch stitching Water Damage Stitching Worsted Wool Thread

Pretty Chic Theme By: Pretty Darn Cute Design