Stitching Idyllic

Stitching Idyllic by Ann Bernard

  • Home
  • Blog
  • Spring Flowers
  • Summer Flowers
  • About Ann

17/12/2017 by Ann Bernard

Cover for Hand Stitch Recognizable Spring Flowers – 2nd edition.

You may not be aware of the new edition of this book on embroidery as my website has been inactive for much of last year. The timing of this information is to help you with your Christmas shopping. It is a great gift for any stitcher. It contains basic and necessary information from a professional such as; how to thread a needle easily, start and finish threads, set up fabric with a tight tension. There are many tips and strategies to help you enjoy stitching and achieve more professional results. It is also a creative text for those who prefer to do their own thing rather than follow kits and charts.

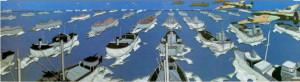
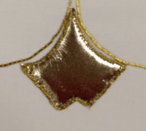
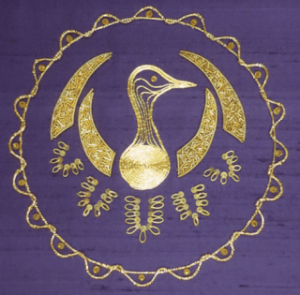
The title is the introduction. With a total of 17 flowers to be included the first consideration was that the cover would not look like a jungle. A definite structure was necessary to keep all the plants/flowers organized.

The outer circle contains the flowers featured in the first book which is no longer available. The inner circle features those that were added for the second edition and are less well known. The bushes and trees are still in the book but are not included in this cover embroidery.

Starting at the top of the outer circle, you will see white snowdrops. To the right are bluebells, primulas and grape hyacinths. Next are narcissi, tulips with hyacinths at the bottom. Following up the left side are tall iris, daffodils, and forget me nots. Lastly are crocus and more hyacinths.

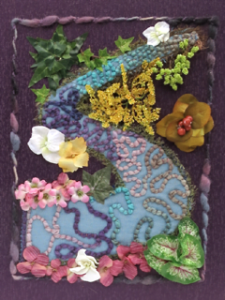
The inner circle of spring flowers are less well known and are new for the 2nd edition. These photos have been enhanced so that you can see the detail of the original and the new flowers more clearly. The colour of the fabric is inaccurate.

At the top there are dark blue and mauve dwarf or rock iris. To the right are some more snowdrops with yellow aconites.

After that blue/mauve, white and pink/mauve pasque flowers or prairie crocus. Next are cream and pale yellow english primroses..

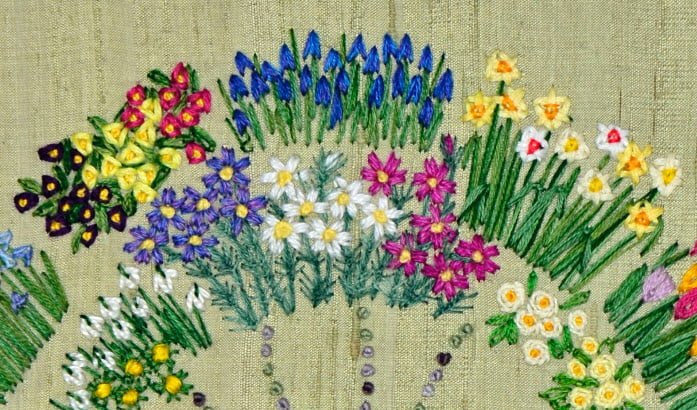
At the lower edge of the inner ring are a wilder variety of primulas in shades of blue followed but more english primroses.

Pink, white and blue star of bethlehem include dandelions growing among them. More snowdrops and aconites complete the inner circle.

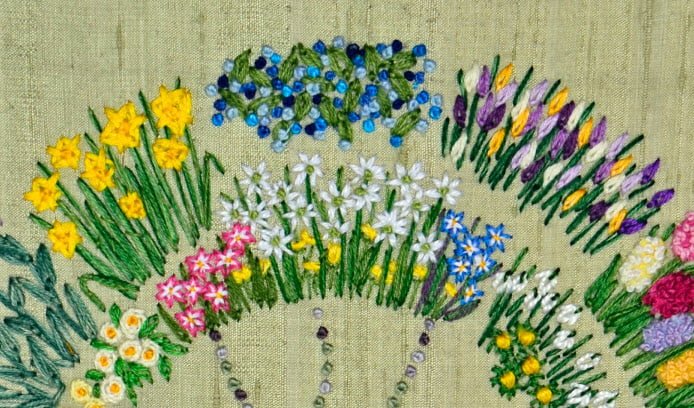
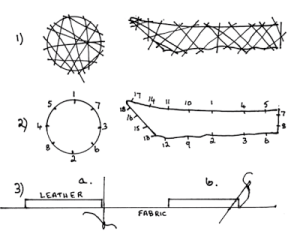
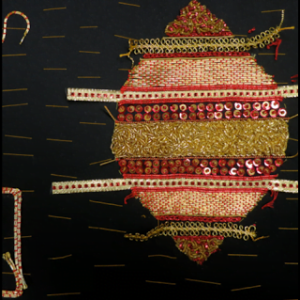
The centre contains a small circle of padded background material with small and scattered french knots. The surrounding circle is larger french knots. The radiating lines are french knots stitched in shades of mauve and green. The green thread is the same shade as the background fabric.

All the plants are stitched using only four embroidery stitches. These are straight, detached chain, buttonhole and french knots. Yes, it was a challenge to portray all these wildly different plants with such a basic and limited number of stitches. Multiple colours of DMC Floss are used. The threads are blended/mixed in the needle to obtain the correct colour for natures’ choice of each plant and flower.

Precise directions and diagrams for stitching each plant are included in the text.

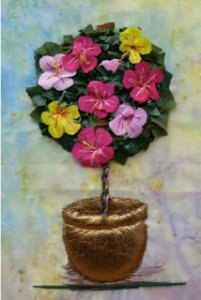
None of this is difficult but it is a different way of portraying flowers. As well as creating a garden which is what most students did, these flowers are useful for small projects such as greeting cards, phone covers and glasses cases all of which you will find in the book.

[do_widget id=arpw-widget-2]

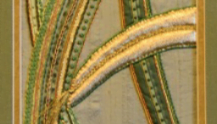
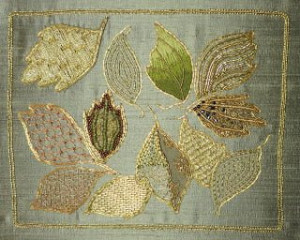
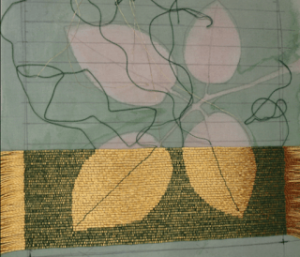
Green seems to be a difficult colour to photograph accurately. This green fabric is a soft gray green and shows off all the greens used for the leaves. When stitching green thread on green fabric, one often has to change the proportions in the thread colour recipe for them to be seen clearly.

I have discovered why fashion photographs so seldom portray green except for really dark or bright greens. This is something I had never noticed before photographing the flowers for this book.

If you are interested in this book, or its companion, Hand Stitch Recognizable Summer Flowers, you can find them at eBookIt.com It is published in an ebook format to make it affordable for everyone.

Professionally colour printing a book with as many colour photos and diagrams as are included in this text is expensive. You can print it on your home colour printer.

If you would like a printed copy, please email me at ann@annbernard.com

The next entry will feature more gardens stitched by students.

05/12/2017 by Ann Bernard

The Battle of Stamford Bridge, the second battle of 1066

Stamford Bridge

Having won the Battle of Fulford, the Vikings took some time off. They did not burn the City of York as they had Scarborough but, as victors, they collected tribute in the form of goods and hostages. For late September, the weather was unseasonably hot. The Vikings made camp on the western and eastern sides of the River Derwent. In this portion of one of fifteen panels, the Viking army is relaxing. The leaders, King Hadrada and Earl Tostig, gave the men permission to leave off their mail shirts which they returned to their ships. The dust storm created by the arrival of the Saxon army is indicated on the upper right.

Meanwhile, in the south of England, Earl Harold Godwinson (King Harold) had his army trained and ready to meet the expected invasion from Normandy. In Normandy, Duke William had spent all summer building boats, making armour, collecting horses and training men for his invasion army but the wind and tides had been unfavourable all summer for such an undertaking. They waited, as did King Harold and his army in England.

King Harold heard about the Viking invasion in Scarborough. The Vikings had a bad reputation which made them unacceptable immigrants. King Harold gathered some/all of his army and marched them north to York. The distance between London and York is 216 miles (347 kms) and the roads were not as they are today. It is said that they did this march in four days but, this is so remarkable that I can only think that they started out before the Battle of Fulford on September 20.

Their arrival at Stamford Bridge and their attack on September 25 was unexpected. The Vikings on the western (wrong end) of the narrow, wooden bridge were trapped. The bridge was a bottle neck being defended by one elite viking warrior known as a berserker. A berserker wore a bear fur collar (baer sarkr, or bear shirt). They were fed psychedelic mushrooms before a battle, and killed anyone in front of them until they were killed, or ran out of enemies – hence our modern word berserk! (Thank you, Heather Cawte for this information). The beserker was finally felled by a saxon who floated down the river and speared him from below. These figures are not yet completely stitched.

After that, the armies formed up in the manner that was traditional for the time and a bloody battle was fought with huge losses on both sides. Both King Hadrada and Earl Tostig died. The section of the army left guarding the boats led by King Hadrada’s son-in-law (who was also killed) arrived in haste but the victory went to the Saxon army.

I was unable to locate a stitching that I was sure was of the battle. Instead, this photo, taken in July 2017, shows visitors viewing the work-in-progress. The tapestry is stitched on linen fabric, a cotton backing and uses Appletons wool threads. The design is placed on the cotton backing, marked through the front linen with running stitch. It is then outlined with stem stitching and filled with Bayeux stitch. Chris Rock designed the tapestry, the volunteer stitchers are under the leadership of Shirley Smith. They have some kits available if you would like to stitch a small piece for yourself or to contact them, go to publicity@stamfordbridgetapestry.org.uk

[do_widget id=arpw-widget-2]

The final picture is of the longboats returning to Norway. Out of the 300 boats that landed, only 24 were needed to take the survivors home. Two generations of men were in that invasion army. We have also experienced this huge loss of men in more recent times. The Vikings promised to never, ever invade England again. The days of Viking supremacy were over. They stayed home, recovered, and became Norwegians.

The information here may or may not be correct. Brevity is not always the best sieve for historical information. The videos below are recent and were filmed on location and will be more accurate.

Battle of Stamford Bridge Tapestry Project 1066 – 2016

Battle of Stamford Bridge Tapestry Project 1066 – 2016

Baz Battles. Historical informational video

BATTLE OF STAMFORD BRIDGE TAPESTRY PROJECT 1066-2016

Although Stamford Bridge was a great triumph for King Harold and the Saxons, their strength was sadly depleted by the fight. And now they faced an even greater foe as news arrived that Duke William of Normandy had landed in Sussex on September 28. The weary Saxons turned south once more and marched back as quickly as they had come.

Read the third and final episode to hear what really happened at the Battle of Hastings.

18/11/2017 by Ann Bernard

1066 and all ???? Prequel Battles to the Battle of Hastings

The Fulford Tapestry

There are two years in history that changed the destiny of the western world.   One is 1944, when the the Allied Forces crossed the Channel to the coasts of Normandy and the other is 1066 when the Saxon armies fought the invasion by the Duke of Normandy at the Battle of Hastings. There were two other battles in England prior to this and both are commemorated with large embroideries But first, here is a brief account of why 1066 was such a pivotal year.

The Bayeux Tapestry, Scene 1: King Edward the Confessor and Earl Harold Godwinson

In January 1066, King Edward the Confessor died without a direct heir but leaving three contenders to the throne of Saxon England. The first was Earl Harold Godwinson, Edward’s brother in law, a competent statesman and army general who had been running the country for Edward for years. The second was King Hadradra of Norway. The third was Duke William of Normandy. As England was a prosperous farming country at the time, it was a desirable acquisition.

King Hadrada was a Viking and a fierce and experienced warrior. The Vikings had a long history of marauding, pillaging and plundering. In 1066 they were well equipped with about 7000 men and 300 longships. In mid September, they landed on the eastern shores of England near Scarborough, which they burned, and then moved on to the city of York. Earl Tostig, Harold Godwinson’s estranged brother, joined the Viking forces bringing more men. Tostig hoped to claim Northumbria as his own domain. Their combined forces were around 10,000 fighting men though the number varties depending on the source. The English army was about half the size.

What ensued on September 20 was the first battle of 1066, the Battle of Fulford Gate, which was won by the Vikings. It was a fierce encounter with heavy losses on both sides. Hadrada is the lone figure on the right hand side with his sword above his head. Their prize was the City of York which the Vikings agreed not to pillage or burn. The Saxons also agreed to join the Vikings on their trek south to London where King Hadrada planned to claim the throne of England.

In the panel below, King Hadrada, with blond hair and beard, followed by Tostig as shown entering the city of York.

The embroidery, like the Bayeaux Tapestry, is a continuous strip of fabric about 18 feet long. The upper and lower friezes contain scenes from everyday life. It was designed by Charles Jones and stitched by local embroiderers who dyed their wool threads using tradional methods. The continuous strip is divided into six sections for photography of which three are included here,

[do_widget id=arpw-widget-2]

The Fulford Tapestry was completed about seven years ago. I have read as much as I can find about the Battle of Fulford Gate and have condensed it to a few sentences which may, or may not, give you an accurate picture. I apologize for errors. You can read more about this important day on the sites listed.

The final photo is of the ladies who stitched on the Fulford Tapestry.

http://www.britainexpress.com/History/battles/Fulford.htm

http://www.fulfordtapestry.info

The creation of the Fulford Tapestry – Images

11/11/2017 by Ann Bernard

Remembrance Day: Lest We Forget

Today is Remembrance Day when we thank the millions of men and women who served in all the forces. We thank those who gave their lives so that our civilization would continue in the free world. We give thanks as countries and communities; we also remember and give thanks as individuals.

The Overlord Embroidery

It was commemorated 40 years later in Portsmouth when Queen Elizabeth, the Queen Mother, opened the D-Day Museum. This building houses the Overlord Embroidery. Commisioned by Lord Dulverton, it was designed by Sandra Lawrence and stitched at the Royal School of Needlework. It consists of 34 panels each 8 feet wide by 3 feet high. The total length, 272 feet, is longer than the Bayeaux Tapestry by 41 feet. Here are a few of the panels of the Overlord Embroidery.

The Supreme Commander, General Eisenhower, discusses the Operation Overlord plan with seniorAllied commanders.

A vast armada of ships, planes and men crossed the English Channel to storm Fortress Europe. They were expected and encountered heavy resistance. Supplies had to be transported and the Mulberry Harbour was towed across the channel in sections and assembled on the French coast. There were multiple examples of ingenuity and selfless courage.

There were only a few days in each month with the right conditions of tide and moon for the invasion. Here troops of the British 3rd Division and the 27th Armoured Brigade await orders to sail.

The fleet moves slowly south towards the Normandy coast; some smaller craft sink in the rough water and others have to turn back. The armada includes some 4,200 landing ships and landing craft. R.A.F. Lancasters, which bombed the German coastal batteries, fly above the ships.

The embroidery technique used is a traditional method of applique which allows for detail, and the embroidery is intensely detailed. While a student at the Royal School of Needlework we were required to learn how to do this and I will tell you that it is both exacting and tedious. Whenever available the fabrics used were those used for the uniforms in the war. Notice the detail and expression in the faces. Sandra Lawrence used photos from the war and consulted with the original Chiefs of Staff on details for authenticity. As the panels were stitched in the ’70s, it was already more than 20 years since the end of the war.

[do_widget id=arpw-widget-2]

An allied deception plan persuades the Germans that the invasion will be made at Pas de Calais. As the main fleet approaches Normandy the radar screens show the fake convoys proceeding up-Channel. Unsuspecting German troops man a bunker while a midget submarine surfaces to mark one of the invasion beaches by showing a green light to seaward.

King George V1 visits the invasion beaches with Winston Churchill, Field Marshal Brooke. Generals Eisenhower and Montgomery. They did not all visit on the same day as shown here. The Mulberry harbour is visible in the background.

The troops are moving out of Normandy on their way east. There remain eight months of bitter fighting before the conclusion of the war. A Frenchman, suspected of being a resistance fighter has been shot by the retreating Germans.

Currently the D-Day Museum in Portsmouth is being renovated, extended and a climate control system is being installed. The Overlord Embroidery will be available for viewing in mid 2018. At the moment, there is not a lot of information regarding the embroidery on line but this will change as the pieces are rehung in the new gallery. A new video is also being made of the embroidery which will include interviews with some of the stitchers. Our Guild has a copy of the original video. When I showed it last week in the residence where I live, there was a lot of interest. There are many veterans amongst us but I am not one of them. One lady, who was 18 years old when the war started and worked on Enigma, is trying to teach me how to salute correctly which is creating laughter all around.

The painted, full size plan designed by Sandra Lawrence is in the Pentagon hanging in the Ministry of Defence.

This video will give you more information on the creation of the Overlord Embroidery. You will likely locate others that I have not discovered.

Women in the D-Day Museum: The Overlord Embroidery – YouTube

 https://www.youtube.com/watch?v=4R7TEUt6YXc

www.sandralawrence.co.uk/Overlord Embroideries.htm

The Norman Invasion under William the Conqueror in 1066 has been the only other successful cross Channel invasion. There is more to this story than I ever learned in school or has been generally known until recent years. I will be writing about this in following blogs.

All have been commemorated with embroideries.

25/06/2017 by Ann Bernard

All’s well that ends well

It has been a long time since you have heard from me which deserves and explanation. In late 2014, I began to get sick. The months passed and I got sicker and sicker. After a number of admissions to hospital, this was diagnosed as an infection which had got into my blood, central nervous system, heart, finishing up with shingles and chronic pain. It was not much fun at all. As my husband, Julian, has Parkinsons Desease, and neither of us was able to look after the other, we moved to Seniors Residence where dinner is provided. It took all the able bodied hands in the family to move us plus a huge amount of downsizing.

Shingles and chronic pain made me seek and find a therapist who could treat these effectivly. It took treatment plus spending many months of sitting around doing almost nothing to get my health back. In the Fall of 2016, an apartment with larger rooms and a terrace became available so we moved again.
It has been busy around here!

Julian has retired from loading my Blog which is now being done by our son, Peter. Having decided to move it to a different system, it had to be reprocessed and reloaded. As Peter works full time, this is a spare time occupation and has taken months. The end is now in sight.

A project for me during the health recovery process was to update and broaden the information in Hand Stitch Recognizable Spring Flowers which has created a 2nd edition. There are extra flowers, a larger section on planning your own garden, contributions from other stitchers and many suggestions on how the flowers could be incorporated into other projects.

My website is also new and contains the most recent gardens created by members of a recent class.

[do_widget id=arpw-widget-2]

I hope that you will enjoy browsing new entries and revisiting some of the old ones.

Ann Stitching

Here is a photo to prove that I exist and that I continue to stitch. I am finishing the backing on a piece called Majestica. As the frame is round, I had to make frames for this and its companion piece, Exotica. They will both be in my next book.
Making frames is not difficult. I have a wonderful time working on stitching projects.

The next entry will feature the new embroidery I made for the cover of 2nd edition. You can find this and its companion ebook on stitching Summer Flowers at ebookit.com

30/05/2016 by Ann Bernard

Summer Time; A time for some light hearted stitching.

While enjoying the summer weather, we all like to take life less seriously, even if we are a dedicated stitcher. Lets leave counting squares on cross stitch charts and stitching with wool threads for when the weather is inclement and we are stuck indoors. Instead, why not try Silk Flower Conversion just for the novelty and the fun of it. This is described in more detail in my last book, Stitching Idyllic: Hand Stitch Recognizable Summer Flowers but you can try it out using only the directions here. I thank Pat Harwood for these examples and for letting me publish them again.

Artificial silk flowers are available in dollar stores and in craft stores such as Michaels. They are made of a textile. Look closely and you will see the weave. This make them relevant to Textile Arts. It is better to purchase better quality flowers that have a bit more body to them. The flimsy ones are harder to work with. Have an idea of what you would like to make and then go to the store and purchase one spray only of each of the flowers you are going to play with and change in some way to be something else. It is easy to get carried away by the huge variety of flowers available. Though I have not yet tried it, I think that the flowers could be painted with acrylic paints if you wish to colour the edges of the petals for instance. You may even have some of these flowers already. They may need a wash first!

Topiary Tree (original size 7 1/2″ x 5″)

Hibiscus Blossoms are bright and vivid. They thrive in the Caribbean Islands and remind us of vacation time. We try to grow them in our northern houses but they usually do not thrive though may last a few years. Pat used the petals of tulip and lily flowers both of which are large and can be cut up to be changed to whatever is needed. The background is a piece of multi-coloured batik cotton. The large pot is padded and covered with bronze leather. The trunk of the tree is a cord of twisted DMC Floss. Behind the tree is a circle of felt covered with dark green cotton. This is the first time Pat has worked with leather, padding and twisted cord. In fact, everything about this project was a first for her.

The patterns

Draw circles 1″ in diameter (or the size you choose) on the reverse side of the petal you are using. Avoid the thick part at the base of the petal. Because it is on the reverse side, you can use a pencil or a ball point pen for this. Cut them out, fold in half and mark the edges of the petals as indicated in the second diagram. Unfold. Snip a short distance inward toward the center five times as shown. Snip right to the centre on the sixth cut. All one colour flowers are good as are several different colours. Now you are ready to stitch them in place.

Use one thread of Floss and a fine needle such as Crewel 9. Overlap the two petals with the long cut between them making a five petaled flower. Attach to the tree with some small stitches along the join line. If the thread is a suitable colour, you can use it shade the centre of each petal. An alternative way of doing this is to overlap the two petals and secure the join while the flower is still in your hand. Pat added stamens using Pistil stitch. The pattern for the leaves is on the right. Cut as many as you need to cover the backing fabric and secure using two stitches invisibly under the flowers or other leaves.

Up the garden path
(original size 11″ x 14″)

Pat’s second creation bears no resemblance to anything grown by nature. It is in the section on Funtasy Flowers. When using artificial silk flowers, you can do anything you want. How nice to be as free as your fancy. She used an artist canvas, available at a craft store, as a base. Purple cotton was secured onto this. She laid a variety of blossoms out on her table and played with them. This is the result. There was a need for a connection between the lower and upper parts. The path achieves this. Pat couched it down with a variegated wool thread. When the final flower spacing was decided, she applied small dabs of glue to secure the flowers and leaves in place and then attached them with small invisible stitches. You may not notice this, but she couched a feathery green braid to the edge of the path to indicate grass edging. The purple variegated wool edging contained and finished the project.

Look at this piece carefully. Notice the balance and triangulation of colour, how textures are varied and that there is a lot of interest for the eye. This piece is worth looking at carefully as the construction, detail and balance are worth it. If you do not like what you create, put it away for 4 – 6 months. The time gap changes subjective vision to objective vision and you will see your creation as other people do.

[do_widget id=arpw-widget-2]

There are other flowers included in the book – clematis, hollyhocks, petunias and leaves. You will also find Passion for Poppies and Organza Extravaganza plus some coasters in the Funtasy Flower section
This is a good technique for greeting cards. You may find even the smaller flowers a bit large, Trim them or use a larger card. Anything is possible with these two techniques.

Try them and, have some summer fun.

Further news from here is that Hand Stitching Recognizable Spring Flowers 2nd edition should be available very soon. You will hear when it happens on this blog. There is a huge amount of work in getting a book ready for publishing. I have also been sick again which slows me down and is annoying. I am allergic to many medications and infections keep coming back. Today is a much better day though my typing is horribly inaccurate.

Thank you to Pat for letting me share this with a wider audience of readers.

All good creative wishes from

Ann B.

07/02/2016 by Ann Bernard

Leather Application – a Tutorial

Stitch leather down securely and almost invisibly. This is not difficult – it just takes a bit of know-how.

For leather without padding: Trace the shape onto the reverse side of the leather using a ball point pen or, preferably, a fine black ink marker. If it is white or a light colour, use a pencil. If it is an irregular shape, take care to not get the pattern reversed during this process. Use sharp scissors and cut right on the marked line. Check the cut out piece on the right side for any bumps or nicks along the edge. If it is a straight line use a metal ruler and a quilting fabric cutter or exacto knife.

Lay the piece of leather in position and attach it to the fabric background with long stitches over the top of the leather. These stitches go from top to bottom and from side to side and securely attach the leather in its correct position so that it will not shift while being stitched. Use dressmaking thread. Diagram 1: The piece of leather in the shape of a row boat for instance is just to show how to apply leather that is an odd shape. It would be preferable to stitch 1 and 2 at the centre first and then the stern and then the prow and come back and add some more in between. Odd shapes need some forethought.

Attach the leather piece to the fabric permanently as follows. Take a longish piece of thread that matches the colour of the leather. Wax it for strength. I use Gutermann’s Polyester Thread in that the thread is fine in diameter and strong. All Purpose thread is OK too but it does need to be fine. Thread it into as fine a needle as possible – hopefully a Crewel size 9 or 10. Place a stitch at the centre top of the piece of leather, then at the centre bottom, next, midway down the right hand side and then, midway down the left hand side. Diagram 2: The basting threads are all still in place at this time but are no longer shown in the diagram. Guttermann’s thread is fine for our use but we are not working on commissioned projects which are meant to last hundreds of years.

Bring the needle to the front of the fabric immediately outside the leather with the needle vertically straight. Diagram 3a..

To take the stitch through the leather from the front of the leather, position your needle on a diagonal as close to the edge of the leather as you are able to enter and still secure it. The angle of the needle means that the stitch on the surface is very short and becomes much longer as it goes through the leather to the underside and through the fabric. This is what fixes it securely and almost invisibly. Diagram 3b.

The next four stitches are placed midway between the previous four stitches, And the next eight stitches are midway between the all the previous ones. This will prevent the leather rotating and skewing itself out of position. Continue placing some stitches in each of the spaces and proceed around the leather in a clockwise direction. Remove the basting threads as they get in your way.

The stitches should be about 1/8″ to 1/4″ apart. Watch that there are no humps in the edge of the leather which means that your stitch spacing is too far apart. Remember, with every stitch that your needle enters the leather diagonally; short on top and long as it gets to the lower surface of the leather and through the fabric. If the earlier stitch, number 2 on the diagram for instance, is not in the right place, snip it out and replace with a more correctly placed stitch. Marsha did a perfect job of applying this piece of leather including getting the points sharp. It is padded.

Padded leather: Use felt of an appropriate colour such as gold or yellow. Decide on how many layers of padding is appropriate. One layer stops it looking flat. Two layers gives it a contour. Three layers is a definite protrusion and four makes it high rise. Cut out two or more patterns of the shape in paper. Use one pattern to cut the correct shapes in felt. The largest is a almost the full size of the shape. The second and third ones are each smaller and the last one is a lot smaller. Lay them in position in sequence, smallest first to largest and check that they will pile up on top of each other and finish up the correct size and shape for the padding. Stitch the smallest one down first with one or two stitches, The second and third layers need enough stithes to secure them accurately without moving. The largest one should be stitched in position following the directions above making sure that the edges are just within the marked line of the shape. Trim if necessary..

[do_widget id=arpw-widget-2]

The leather: Using the second paper pattern piece, draw around the pattern on the reverse side of the leather as above. Cut it out leaving 1/4″ all around. Lay it in place and check the exact finished size you will need. Usually, cutting just outside the marked line edge of the marked line obtains an accurate size but you may need to cut it slightly larger than that. See above on how to stitch in place. It is essential to baste the leather in place first with the long vertical and horizontal stitches.

Gail has attached gold leather to this complex shape very well. It is highly padded. She left the points on the right to last and then trimmed them to fit. This design has four of these golden horseshoes and each of then should look identical – which they do.

Frances did something quite different with the leather. She applied two sets of padding leaving the vein area unpadded. She cut the leather wider than you would think normal, basted it into position and then stitched through the central vein with a back stitching. She then followed these directions and trimmed the leather as and where necessary while stitching it in place.

This method is also appropriate for fabric applique especially when it is padded.

Wishing you happy stitching. As always, Ann B.

To Diane Cadd – Bunka is a Japanese method of hooking thread through fabric. The kits and supplies come from Japan.

12/01/2016 by Ann Bernard

More Students’ Gold Work

The Gold Work class held in Guelph, Ontario last spring produced some varied pieces of work. This was an Intermediate class in that the participants had already learned how to handle the threads. These are their first attempts at designing and stitching their individual creations. The creations of the other students was posted previously in Gold Work Brag Time.

Contemporary Leaves stitched by Pat Harwood

Look at her work closely and you will notice that she has tried out many different ways of using Gold Threads. She was careful to balance the density of the fillings and to make each leaf different. She even tried SSSing in the top leaf on the right. This is one of the more difficult stitches in this medium.

In a Mind’s Eye stitched by Nancy Green

Nancy doodled this design thus making it totally original. A design that involves curves is easier for metalic threads than is a geometric design. The navy blue background shows off the gold well. She included a lot of techniques. The plain areas of padding are a good rest for the eye. Sequins are used in moderation. A lot of sequins look fine on a ballgown but are not so attractive in gold work. The photo was taken prior to completion.

Russian Odyssey stitched by Janet Sunderani

St Basil’s Church in Moscow is a favourite subject for Gold Work. This rendition is unfinshed. A year ago, Janet tripped over the cat which resulted in a broken arm. Stitching has not been an option until now. Those curved lines of the roofs are difficult to get spaced correctly. Again, she also has the leather pieces stitched down really well. This photo does not do justice to the quality of her stitching. I am looking forward to see this piece completed.

Golden Shoe stitched by Susan M. Knight

The 18th Century Golden Shoe was stitched by Susan M. Knight for her gold work certificate course at the Royal School of Needlework. It is stitched on antique blue dupioni silk having being inspired by a picture about 18th Century Fashion. The techniques used were chipping, couching plus stitching pearl purl, bright check, twist and spangles. P.S. from Ann. The flat sequins/spangles are specifically for gold work. The faceted ones are for dressmaking. We are very happy that Susan has joined our Guild.

The Cat with Blue Suede Shoes stitched by Connie Dorion

And now for something completely different. The background is pale mauve silk. Mr Wellington is stitched in rows of novelty ribbon outlined with twisted gold thread. The face is leather and would not be so effective if it had been padded. One can still see the basting threads used in fabric preparation . These will be removed before mounting and framing. We hope that this one brings a smile to your face which is its intention.

[do_widget id=arpw-widget-2]

The next Blog will be on stitching leather in position almost invisibly.

11/11/2015 by Ann Bernard

Gold Work Brag Time

Teachers have a tendency to be very proud of their students’ work and I am no exception. The pieces included here were stitched in the spring of this year. This was an Intermediate class. In a previous class students had learned the basics of handling metal threads and stitched two small set pieces. Some made time to create an extra piece of their own choosing. These new examples were all designed and interpreted by the stitchers while I provided supplies and technical support and advice.

Sun Dance by Sandra Ackerley

Sandra started with the circular body of the bird. Creating a perfect circle using couched gold thread is a challenge; deciding just how to continue the thread lines into the head is another. The perfect circular surround with the evenly spaced decorative line – more challenges. Having evenly spaced and balanced wing feathers and lower decorations are also difficult. Look at this closely and note how evenly perfect every part is.

Summer Breeze by Barbara Lee Johnson

Barbara Lee has attended several gold work classes and is an experienced stitcher of these threads. She has combined applique with metal thread embroidery and beading. The leaves are all edged with fine pearl purl. The stalks and veins are beading using a different method on each main stalk.

Christmas Ornament by Marsha Fontes

This piece by Marsha is unfinished but gives you an idea of the diversity of the designs. Couching with a coloured thread is difficult but at least one can see what one is doing. Bottom left corner is part of her practice at stitching right angled corners.

Petals of Gold by Marsha Fontes

Marsha is becoming a teacher and this was the design she chose to teach the basics to another class. Note the shapes of the petals are all the same but the shape altering insertions are all different and complementary. The class learned a lot in this piece including attaching leather almost invisibly. I will be including the instructions for that in another blog.

Untangled by Gail Bailey

Gail’s design is a small piece of a Zentangle created by her daughter. In a symmetrical design such as this, discrepancies become glaringly obvious. Can you spot any? I am unable to do so. The balance between the blue background, the centre and the light green surround is delightful. Gail also attached the gold leather almost invisibly. The detail on the central ends of the leather arcs adds interest and breaks the geometry. The centre is heavily beaded which Gail learned in a subsequent class.

[do_widget id=arpw-widget-2]

Serviceberry Leaves by Barbara Lee Johnson

The lines in this piece of Or Nué are straight. It is the photographer who did not get it straight. I wish that I could show these pieces with better clarity and detail. Barbara Lee couched the leaves using a gold metallic thread which adds to the gleam of the gold. She uses a different green thread for each section. It is helpful when stitching Or Nué to add lines on the background fabric to help keep the stitching lines straight. She painted the green background to help maintain the purity of the green colour. This is one of Barbara Lee’s series of leaves all stitched in different techniques, threads and fabrics.

There will be another group of photos from this class shortly when I am able to take the necessary pictures.

15/06/2015 by Ann Bernard

Books, Books and More Books

You have not heard from me recently because I have been sick. An infection got into my blood stream and the results were not entertaining. I am now considerably better and, although I have not been stitchingly creative, I am trying to write a relevant posting for you.
Over the years, I have collected stitching books that were useful and meaningful to me. Now, that we are moving from a bungalow to a one bedroom apartment, downsizing has become a major issue for both my husband and myself. It’s not so much the furniture but the contents of cupboards and drawers and our collections of books. Being a member of an Embroidery Guild helps as we have regular stash sales which recycles items to others who can use them.

It is a traumatic time as one hopes to find new homes for treasures. My problem especially is with the large, hardcover books, beautifully printed and illustrated and still valuable because of their content and their condition. I have a list if anyone would like to see it. Mailing books is hugely expensive but maybe we can make arrangements for pickup at convenient locations.

Which brings me to the topic I wish to share with you. The world and life have changed radically with the advent of computer technology. Younger generations especially use it daily in all aspects of their lives. But publishing embroidery books electronically is still in its infancy.

If ever there was a pair of technologies destined to be wed, this is the ideal couple. The old knowledge and the new presentation. The convenience of the coupling is revelationary. An ebook on a tablet is small enough to sit on the table beside you while you stitch no matter where you are. It does not have to be forced to stay open. One can move forward and backwards in the text easily. Photos and diagrams can be enlarged as one wishes. It will always be there but out of sight when not needed. And, it takes up no space on one’s bookshelf and downsizing it will never be a problem.

Adding to this, the purchase price of an ebook is considerbly less than any printed book either hardcover or softcover. This is a consumer’s bonanza. For the writer, the amount of work involved remains astronomical and possibly more labour intensive than preparing a text for a publisher to edit and illustrate.

There are definite stages which will be encountered in adapting to this new way of owning information. First, there is the absence of the emotional one of loving books, the smell and glossy feel of the paper, the heft of its weight and the choosing of the place on the shelf among the other books you value. After that comes the stage where you acquire an ebook but decide to print it anyway and store it in a binder on your shelf. Labelling the spine does help locate it but it is less glamorous and tends to be forgotten among its more spectacular sisters. Then, comes the final stage of acceptance. Download it onto your iPad and leave it there. The information is always available whenever and wherever you want it. I have been recently making nametags featuring spring flowers and I needed to have my iPad right beside me for the information on how to stitch the individual flowers. Yes, I need to look them up, too. It was totally convenient and efficient.

EBooks on embroidery are still sparse. Mary Corbet has recently published her eighth, Stitch Sampler Alphabet. Her eBooks vary in length depending on the content. You can contact her at http://shop.needlenthread.com.

I now have two books online as Summer Flowers has joined Spring Flowers. I am working on a second edition of Spring Flowers with updated information and presentation. After that, I have in my head a further two books on totally different aspects of embroidery. There are also reprints of the gems printed in the early 1900s now available electronically. These classics are well worth investigating. In embroidery, our heritage is as valuable as is innovation.

[do_widget id=arpw-widget-2]

I was surprised to discover, as a user, an unanticipated distinction between a novel and technical information when viewed electronically. I have found it hard to follow story lines on my iPad and sometimes get lost. But the opposite is true for embroidery information. It is there, available and responds to whatever I ask of it. The cost is reasonable and it takes up no room on my shelf. It produces absolutely no downsizing problems. You may not have reached that stage in your life but, one day, downsizing will happen to you, too. Get with it and invest in ebooks instead of hard cover glossies, support the writers and help the trend grow.
You can browse my books at www.annbernard.com.

Enjoy your visit.

  • « Previous Page
  • 1
  • 2
  • 3
  • Next Page »

Search

Recent Posts

  • Laid Work – Introduction.
  • How to stitch Snowdrops. Quick and Easy!
  • Inspirations, All Stitched Up! from Australia
  • Newsletter Märchenhaftes Sticken – Jessica Grimm
  • Cotton Quartet 1: Preliminaries & First Stitches

Recent Comments

  • Ann Bernard on Prepare your embroidery for the framers – Mount on Foam Core Board
  • SGibau on Prepare your embroidery for the framers – Mount on Foam Core Board
  • Louise Desmarais on Prepare your embroidery for the framers – Mount on Foam Core Board
  • Katherine & Malcolm Bell on Embroideries that Record History
    Queen Mary’s Carpet
  • Ann Bernard on Embroideries that Record History
    Queen Mary’s Carpet

Pretty Chic Theme By: Pretty Darn Cute Design