Stitching Idyllic

Stitching Idyllic by Ann Bernard

  • Home
  • Blog
  • Spring Flowers
  • Summer Flowers
  • About Ann

30/05/2016 by Ann Bernard

Summer Time; A time for some light hearted stitching.

While enjoying the summer weather, we all like to take life less seriously, even if we are a dedicated stitcher. Lets leave counting squares on cross stitch charts and stitching with wool threads for when the weather is inclement and we are stuck indoors. Instead, why not try Silk Flower Conversion just for the novelty and the fun of it. This is described in more detail in my last book, Stitching Idyllic: Hand Stitch Recognizable Summer Flowers but you can try it out using only the directions here. I thank Pat Harwood for these examples and for letting me publish them again.

Artificial silk flowers are available in dollar stores and in craft stores such as Michaels. They are made of a textile. Look closely and you will see the weave. This make them relevant to Textile Arts. It is better to purchase better quality flowers that have a bit more body to them. The flimsy ones are harder to work with. Have an idea of what you would like to make and then go to the store and purchase one spray only of each of the flowers you are going to play with and change in some way to be something else. It is easy to get carried away by the huge variety of flowers available. Though I have not yet tried it, I think that the flowers could be painted with acrylic paints if you wish to colour the edges of the petals for instance. You may even have some of these flowers already. They may need a wash first!

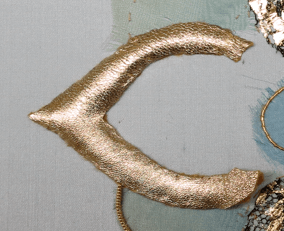
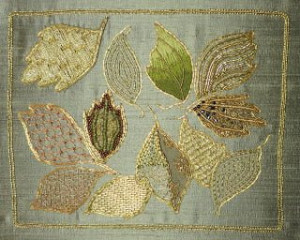
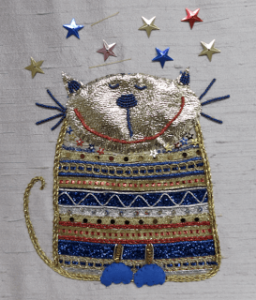
Topiary Tree (original size 7 1/2″ x 5″)

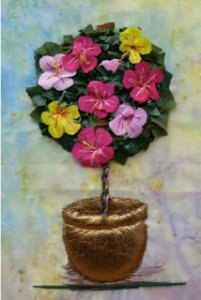
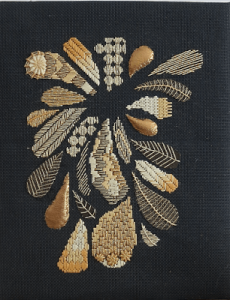
Hibiscus Blossoms are bright and vivid. They thrive in the Caribbean Islands and remind us of vacation time. We try to grow them in our northern houses but they usually do not thrive though may last a few years. Pat used the petals of tulip and lily flowers both of which are large and can be cut up to be changed to whatever is needed. The background is a piece of multi-coloured batik cotton. The large pot is padded and covered with bronze leather. The trunk of the tree is a cord of twisted DMC Floss. Behind the tree is a circle of felt covered with dark green cotton. This is the first time Pat has worked with leather, padding and twisted cord. In fact, everything about this project was a first for her.

The patterns

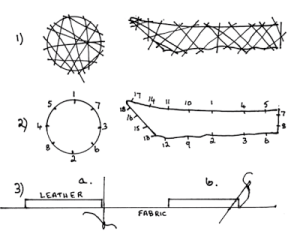
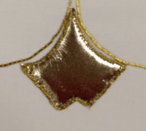
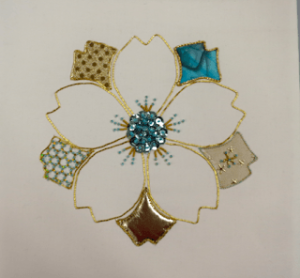
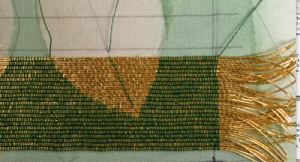
Draw circles 1″ in diameter (or the size you choose) on the reverse side of the petal you are using. Avoid the thick part at the base of the petal. Because it is on the reverse side, you can use a pencil or a ball point pen for this. Cut them out, fold in half and mark the edges of the petals as indicated in the second diagram. Unfold. Snip a short distance inward toward the center five times as shown. Snip right to the centre on the sixth cut. All one colour flowers are good as are several different colours. Now you are ready to stitch them in place.

Use one thread of Floss and a fine needle such as Crewel 9. Overlap the two petals with the long cut between them making a five petaled flower. Attach to the tree with some small stitches along the join line. If the thread is a suitable colour, you can use it shade the centre of each petal. An alternative way of doing this is to overlap the two petals and secure the join while the flower is still in your hand. Pat added stamens using Pistil stitch. The pattern for the leaves is on the right. Cut as many as you need to cover the backing fabric and secure using two stitches invisibly under the flowers or other leaves.
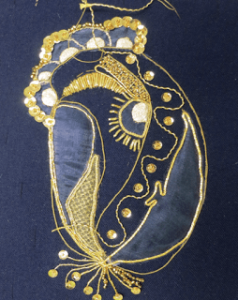
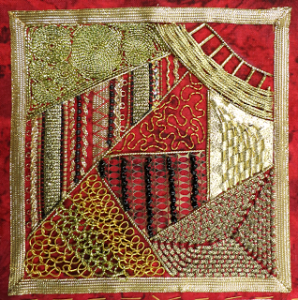
Up the garden path
(original size 11″ x 14″)

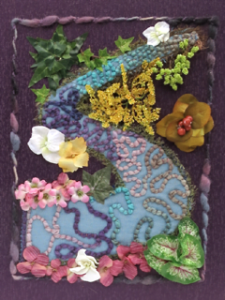
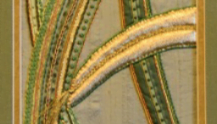
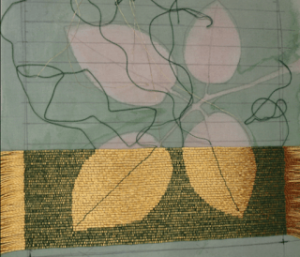
Pat’s second creation bears no resemblance to anything grown by nature. It is in the section on Funtasy Flowers. When using artificial silk flowers, you can do anything you want. How nice to be as free as your fancy. She used an artist canvas, available at a craft store, as a base. Purple cotton was secured onto this. She laid a variety of blossoms out on her table and played with them. This is the result. There was a need for a connection between the lower and upper parts. The path achieves this. Pat couched it down with a variegated wool thread. When the final flower spacing was decided, she applied small dabs of glue to secure the flowers and leaves in place and then attached them with small invisible stitches. You may not notice this, but she couched a feathery green braid to the edge of the path to indicate grass edging. The purple variegated wool edging contained and finished the project.

Look at this piece carefully. Notice the balance and triangulation of colour, how textures are varied and that there is a lot of interest for the eye. This piece is worth looking at carefully as the construction, detail and balance are worth it. If you do not like what you create, put it away for 4 – 6 months. The time gap changes subjective vision to objective vision and you will see your creation as other people do.

[do_widget id=arpw-widget-2]

There are other flowers included in the book – clematis, hollyhocks, petunias and leaves. You will also find Passion for Poppies and Organza Extravaganza plus some coasters in the Funtasy Flower section
This is a good technique for greeting cards. You may find even the smaller flowers a bit large, Trim them or use a larger card. Anything is possible with these two techniques.

Try them and, have some summer fun.

Further news from here is that Hand Stitching Recognizable Spring Flowers 2nd edition should be available very soon. You will hear when it happens on this blog. There is a huge amount of work in getting a book ready for publishing. I have also been sick again which slows me down and is annoying. I am allergic to many medications and infections keep coming back. Today is a much better day though my typing is horribly inaccurate.

Thank you to Pat for letting me share this with a wider audience of readers.

All good creative wishes from

Ann B.

07/02/2016 by Ann Bernard

Leather Application – a Tutorial

Stitch leather down securely and almost invisibly. This is not difficult – it just takes a bit of know-how.

For leather without padding: Trace the shape onto the reverse side of the leather using a ball point pen or, preferably, a fine black ink marker. If it is white or a light colour, use a pencil. If it is an irregular shape, take care to not get the pattern reversed during this process. Use sharp scissors and cut right on the marked line. Check the cut out piece on the right side for any bumps or nicks along the edge. If it is a straight line use a metal ruler and a quilting fabric cutter or exacto knife.

Lay the piece of leather in position and attach it to the fabric background with long stitches over the top of the leather. These stitches go from top to bottom and from side to side and securely attach the leather in its correct position so that it will not shift while being stitched. Use dressmaking thread. Diagram 1: The piece of leather in the shape of a row boat for instance is just to show how to apply leather that is an odd shape. It would be preferable to stitch 1 and 2 at the centre first and then the stern and then the prow and come back and add some more in between. Odd shapes need some forethought.

Attach the leather piece to the fabric permanently as follows. Take a longish piece of thread that matches the colour of the leather. Wax it for strength. I use Gutermann’s Polyester Thread in that the thread is fine in diameter and strong. All Purpose thread is OK too but it does need to be fine. Thread it into as fine a needle as possible – hopefully a Crewel size 9 or 10. Place a stitch at the centre top of the piece of leather, then at the centre bottom, next, midway down the right hand side and then, midway down the left hand side. Diagram 2: The basting threads are all still in place at this time but are no longer shown in the diagram. Guttermann’s thread is fine for our use but we are not working on commissioned projects which are meant to last hundreds of years.

Bring the needle to the front of the fabric immediately outside the leather with the needle vertically straight. Diagram 3a..

To take the stitch through the leather from the front of the leather, position your needle on a diagonal as close to the edge of the leather as you are able to enter and still secure it. The angle of the needle means that the stitch on the surface is very short and becomes much longer as it goes through the leather to the underside and through the fabric. This is what fixes it securely and almost invisibly. Diagram 3b.

The next four stitches are placed midway between the previous four stitches, And the next eight stitches are midway between the all the previous ones. This will prevent the leather rotating and skewing itself out of position. Continue placing some stitches in each of the spaces and proceed around the leather in a clockwise direction. Remove the basting threads as they get in your way.

The stitches should be about 1/8″ to 1/4″ apart. Watch that there are no humps in the edge of the leather which means that your stitch spacing is too far apart. Remember, with every stitch that your needle enters the leather diagonally; short on top and long as it gets to the lower surface of the leather and through the fabric. If the earlier stitch, number 2 on the diagram for instance, is not in the right place, snip it out and replace with a more correctly placed stitch. Marsha did a perfect job of applying this piece of leather including getting the points sharp. It is padded.

Padded leather: Use felt of an appropriate colour such as gold or yellow. Decide on how many layers of padding is appropriate. One layer stops it looking flat. Two layers gives it a contour. Three layers is a definite protrusion and four makes it high rise. Cut out two or more patterns of the shape in paper. Use one pattern to cut the correct shapes in felt. The largest is a almost the full size of the shape. The second and third ones are each smaller and the last one is a lot smaller. Lay them in position in sequence, smallest first to largest and check that they will pile up on top of each other and finish up the correct size and shape for the padding. Stitch the smallest one down first with one or two stitches, The second and third layers need enough stithes to secure them accurately without moving. The largest one should be stitched in position following the directions above making sure that the edges are just within the marked line of the shape. Trim if necessary..

[do_widget id=arpw-widget-2]

The leather: Using the second paper pattern piece, draw around the pattern on the reverse side of the leather as above. Cut it out leaving 1/4″ all around. Lay it in place and check the exact finished size you will need. Usually, cutting just outside the marked line edge of the marked line obtains an accurate size but you may need to cut it slightly larger than that. See above on how to stitch in place. It is essential to baste the leather in place first with the long vertical and horizontal stitches.

Gail has attached gold leather to this complex shape very well. It is highly padded. She left the points on the right to last and then trimmed them to fit. This design has four of these golden horseshoes and each of then should look identical – which they do.

Frances did something quite different with the leather. She applied two sets of padding leaving the vein area unpadded. She cut the leather wider than you would think normal, basted it into position and then stitched through the central vein with a back stitching. She then followed these directions and trimmed the leather as and where necessary while stitching it in place.

This method is also appropriate for fabric applique especially when it is padded.

Wishing you happy stitching. As always, Ann B.

To Diane Cadd – Bunka is a Japanese method of hooking thread through fabric. The kits and supplies come from Japan.

12/01/2016 by Ann Bernard

More Students’ Gold Work

The Gold Work class held in Guelph, Ontario last spring produced some varied pieces of work. This was an Intermediate class in that the participants had already learned how to handle the threads. These are their first attempts at designing and stitching their individual creations. The creations of the other students was posted previously in Gold Work Brag Time.

Contemporary Leaves stitched by Pat Harwood

Look at her work closely and you will notice that she has tried out many different ways of using Gold Threads. She was careful to balance the density of the fillings and to make each leaf different. She even tried SSSing in the top leaf on the right. This is one of the more difficult stitches in this medium.

In a Mind’s Eye stitched by Nancy Green

Nancy doodled this design thus making it totally original. A design that involves curves is easier for metalic threads than is a geometric design. The navy blue background shows off the gold well. She included a lot of techniques. The plain areas of padding are a good rest for the eye. Sequins are used in moderation. A lot of sequins look fine on a ballgown but are not so attractive in gold work. The photo was taken prior to completion.

Russian Odyssey stitched by Janet Sunderani

St Basil’s Church in Moscow is a favourite subject for Gold Work. This rendition is unfinshed. A year ago, Janet tripped over the cat which resulted in a broken arm. Stitching has not been an option until now. Those curved lines of the roofs are difficult to get spaced correctly. Again, she also has the leather pieces stitched down really well. This photo does not do justice to the quality of her stitching. I am looking forward to see this piece completed.

Golden Shoe stitched by Susan M. Knight

The 18th Century Golden Shoe was stitched by Susan M. Knight for her gold work certificate course at the Royal School of Needlework. It is stitched on antique blue dupioni silk having being inspired by a picture about 18th Century Fashion. The techniques used were chipping, couching plus stitching pearl purl, bright check, twist and spangles. P.S. from Ann. The flat sequins/spangles are specifically for gold work. The faceted ones are for dressmaking. We are very happy that Susan has joined our Guild.

The Cat with Blue Suede Shoes stitched by Connie Dorion

And now for something completely different. The background is pale mauve silk. Mr Wellington is stitched in rows of novelty ribbon outlined with twisted gold thread. The face is leather and would not be so effective if it had been padded. One can still see the basting threads used in fabric preparation . These will be removed before mounting and framing. We hope that this one brings a smile to your face which is its intention.

[do_widget id=arpw-widget-2]

The next Blog will be on stitching leather in position almost invisibly.

11/11/2015 by Ann Bernard

Gold Work Brag Time

Teachers have a tendency to be very proud of their students’ work and I am no exception. The pieces included here were stitched in the spring of this year. This was an Intermediate class. In a previous class students had learned the basics of handling metal threads and stitched two small set pieces. Some made time to create an extra piece of their own choosing. These new examples were all designed and interpreted by the stitchers while I provided supplies and technical support and advice.

Sun Dance by Sandra Ackerley

Sandra started with the circular body of the bird. Creating a perfect circle using couched gold thread is a challenge; deciding just how to continue the thread lines into the head is another. The perfect circular surround with the evenly spaced decorative line – more challenges. Having evenly spaced and balanced wing feathers and lower decorations are also difficult. Look at this closely and note how evenly perfect every part is.

Summer Breeze by Barbara Lee Johnson

Barbara Lee has attended several gold work classes and is an experienced stitcher of these threads. She has combined applique with metal thread embroidery and beading. The leaves are all edged with fine pearl purl. The stalks and veins are beading using a different method on each main stalk.

Christmas Ornament by Marsha Fontes

This piece by Marsha is unfinished but gives you an idea of the diversity of the designs. Couching with a coloured thread is difficult but at least one can see what one is doing. Bottom left corner is part of her practice at stitching right angled corners.

Petals of Gold by Marsha Fontes

Marsha is becoming a teacher and this was the design she chose to teach the basics to another class. Note the shapes of the petals are all the same but the shape altering insertions are all different and complementary. The class learned a lot in this piece including attaching leather almost invisibly. I will be including the instructions for that in another blog.

Untangled by Gail Bailey

Gail’s design is a small piece of a Zentangle created by her daughter. In a symmetrical design such as this, discrepancies become glaringly obvious. Can you spot any? I am unable to do so. The balance between the blue background, the centre and the light green surround is delightful. Gail also attached the gold leather almost invisibly. The detail on the central ends of the leather arcs adds interest and breaks the geometry. The centre is heavily beaded which Gail learned in a subsequent class.

[do_widget id=arpw-widget-2]

Serviceberry Leaves by Barbara Lee Johnson

The lines in this piece of Or Nué are straight. It is the photographer who did not get it straight. I wish that I could show these pieces with better clarity and detail. Barbara Lee couched the leaves using a gold metallic thread which adds to the gleam of the gold. She uses a different green thread for each section. It is helpful when stitching Or Nué to add lines on the background fabric to help keep the stitching lines straight. She painted the green background to help maintain the purity of the green colour. This is one of Barbara Lee’s series of leaves all stitched in different techniques, threads and fabrics.

There will be another group of photos from this class shortly when I am able to take the necessary pictures.

15/06/2015 by Ann Bernard

Books, Books and More Books

You have not heard from me recently because I have been sick. An infection got into my blood stream and the results were not entertaining. I am now considerably better and, although I have not been stitchingly creative, I am trying to write a relevant posting for you.
Over the years, I have collected stitching books that were useful and meaningful to me. Now, that we are moving from a bungalow to a one bedroom apartment, downsizing has become a major issue for both my husband and myself. It’s not so much the furniture but the contents of cupboards and drawers and our collections of books. Being a member of an Embroidery Guild helps as we have regular stash sales which recycles items to others who can use them.

It is a traumatic time as one hopes to find new homes for treasures. My problem especially is with the large, hardcover books, beautifully printed and illustrated and still valuable because of their content and their condition. I have a list if anyone would like to see it. Mailing books is hugely expensive but maybe we can make arrangements for pickup at convenient locations.

Which brings me to the topic I wish to share with you. The world and life have changed radically with the advent of computer technology. Younger generations especially use it daily in all aspects of their lives. But publishing embroidery books electronically is still in its infancy.

If ever there was a pair of technologies destined to be wed, this is the ideal couple. The old knowledge and the new presentation. The convenience of the coupling is revelationary. An ebook on a tablet is small enough to sit on the table beside you while you stitch no matter where you are. It does not have to be forced to stay open. One can move forward and backwards in the text easily. Photos and diagrams can be enlarged as one wishes. It will always be there but out of sight when not needed. And, it takes up no space on one’s bookshelf and downsizing it will never be a problem.

Adding to this, the purchase price of an ebook is considerbly less than any printed book either hardcover or softcover. This is a consumer’s bonanza. For the writer, the amount of work involved remains astronomical and possibly more labour intensive than preparing a text for a publisher to edit and illustrate.

There are definite stages which will be encountered in adapting to this new way of owning information. First, there is the absence of the emotional one of loving books, the smell and glossy feel of the paper, the heft of its weight and the choosing of the place on the shelf among the other books you value. After that comes the stage where you acquire an ebook but decide to print it anyway and store it in a binder on your shelf. Labelling the spine does help locate it but it is less glamorous and tends to be forgotten among its more spectacular sisters. Then, comes the final stage of acceptance. Download it onto your iPad and leave it there. The information is always available whenever and wherever you want it. I have been recently making nametags featuring spring flowers and I needed to have my iPad right beside me for the information on how to stitch the individual flowers. Yes, I need to look them up, too. It was totally convenient and efficient.

EBooks on embroidery are still sparse. Mary Corbet has recently published her eighth, Stitch Sampler Alphabet. Her eBooks vary in length depending on the content. You can contact her at http://shop.needlenthread.com.

I now have two books online as Summer Flowers has joined Spring Flowers. I am working on a second edition of Spring Flowers with updated information and presentation. After that, I have in my head a further two books on totally different aspects of embroidery. There are also reprints of the gems printed in the early 1900s now available electronically. These classics are well worth investigating. In embroidery, our heritage is as valuable as is innovation.

[do_widget id=arpw-widget-2]

I was surprised to discover, as a user, an unanticipated distinction between a novel and technical information when viewed electronically. I have found it hard to follow story lines on my iPad and sometimes get lost. But the opposite is true for embroidery information. It is there, available and responds to whatever I ask of it. The cost is reasonable and it takes up no room on my shelf. It produces absolutely no downsizing problems. You may not have reached that stage in your life but, one day, downsizing will happen to you, too. Get with it and invest in ebooks instead of hard cover glossies, support the writers and help the trend grow.
You can browse my books at www.annbernard.com.

Enjoy your visit.

07/03/2015 by Ann Bernard

Golden Splash

It is nice to undertake a stitching project that it is entirely different to the spring and summer flowers that have dominated my stitching life for the last three or more years. Also, a semester away from teaching has given me the chance and opportunity to do some canvas work. It is many years since I last had to count holes and be constantly getting my needle into the wrong one. Be warned that black canvas is the same colour as a stitching needle thus rendering the needle invisible. Very annoying.

I prefer movement to a static design in the same way that I prefer paintings showing action rather than still life. Previous canvas projects have been the traditional circuits of different stitches all laid out in a square and headed for a cushion cover. Tell me, did I manage portray action in this design and choice of stitches? You will see some bargello that was altered to meet the needs of the situation. There is also couching, leaf stitches and padded leather. Would you believe that the gold threads used in metal thread embroidery are not used here at all? There is some DMC Floss but the rest are novelty yarns and Christmas parcel cord.

The black canvas was really annoying to work on. But it suited the concept. I must have gone through the wrong hole hundreds of times. Behind the canvas is a piece of metallic cloth where the threads were black in one direction and gold in the other. It gives the background just a bit of a sparkle when held in the right light. There was no way I was going to tent stitch all the background. It has been mounted on acid free foam core board. When our outside temperatures rise above freezing and stay there, I will take it to the framer. I think that a plain, matt black frame will finish it and not distract from the image. What do you think? I would be interested in hearing some other options. One can see too much of something to have an objective view.

[do_widget id=arpw-widget-2]

This was an enjoyable break of pace and interest and it has refreshed my mind before returning to flowers. But, it’s back to flowers and the research needed to create recognizable stitched plants and flowers.

17/01/2015 by Ann Bernard

Stitching Idyllic: Hand Stitch Recognizable Summer Flowers

Dear Readers,

It is with great pleasure that this blog posting launches my second book:

Stitching Idyllic: Hand Stitch Recognizable Summer Flowers

I send my profound thanks to the contributing stitchers and to the reviewers. You are all part of the process of creating and publishing and, without you, this launch would be like a bicycle tire with a puncture.

The book introduction is on my web site: www.annbernard.com

You will be able to ‘take a peek inside’ just as you do when you purchase any book online. It also includes directions on purchasing if you wish to do so.

But now, join me in an explanation about writing an ebook. This is as onerous as is writing any book unless it is a part of ‘you’ that just has to be expressed. For someone creative who wants to share their discoveries, it’s a good fit but an enormous amount of work. Completion is a special feeling comparable to TGIF, but more rewarding.

First, one has to have an idea and develop that idea. One should know one’s subject well and be ready to experiment with modifications and variations in techniques and materials. For instance, there are numerous books on many of the aspects of stitching but, if your book is a repetition of what has already been published, do you really need to add to the collection? The content should be new for readers and the information relevant to the topic. Or, the techniques described should be an advancement on what is already published.

Why an eBook rather than a printed book? These are my reasons which may or may not be relevant for other writers. I am older than many of you and have spent most of my working days in the medical world. Retirement gave me the time to resume a lifelong and deep compulsion to stitch but I was unknown in this field. I did not think that I had the time to undertake the process of creating a book to be published in the traditional way. A traditional book publisher generally undertakes the task of creating professional quality diagrams, photographs and layout. The author provides the material with which the publisher works. An eBook gave me the opportunity to publish fairly quickly.

An eBook is almost entirely constructed by the author from written content to diagrams, photos and layout. The ePublisher formats, adjusts and adapts it as necessary to meet the technical requirements many of which came as a surprise to this novice. For instance, no columns or explanations written around a photo; captions have to be above or below the photo. Photos must be of minimum pixels while still commensurate with a satisfactory image. There are no pages or page numbers but referencing backwards and forwards is just a click. The people at eBookIt.com were forever patient, encouraging and helpful to this computer dummy who has no understanding of their process or of how a computer works.

After purchase, the book downloads onto your computer or tablet and you can print it for yourself in full and high quality colour or it can be a ‘quick colour print’ which uses less ink. Or you can print it in black and white which will give you the information but not the inspiration.

While the publisher makes the contacts with all the principal distributors, publicity is the author’s responsibility. What plans do I have for promoting this eBook? You are reading one of mine right now!

As with any purchase, the choice of purchasing or not purchasing is yours. For this reason, you will find an excerpt of the book on my web page which will allow you to ‘peek inside’ and to read reviews which will help you make that decision.

www.annbernard.com

[do_widget id=arpw-widget-2]

This is a much more economical way for you to acquire the information than it is to purchase a printed copy especially bearing in mind the costs of printing, packaging and mailing. An ebook is available on your computer, or tablet, wherever and whenever you need it. The world is now accustomed to using the the electronic highway. With advantages for both the author and the user, I would have thought that publishing a stitching book in an eBook format would be established by now. The tablet habit is here to stay and we should all take advantage of the technology.

02/12/2014 by Ann Bernard

Gold Work Stitching Class – Fall 2014

It is teacher’s brag time. I am always delighted to have an opportunity to work with gold threads and to teach another generation of stitchers how to handle these specialized threads. This was an intermediate class in that all had learned the basics earlier this year. Many of the projects are unfinished but I thought that it would be nice for you to see some of the creativity of this class. These are a few only; hopefully, there will be more later.

First, Janet Sunderani did a practice/experimental piece to try out some threads and techniques to see what they would do and to gain some experience. You will remember Janet from the postings titled From Clogs to Education and Silk, Stocking and Clogs.

Look how well Janet has couched the dull gold thread in the lower right corner and how well she has stitched the pointed turns. You can see them clearly when they are stitched with a coloured thread, a specific technique included in the class. Look to the left and note the evenness in the Detached Buttonhole stitching. Close by is sequin waste placed in a double layer forming ovals. In the top left quadrant she has been practising circles. Note the perfectly mitred corners. The top right corner is unfinished but she thought she would place chippits in that area. Chippits are small pieces of leftover gilts and pearl purl stitched in the same manner as beads.

The first two pieces pictured here do not use the traditional gold work threads though they are using the techniques. Yes, one can do that. Why not? Be creative in your own way with what is available.

Red Experiment

Red Experiment Stitching

Janet writes, “I really enjoyed playing with these cheap threads because I was less concerned about doing it right and just freer to experiment and see how the threads behaved. Obviously many are not designed for this work and are quite gaudy. The cores of some were elastic and you cannot plunge them easily so mostly I did not do this. The braids tend to unravel so I sealed the ends with clear nail polish.”

That is a good tip. When your design includes loose ends of Japanese gold thread left on the surface of the fabric, dip the ends in clear nail polish to stop them from unravelling.

Meet Wellington, the Cat with Pizzazz and Blue Suede Shoes

Cat with Pizzazz and Blue Suede Shoes

Connie Dorion wanted to stitch a gift for her daughter who has recently lost her husband. She chose a pale mauve silk for the background. The first decision after that was that Wellington should have blue suede shoes. From there, she chose ribbons and trims to create a memorable cat. His face is gold leather and his smug smile is all Connie’s doing. He makes me smile, too whenever I see him and I love his blue whiskers. Connie is hoping that Wellington will be a therapeutic addition to her family. Wellington is completed but there are still some back basting stitches to be removed.

Or Nué

Or Nue

Barbara Lee Johnson is not only in a leaf phase of her life but this is her second piece of Or Nué. You will know Barbara Lee as a regular contributor to stitchinfingers. This is the lower quarter of a new piece. The photo segment is small so that you can see the detail. Or Nué is a difficult technique. Not only that but each line takes time and concentration and progress is slow, really slow. Note the evenness of the green and the gold stitching. Look at her pencilled guide lines and the straightness of her stitching in conjunction to the guide lines. The Japanese Gold thread is laid down in pairs which is the traditional way of stitching Or Nué. The ends will be left on the surface and covered with a matt board. If they were sunk through to the back, they would in effect, tear the fabric. This is a safe way to handle this problem. Barbara Lee is an experienced Gold Work stitcher, this being at least the sixth piece she has undertaken.

[do_widget id=arpw-widget-2]

There are other, interesting pieces stitched by members of this class but they are not sufficiently complete at this time to show them to you though I am hoping there will soon be an opportunity to share them.

It is a teacher’s delight to be able to post a blog such as this. Thank you, stitchers.

29/10/2014 by Ann Bernard

From Clogs to Education, by Janet Sunderani

And the clogs?

Well, my father had an expression – From Clogs to Clogs in Three Generations. It was a dire warning to remember that clogs , a mark of poverty and of hard work, were worn by people who, through hard work, industry and thrift, made a good future for their children. If we squander our inheritance, we will end up wearing clogs again. My grandmother wore clogs and so did her children until their grammar school days, much to their mortification. Aunt Edna was sent home from school for wearing clogs as they were too noisy and was told to return in leather shoes.

Clogs

I have a tiny pair of traditional Lancashire clogs made by Walter Hurst of Hindley – his was the last family clog making business in the UK. He was a customer of the bank where my father was manager. Dad bought them for my son Michael when he was born. They are bright red and quite beautiful. Michael has never worn them. Notice the metal on the soles and heels of the clogs. They improved wear and kept the wooden part out of the wet and dirt on the mill floor. Mr Hurst’s business has now closed and he has retired. His family made clogs for the workers of the six cotton mills and 16 mines in the area for 103 years. His son, a pharmacist, did not follow into the clog making business. It was a dying trade and neither clog making nor shoe repair could maintain the family. We live in a disposable society where cheaply made goods are built, not or service but for fashion, and then quickly discarded.

Our embroidery is an exception to this and a link to that heritage of industry, craft and thrift. We are a tribute to both the clog makers and the clog wearers!

So I am off now to find my clogs and do some gardening.

Want to know more about Clog Dancing?

http://www.historic-uk.com/CultureUK/Clog-Dancing/

Back to Janet’s voice and my research.

Among the many things that interest me is the teaching of needlework in schools; it has died out completely. On the Antiques Roadshow is a sample folder or book, stitched by a young Irish girl in Kildare, of beautiful tiny garments pin-tucked, smocked, embroidered, hemmed and buttonholed to show off her skills to prospective employers. I could not find pictures though I did find a picture of the instruction manual used by the teacher as an example and guide. It is heartbreakingly beautiful.

http://www.prices4antiques.com/Reference-Books-2-Needlework-Instruction-with-Samples-Irish-Female-Academy-9-inc-D9684635.html

When I saw the item being valued it gave me the shivers to think it was the work of a small child and it was the means of securing her life and her future.

It seems to me that many Victorian industrialists tried hard to provide for those unable to work or fend for themselves. They felt a social and moral obligation to do so. I am sure they lived comfortable lives themselves too, but they did provide employment, housing and education for their workforce. JP Coats certainly did so to the benefit of my ancestors. The company’s attitude to their workers and their education shows how enlightened they were.

Does this demonstrate that when one educates a girl, one can change life for future generations?

The other sampler I found was stitched by a woman, Lorina Bulwer, living in a lunatic ward in a workhouse around 1900. It was featured on the Antiques Road Show in the UK. Anyone who has read What She Left Behind by Ellen Marie Wiseman will know that one did not have to be a lunatic to be incarcerated in an asylum. It could be a matter of convenience for someone else. This is a video you really do need to see. It is a sampler like no other and is well worth connecting to the Antiques Road Show to see and hear about it. Please view this video even if you miss the others.

https://twitter.com/timetidemuseum/status/420852758531407873

How privileged we are to be able to sew for leisure and pleasure.

https://www.paisley.org.uk/paisley-history/ferguslie-half-timers-school/

Ferguslie Half Timers School was one of the finest school buildings in Scotland. Built in 1866 by the Coats family, they hired eminent architects to build a “palace of education”. It was described as “an admirably equipped school” and a “model of beauty and appropriateness”. It is now, unfortunately, derelict having suffered fires and then been left open to the weather. A drawing and floor plan of this school can be found from the link above. Half Timers were students who worked half a day in industry and went to school for the other half of the day. If you search the web you will find a video of the Ferguslie school in its current condition.

Eagley Mills owned by Chadwicks and then JP Coates has fared much better. It was closed in the 1970s and has been converted into residences. See the transformation of this old mill building.

http://www.pjlivesey-group.co.uk/case-study-4-eagley-mills/

In 1750 James and Patrick Clark began work in the loom equipment and silk thread business in Paisley, Scotland. In 1830, James and Peter Clark inherited the business naming it J. & P. Coats. The company expanded and is now an International provider of threads and other textile items and operates under a variety of names. One of the brands we all recognize is Clarks Anchor Embroidery Floss.

[do_widget id=arpw-widget-2]

Social history tells us of the lives and times of our ancestors and the conditions in which they lived. I am hoping that these articles focussing on the daily lives of ordinary people will keep the details of their lives within our memories.

This is a good moment to offer profound thanks to Janet Sunderani without whom the last two blogs would not have happened. I have enjoyed this trip into our history about which I knew nothing. Researching for pictures and videos has been interesting and rewarding.

27/10/2014 by Ann Bernard

Silk, Stockings and Clogs, by Janet Sunderani

1980s Britain was a difficult time to graduate from university. With a degree in English and no discernible job skills apart from a willing heart and an urgent need to earn my keep I felt very lucky to land a job with a textile company in the Midlands. Filigree Textiles made knitted voile, Jacquard lace, lace insertions and trimmings from Diolen. This polyester thread was used to make the sheer and lace curtains so popular at that time in the UK. They also owned E. A. Richards, a manufacturer of traditional Nottingham lace tablecloths, bedspreads and trimmings using machines that were already over 100 years old.

To take a tour of Leavers lace mill and see a working lace making machine watch the video below. Yes, I noted that it is in Rhode Island.

It is still possible to purchase Nottingham Lace. This tablecloth (Aintree design)can be found at the site below. Lace Story, also on this site, contains more information. The Lucilla pattern is 100% cotton and hand made. From cruising the web and reading the advertising, my impression is that there is an increased interest in using lace thanks to Downton Abbey.

http://www.quintessentialenglishlace.co.uk

I had a grand title, Marketing Executive, but in reality my job was a gofer. Officially I assisted in all aspects of our participation in national and international trade fairs. Included were purchasing of sales materials, display stands, packaging and print. Other duties could find me doing anything from cleaning the showroom, ironing samples to fetching and delivering urgently needed goods and trimmings. I felt lucky to have a job and was rarely bored.
I loved living in the Midlands near to Nottingham. We settled in Belper in a tiny cottage on Mill Lane. Our neighbour, Dina, had lived on that street all her life and worked for the local stocking factory, Brettles, where she was a ‘leg straightener’. She pulled the knitted stockings over a leg form prior to them being steam finished and becoming fully fashioned. That is, acquiring a leg shape. We moved and our new next door neighbour was ‘Dina’s other leg’. This means that she worked the other shift but worked on the same leg forms. I don’t think stockings are made like that any more.

If you would like to see a leg straightener at work, watch the following video:

www.britishpathe.com/video/stocking-factory

No. 17, was our neighbour on the right. This was an interesting cottage as it had been squeezed into the triangle shape between our house and the house further up the lane. At the front is a brick structure which was a nail makers workshop. As most of the mill workers were women and children, the men needed employment too. Belper was a centre for nail making and there are several nail makers cottages in the town. No. 17 was about twelve feet wide at the front but only three or four at the rear. All the cottages were tiny. I do not know how they brought up families in such small houses.

http://www.rightmove.co.uk/property-for-sale/property-34348430.html

Take a tour of 17 which has been renovated to a desirable residence. The bathroom has a heated towel rack which is an attraction living with the general dampness outside the home. Dina and her husband continue to live in the same house on Mill Lane.

Belper was also home to other manufacturers. Thorntons made wonderful toffee and chocolate and the smell was amazing. Strutts cotton mill and Silkolene had closed by then. Silkolene had developed a conditioner for silk weaving that became Swarfega – a hand cleanser used by mechanics.

I was often sent to Congleton to Berisfords where they made silk ribbon and trimmings. The route took me through the beautiful Derbyshire Peak District by way of Ashbourne and Leek. The countryside bore the evidence of its industrial past. This was mining country. Most of the girls who sewed the sheer and lace curtains were the wives and daughters of miners. The Victorian industrialists had taken full advantage of the confluence of coal, water, steel and a labour force to build substantial factories. This moved knitting and weaving out of the cottages and into large purpose built mills.

Wardles Silk Mill dominated the town of Leek though It was closed even then. The Victorians built those buildings to last. The Wardles had been a prominent family and several of them had been mayors of the town. Many of the mill owners of that time built schools for the children of their workers. This had a radical effect on the social mobility of that class as their children received an education for the first time.

For more pictures of the Wardle and Davenport Mill in Leek, go to:

http://www.28dayslater.co.uk/forums/showthread.php/79297-Wardle-amp-Davenport-Ltd-(The-Big-mill)-silk-manufacturer-Leek-march-2013

Refer also to Dyeing and the Silk Industry during the Late 1800s. Posted on this blog Monday, November 25, 2013.

In a way I felt completely at home in that industry. My grandmother had been a mill girl before her marriage and worked as a child (1905-1915 approximately) in a cotton mill as a halftime piecer. Under the looms, she joined together the threads as they were woven into fabric. She worked mornings and went to school in the afternoons. School included a nutritious hot lunch cooked on site. I wish I had paid more attention to her stories. All the local girls worked in the mill. It was much better money than being in service in a large home. Her husband was a chauffeur. Even married girls worked in the mill; their babies were brought to the mill for nursing at lunchtime. My Aunt Edna always credited her scholarship to Grammar School to the excellent education she received at the JP Coates school which used the strict Scottish education system. JP Coates made embroidery supplies. My great aunt Alice stitched the sample tapestries used in stores publicize their wares.

I often thought of the family connection as I drove through these Midlands industrial towns. The UK was in the midst of a hard recession. Company profits were down 20% and manufacturing output was down 15%. Inflation was 17% and unemployment had reached 1.5 million. Evidence of this was everywhere in the closed shops though the area was better off than some. Race riots occurred in the major cities triggered by arson attacks on the homes of racial minorities. The prisons were in uproar too with riots and hunger strikes. Peace camps were set up at Greenham Common to protest the siting of nuclear missiles as the USA slid towards war with Iran.

However Prime Minister Margaret Thatcher who was deeply unpopular, declared her intention to continue her policies announcing “the Lady’s not for turning”, and her Minister of Employment advised people to “get on your bike and look for work!”

One bright spot in all this was that Prince Charles and Lady Di were married and we were all invited to watch on the telly. As she swept down the aisle of St. Paul’s Cathedral, her magnificent silk dress had become a little crumpled from the confines of the glass coach. Perhaps this was a foreshadowing of things to come. The silk for the dress was woven in Suffolk, not Macclesfield. Filigree Textiles designed and produced an official souvenir lace panel to commemorate the occasion which sold very well in Japan.

The Lace on the bodice of Lady Diana’s wedding gown.

Like Wardles Mill, the factory I worked at is now derelict. Unlike Wardles the modern building did not last a hundred years. Filigree Textiles swallowed up its competitors and centralized its manufacturing into a new factory. I am not sure how much of its lace and voile is still manufactured in the Midlands. Cheap imports of excellent quality textiles from Eastern Europe were already threatening the market even in the 80s. Filigree had begun to buy lace rather than make it.

Information regarding lace keeps arriving:

“Do you know how to tell good lace from cheap lace? It’s the variation of the size of the holes. The more variations, the better the quality. This variation also causes the woven fabric to feel fairly stiff. Manufacturers would starch cheap lace so that it felt like good quality lace”. (Sheila McCoy)

Most of the old mills are derelict or transformed into flats or historic museums for the tourists. Which amounts to a glimpse at Britain’s manufacturing past and a trip to the tearoom.

[do_widget id=arpw-widget-2]

Each generation of the industry, each innovation seems to have been shorter than the previous ones. Cloth and thread were home produced for hundreds of years. That is, home grown, home spun and hand woven. Many generations would have worn cloth that was produced, cut and sewn within a very few miles of their homes. When the Victorians built the massive mills my grandmother worked in, wearing her clogs, they must have expected this marvellous new technology to last for many generations. The buildings and the machines were built to last. And yet I probably do not own one item in my closet that was made in North America. That is, made from American cotton, woven, cut and sewn all in North America.

In fact probably almost half of my wardrobe has more to do with the oil patch than the cotton patch, sheep fold or silkworm.

And the clogs? Janet has so much to share with the readers of this blog that it has been divided into two instalments. Stay tuned!

  • « Previous Page
  • 1
  • …
  • 11
  • 12
  • 13
  • 14
  • 15
  • …
  • 17
  • Next Page »

Search

Recent Posts

  • Laid Work – Introduction.
  • How to stitch Snowdrops. Quick and Easy!
  • Inspirations, All Stitched Up! from Australia
  • Newsletter Märchenhaftes Sticken – Jessica Grimm
  • Cotton Quartet 1: Preliminaries & First Stitches

Recent Comments

  • Ann Bernard on Prepare your embroidery for the framers – Mount on Foam Core Board
  • SGibau on Prepare your embroidery for the framers – Mount on Foam Core Board
  • Louise Desmarais on Prepare your embroidery for the framers – Mount on Foam Core Board
  • Katherine & Malcolm Bell on Embroideries that Record History
    Queen Mary’s Carpet
  • Ann Bernard on Embroideries that Record History
    Queen Mary’s Carpet

Pretty Chic Theme By: Pretty Darn Cute Design