Stitching Idyllic

Stitching Idyllic by Ann Bernard

  • Home
  • Blog
  • Spring Flowers
  • Summer Flowers
  • About Ann

04/12/2019 by Ann Bernard

A Garden of Spring and Summer Flowers

Here is an original piece of embroidery.  There was no inspiration except for her imagination and the pencil drawing of her plan.  Lilian Henrikson used all the flowers in both of my books, Hand Stitch Recognizable Spring and Summer Flowers, and, she included some she created herself.  What was remarkable, was that Lilian never once asked for any guidance or interpretation of the instructions, which to me, meant that the instructions were complete.  It is good to know that the books cover the subjects completely. It is also good to know that it is possible to create and add flowers of one’s own.  You may not think that you would ever do that but Lilian did and, so can you!  That is, if you wish to do so.

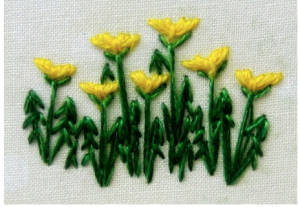
It started as a sampler trying out some spring flowers.  You can see snowdrops, crocus, daffodils and narcissus here in small numbers plus a forsythia bush.

From there it grew to include groupings of flowers.  Note that Lilian stitched lots of daffodils, many hyacinths in different colours and some primulas.

Here are the hyacinths again plus some tulips and iris. At the top, an unusual spring flower called Crown Imperial Fritillaria. It is tall and striking, and smells terrible.

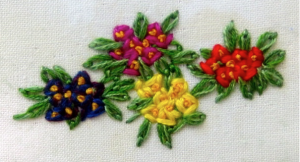
Lilian moved on to summer flowers.  Here are delphiniums, shasta daisies, several roses and orange cone flowers.  Next to the holly bush (red) are asters, below is alyssum, the blue are gentian, the orange are cone flowers, the light blue are hydrangeas, and the pink are a feathery spike flower but the name is unknown

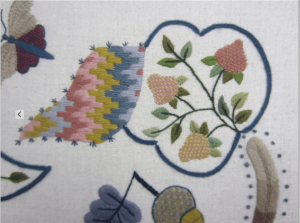
A close up of the portulaca which are my favourite in this garden.  These are the first ones I have seen other than the ones included in the book.  The colours of these flowers is vivid and different as is the stitching technique.

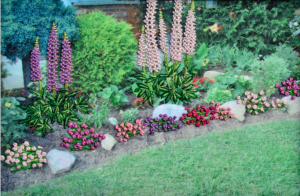
At the top left corner are hollyhocks and in the top right are sunflowers with lupins and peonies in between.

This is the completed Spring into Summer Garden.  Lilian planned the pathway which makes the eye wander onwards.  One should always pay attention to the scenery when walking through a real life garden.

It has been framed in dark green which sets it off nicely and does not detract from the embroidery.  The glass protection reflects the lights and I was unable to get a satisfactory picture of it completed.

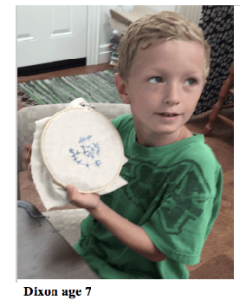
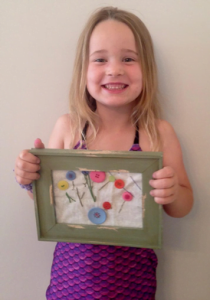
Here is Lilian who is obviously pleased with her achievement.  And, she likes flowers -also obviously!  She says she should have included a bunny somewhere!

This took many months to complete as Lilian is a busy person and mostly stitches for one afternoon a week. This is OK because I know that it took me many months to years to work out how to portray the 46 flowers, bushes and trees.included in both books.  She comments that the project was fun and that she never got bored with repetition.  Stitching kits can be really boring because of repetition.  Quantities of repetition.  It is not you, it is a fact of life and of kits.

Would you like to purchase a copy of both Spring and Summer Flowers ebooks at half price?  Post a comment to this blog entry and see what happens.

The next blog will be a close up look at the contents of my two books.  The half price offer will be included.  It will be in time for you to consider this for a seasonal gift to yourself or someone else who enjoys stitching.

20/04/2019 by Ann Bernard

Spring has Sprung: Posted on my Front Door.

Phantasy Flowers.

It is Easter weekend and we have April weather.  Chilly rain and wind out there.  It has been an endless winter but I say that every April.

I have just completed this spring bouquet for my front door.  Am in the process of writing a book on how to create these.  They are easy to make but there are potholes that can be avoided if you are aware of them.  Why fall into them if you do not have to!

[do_widget id=arpw-widget-2]

Happy Easter Wishes to all readers.

Ann

31/01/2019 by Ann Bernard

“If Winter comes, can Spring be far behind”.

This famous quote helps us through the depths of the winter weather.

To help both you and myself, let us anticipate spring.  It is bitterly cold here in southern Ontario.  Today looks lovely but it the cold goes right through even the warmest coat and gets into ones bones.

It is a day to stay indoors and dream of Spring Flowers.

Here are some hand stitched spring flowers which are based on chain stitch.  It is amazing what one can do with the most basic and best known stitches if one plays around with them a little.   One never knows what will happen.  To achieve flowers that are  recognizable it is important that the proportion of plant height and flower size be correct and that the colours of both foliage and the flowers also be correct.  Otherwise, our eyes do not recognize them.  They become generic, rather than specific.

Snowdrops.  Except for celandines, these really are the first flower of spring.  One can have both snow and blooms in the same flower bed. Use a white Perlé thread to give the flowers some sparkle.  In nature, they really do sparkle.

Crocus also bloom in early spring.  DMC floss thread in the correct colours gives us a good rendition of these popular and fragile blooms.  Note that the foliage colour of all three plants is different.

Tulips are both taller and much later in the season.  These flowers bloom in a multitude of different colours.

My good friend, Mary, created card inserts using the instructions for tulips.  I would love to receive such a card for a birthday or to wish me well if I had been sick.  It is such a personal gift to, or from, someone important in ones life.

[do_widget id=arpw-widget-2]

You will find the instructions on how to stitch these flowers together with the DMC floss colour numbers in this ebook.

Hand Stitch Recognizable Spring Flowers published by ebookit.com

The book contains the instructions for 23 different flowers, bushes and trees.  It also contains, and this is important, information on setting up a frame with fabric that is taut.  Basic, ‘how to stitch’ information is included plus finishing and mounting ones completed work.  As most books assume that everyone knows the basics, they do not cover this vital information.  Because it is not widely know, I have included it in mine.  It saves beginning stitchers falling into  potholes and embroidery is full of them.  The experience is more enjoyable if one knows where the potholes are and is able to avoid them.

The book is published in ebook format because of the high cost of colour printing.  You can print it on your printer for your own personal use.  We have proved many times that the instructions are complete and you will not need other assistance.

Have fun with this and enjoy anticipating Spring.

Ann

09/09/2018 by Ann Bernard

Straw Embroidery. A historical technique that has been revived and modernize.

It is a pleasure to introduce you to Natalia Lashko.  She uses straw as her creative medium and her pieces are dazzling.  Her website includes pictures of many pieces some of which are floral and others are religious.

Snail by Natalia Lashko

Straw was used in Russia since the 16th century (according to some sources – even much earlier) as an imitation of gold embroidery.  Natalia was aware the actual process had been lost over time.  Through much experimentation, trial and error, Natalia began a journey of discovery, including her love of quilting (as evidenced by the fabric selections she draws together in her work).  To further her knowledge and skills she travels the world, visiting exhibitions, holding courses and master classes with leading foreign masters of patchwork, a word she uses to describe her pieces.

Natalia has developed her own style of straw embroidery;  one that creates dimension by not necessarily sewing each piece of straw as it might if it were thread stitched. As a result Natalia has taken straw embroidery into the current century.  The straw works of Natalia look both traditional and original and alive. Her masterpieces of straw that may take as long as five years to complete.  Her works, some being 5 feet in length, may be found in private collections in Israel, France, Russia and Poland.

                                                                     Madonna and child

According to Natalia, “Straw is a flexible material. Working with it is difficult and at the same time enjoyable. ”  There was difficulty with portraits, because they have to be graceful and beautiful. I had a lot of experimenting. Imagine the face of  Jesus just two millimeters and centimeters, in which I must depict the eyes, nose, lips, and that it was a child, with plump cheeks that he was beautiful. From all that I have embroidered, and this many characters, Jesus was for me a pleasure.

The Straw Shop is privileged to be the only American website granted permission to share her works.

I googled their site.  I found information on straw and several examples of its use.  I did not find anything by Natalia Lashko.  This is free publicity for you both.

You can see more of her creative work by entering Natalia Lashko on your browser and clicking on Images.

Enjoy; and be dazzled.

29/08/2018 by Ann Bernard

More Summer Flowers – a Second Peek

Lavender  Lavender is featured in Water Garden and Briarwood Garden.

Lavender is a bushy plant with long, delicate stems and leaves. The blue/mauve flowers form long spikes with a knobby  texture. It looks to be related to Veronica but the structure and colour of the leaves are different.

Stalks and Leaves: Green 988 (2).

Flowers: Blue/Mauve 340 (1) + 210 (1) = 2.

Stalks: Stitch some stalks in Straight Stitch adding a few shorter straight stitches as leaves to fill out the base of the plant. Add some flowers to the stalks. Create bends or curves in the stalks by displacing the stalk to one side with the point of an awl or with another needle. This is done while the flower spikes are being stitched. Add until a lavender bush of the size and shape you wish is achieved.

Flowers: Use one thread each of the blue and light mauve. Stitch with Open Herringbone stitch. Start at the upper end of the stalk and cover the desired length of the stem. Note that the stitching is narrow in width and that the stem forms padding for the flower spike. Start stitching  just above the tip of the stem, or start slightly below the tip for a flower spike that is not yet fully open.

Water Garden, stitched by Ann Bernard (original is 4″ x 6″)

This garden  includes both Lavender and Veronica. These two plants are visually similar except for the colour of the blooms. Also, the leaves are different in both form and colour.  Start by stitching the green stalks and leaves of all the plants you wish to include in your garden. Leave the threads posted to the spare cloth border so that you can recapture the thread and add or make alterations easily. When you are satisfied on the placement in terms of position and balance, return to each group and complete the basic stalks and leaves.

The directions for stitching Alyssum are included in the book.  The plants need a base of green stitching behind the french knot flowers.

Contents:  Hand Stitch Recognizable Summer Flowers

Fabrics for your Garden: Batik, dyed fabric, photo print, paint the fabric, silk and wool rovings, silk fusion, machine embellishing, machine pieced quilting.

Backing fabric and back-basting : Straight of grain: Supporting your frame.

Frames: Dressing Your Frame: Staples, thumbtacks, Q-Snap Frames, Grip-n-Stitch Frames. Ring or hoop frames. Supporting your frame on a table

Threads: Stranding, Stripping, Mixing and Saving. Threading your needle, thread management, Resources such as Google, DMC  Thread Colour Cards, Tools.

Stitch Directions: Split, overstitching, seeding, stem, detached chain, enhanced chain, fly, feather, cretan, herringbone, woven spider web wheels, french knots.

Summer Garden Flowers:

Border Plants: Alyssum, dandelions, impatiens, lily of the valley, portulaca.

Daisy Family of Plants Stitch directions: Asters, black eyed susans, cosmos, english daisies, purple coneflower, pyrethrums, shasta daisies.

South African Daisies: Gazanias, gerbera daisies, osteospermum.

Herringbone Flowers: Delphiniums, lavender, liatris, veronica.

[do_widget id=arpw-widget-2]

Roses – Stitched with bullion knots, woven spider web wheels, stem stitch.

Tall Plants: Double Hollyhocks, lupins, peonies, sunflowers.

Small Projects: Coasters, card inserts. Distorted straight stitch.

Cover Story: Come Stitch With Me:

Silk Flower Conversion: Technique; Clematis, hibiscus, single hollyhocks, petunias, leaves.

Funtasy Flowers: Poppies, and creating. Coasters.

Mounting Your Garden Ready For Framing:

This book is published as an ebook.  Commercial colour printing is expensive and there are a huge number of colour photos and diagrams.  An ebook makes the price affordable.  You can print it on your printer for your own personal use.  Priced at $12.99, this is a bargain and the information included makes it a good investment for both experienced and new stitchers.

Go to eBookIt.com.  Bookstore is at the top of the home page.  Go down to Crafts and Hobbies, Select and proceed to Purchase.  Select the format that is compatible with your computer.  You can also download it onto a tablet or iPad.

If you have any problems with purchase or downloading, email ryan@ebookit.com

I hope that you enjoy this book, use the preparation strategies and try out the flowers.

Nothing, particularly stitching, is very difficult once you know how!!!

Thank you,  Ann B.

28/08/2018 by Ann Bernard

Summer Garden Flowers – Take a Peek

Hello Friends and Fellow Stitchers,

Lazy Daisy stitches and French Knots have been used forever for portraying flowers.  Using alternative but basic stitches was my mission when I developed and then published Hand Stitching Recognizable Summer Flowers.  After much experimentation and, many failures, here are the results.  You will not have to do what I had to do.  You can pick up your needle, the correct coloured thread and stitch up any of the flowers in this book knowing that the result will be as pictured or, your own personal interpretation of the information.   I am  including one if the 23 flowers in this ebook as more is content overload for one entry.

Purple Coneflower

The Purple Coneflower grows in clumps and reaches a height between 2′ and 4′. It blooms from mid summer into the autumn. Each flower opens with pink/purple petals and a flat center similar to a Shasta Daisy. As the flower ages and the seeds in the center ripen, the petals droop down to become vertical and the center becomes larger and domed, eventually becoming cone shaped. One plant can have many flowers in different stages of development. The birds and bees love this plant.

Stalks: Green 987 (6).   Leaves: Green 702 (2) + 988 (1) + 987 (1) = 4.

Petals: Pink 3609 (2), 3608 (3), 3607 (1). Explained in Petal directions.

Centers: Brown 433 (1) + 938 (1) = 2.Orange 721 (1 doubled in the needle) = 2

Stalks: Using long Straight stitch the stalks of the plant.  Indicate the centers of each of the flowers with a small Cross stitch in either of the two brown threads.

Petals: Stitch a few Straight stitch petals in each bloom using 3609 (2). Add more petals using 3608 (3). Note that the petals are uneven in length and that the petals can be darker towards the center of the flower. You can Overstitch the base of the petals with one thread of 3607 but this is not essential.

Centers: 433 (1) + 938 (1) + 721 (1) = 3. Overstitch a few horizontal Straight Stitches across the central brown Cross Stitch. Using 721(1) doubled in the needle = 2, Overstitch a few French Knots on the centers using a fine needle for this such as a Crewel 9 or 10.

Leaves: 702 (2) + 987 (1) + 988 (1) = 4.

Detached Chain stitch with the catch stitch towards the stalks of the plant. The upper leaves are stitched with 702 (2) + 988 (1) = 3. The foliage on this plant is fairly dense with the leaves being an oval with a point at the tip of the leaf.

The angles of the leaves vary considerably.

                               Stitched size is 2″ wide x 2 1/4″ high.

Briarwood Garden, stitched by Janet Sunderani (original is 6 1/2″ x 5 1/2″)

Briarwood Garden

This delightful garden reminded Janet of, and is named after, the garden she had to leave behind when the little used road next to her property became a four lane highway. All that noise would not suit this peaceful scene.

The background fabric was created using loose silk threads that were machine needle felted into a scrim background.  We generally used pale green batik cotton fabric for the backgrounds which is easy to stitch on. We also used photo prints on fabric for many of the gardens.  The directions on how to do this are included in the book.

The flowers in the above garden are Purple Coneflowers, Black Eyed Susan, Lavender and Roses.  You will find them all in the book Hand Stitch Recognizable Summer Flowers.    eBookIt.com   Go to Bookstore – Crafts and Hobbies and select this book and/or Spring Flowers.  Choose your download method and then go to purchase.  eBook format makes these books very affordable.

Learning by trial and error can be missed experience by those who follow the information in the section on preparation of fabric and threads.  Few embroidery texts include all this information which is why I included it. The assumption is that everyone already knows the whys and hows which is not always true.   You will jump ahead in embroidery skills and be delighted with improved results when you follow the directions that are included in both these books.  Knowing exactly how to do things can make learning the skill of embroidery enjoyable rather stressful.

Tune in tomorrow for the second part of this posting.

26/06/2018 by Ann Bernard

Catching “The Itch to Stitch” at a very early age.

It is never too young to start a creative career:

In the Northern Hemisphere, summer vacation time will shortly be here.  If you have the opportunity, this is a great time to stitch (thus starting the “itch to stitch”) with the younger members of your family.

Grandma Marlene definitely had a great time introducing her grandchildren to stitching. The children had fun too and Meghan and Chloe have continued to stitch.

Meghan and Georgina both aged 3

The boys enjoyed it as much as the girls.

Marlene suggests that you prepare for each child a piece of suitable fabric and a 6″ – 8″ hoop.  Cut 30″ lengths (3 pulls from the skein) of several to many colours of Floss.  Thread each of them into a Chenille needle and knot both ends together so that the needle will not come un-threaded during stitching.  Place all the needles in a pincushion and let the children choose the colour they wish to work with.

This is how I caught the “Itch to Stitch”  About the age of 6 years, my grandmother was caring for me.  She provided fabric and threads and I made an eggcosy.  This is like a teacosy but is sized for a soft boiled egg.  When I was old enough to not lose it, she gave it to me.  The embroidery stitching and design were just like those of Marlene’s grandchildren.  At the age of 10 years, an aunt gave me a cushion cover kit.  It was a Jacobean design, good quality fabric, thick Penelope wool thread and instructions.  I stitched it; it turned out OK and won First Prize at the Adult Embroidery Section at Cartmel Fair.  I was hooked!  My father used that cushion for years until it was totally worn out.  Unfortunately, the eggcosy got lost in house moves or you would see a picture of it here.

[do_widget id=arpw-widget-2]

Meghan produced the following piece during her Kindergarten year.

Both she and her teacher were delighted with it.

Mary Corbett of Needlenthread.com is writing a series on embroidery classes for children.  There are three levels, ages 9 – 11,  12 – 13 and 13 – 15 years.  She is teaching the participants specific embroidery stitches.

The next post will show you Chloe’s  stitching career to date.

13/06/2018 by Ann Bernard

“Take a Peek Inside” Stitching Idyllic Spring Flowers Second Edition

When available, I always like to “Take a Peek Inside” a stitching book that I am contemplating purchasing.  Then I know if the information duplicates what I already know or if it new for me.  This book is technically relevant for new stitchers in that it includes basic information that I have not seen in other books.  It is also good for experienced stitchers in that there are unique adaptations and uses of stitches and a method of planing your very own garden.  An ebook is also inexpensive. and you can print your own personal copy

Carry on reading this blog entry and the next one to know why this book is a good investment for you.

A Summary On Hand Stitching Recognizable Spring Flowers Using Creative Surface Stitchery 2nd ED

An English Country Garden, as sung by Nana Mouskouri, was in my brain. Just to show you the mood I was in and how creativity came acalling, you can hear Nana Mouskouri sing this song.

To create any piece of stitching, it is necessary to first gather the materials and tools.

Fabric: The sample flowers are all stitched on a light green Batik cotton fabric.

Threads: DMC floss was used throughout for the stitching.  There are floss conversion charts on line.

Tools: Needles, scissors and other essentials are explained later in the text.

Stitch Directions: There are only four stitches plus some adaptations used in this book. Unbelievable! The stitches are –

Straight, Detached Chain, Buttonhole and French Knots.

This makes this an ideal book for a learner.  The flowers are stitched so as to be recognizable and identifiable. They are not as elegant as those created by Mother Nature but it is obvious what they are.

Stitching Frames: Ring or Hoop frames seem to be a favourite choice. Although the fabric is held at a tension, this tension is not always well maintained. Some functionally improved alternatives are

Q-Snap Frames and Grip-n-Stitch Frames. Stretcher Bars are available in Art and Craft stores and are very satisfactory. A Slate Frame is ideal if you should be so fortunate as to own one.

Grip-n-Stitch/Clip-n-Stitch frames can be found via www.fabricflair.com

Stitching on really taut fabric is a huge plus for all stitchers. It is an essential that one does not recognize until you experience it yourself. There are no issues of puckering and having to stretch the finished piece for framing. Also, the stitches lie on top of the fabric surface giving an embossed effect which is achieved by nothing more complex than the fabric being drum tight. If you can bounce a coin on it, it is tight enough. There are nothing but pluses to be gained by adhering to this principle.

Placing a backing fabric behind the front fabric has many benefits. It stabilizes and gives body to your stitching surface. It makes starting, ending, reverse stitching, plus long threads on the reverse side much simpler. It allows you to stitch on fabrics that are not always deemed suitable for embroidery.

Each Spring Flower has a photo of the real flower. There is the thread recipe for that plant’s foliage and flower, a stitching diagram and a photo of the stitched flower included. There are no patterns to follow in this book. Instead, a way of planning a garden layout and then stitching it are shown. This establishes original creativity immediately. Chloe, for example, has already bypassed cross stitch and other kits in her first venture into textile creativity.

Right now, I would like you to meet Edna Mumford and to see the garden she stitched.

I can thoroughly recommend Ann Bernard’s Stitching Idyllic for Spring Flowers.  Ann brings her training at the Royal School of Needlework to the fore by devising a whole new way of embroidering spring flowers with ordinary cotton floss.

Her method of combining different hues of 4 or 6 strands at a time for flower stems and flower heads results in lovely raised effects which make the effort of stranding (which I originally thought tedious) very worthwhile, and gives the impression of many stitches whereas your one bold and stranded stitch is fully expressive by itself.  This technique for the flowers and stems – which aims for true colours in nature – at once gives a wonderful shaded and depth effect.

I’ve been an embroiderer for many decades and I was delighted with the results I achieved just doing a practice piece. Using only her techniques, I then embarked on an embroidery, of my own composition of spring flowers. Her directions ‘take you by the hand’ and lead you through flower sizes, growing habit, and colour to make them quite realistic. I completed my own piece of work without my usual agonies as a result, and I was very pleased to produce recognizable flowers.  The directions are thorough and the diagrams very descriptive.

I would recommend this book for any stitcher whether novice or experienced, as there is much to learn for very pleasing results.

Sincerely, Edna Mumford

There are many examples of stitched gardens. They all use the same stitches and thread colours but each garden is totally different.

A way to plan your own garden is included. It is a well known method using a triangular positioning of colour. The viewers’ eye is comfortable with this. I was  looking at a painting by Monet and although the triangulation of colour was not obvious as I looked at it carefully, I found it. It is been a method of design for a long time and will be helpful to you in laying out your garden. This is how each garden becomes individual and unique.

Some smaller projects have been developed including name tags, artist trading cards, greeting cards, phone and eye glass cases. Every stitcher who belongs to a Guild needs a name tag and it is nice to have a new one occasionally. Try wearing your stitched name tag to another event and see what the reaction is. You can even wear the official tag and your spring flowers one too. Two are better than none and you will be flattered at how many people remember you the next time you meet. They are great conversation starters too.

Finishing and mounting are included. This process is quick and easy when you follow the directions in the latter part of the book.

You will have created a unique item that is specifically original to you. If you really are a beginner, your stitching career is off to a flying start. If you are already experienced, you will still find techniques and ideas in this book that you can blend into your repertoire and give you another mode of expression to add to your stitching portfolio.

Stitching freehand, but with guidance, is a wonderful experience. You can express your own ideas and there are no black lines or charts to follow. Your creation will be unique and totally your own. It is of continuous amazement to me that, using the same stitches, the same threads and the same information, that the results can be so infinitely varied.

[do_widget id=arpw-widget-2]

The creative use of these four basic stitches to express the spring flowers and plants in this book are entirely my own. I have not borrowed or been inspired by any influence other than the bounty and glory of nature. It has been a challenging process with endless trial and error.  I am happy with the final results.  They are different and have proved to be infinitely adaptable.

Welcome, and Enjoy.

Ann Bernard.

Reviews
Once in a lifetime, a keen student obtains an authoritative text which becomes a firm foundation for everything that follows. In the world of botanical embroidery – this is that text. It is not the fanciful embroidery of the Jacobean’s, nor the drooping coils of Art Nouveaux. This is the rendering of botanically correct images using embroidery thread with due attention to hue and colour. It uses the techniques artists use to create the infinite complexity of natural patterns. Follow the detailed instructions and the numerous illustrations and you will be exploring all the different yellows to contrast the daffodil with the crocus. Perhaps you will be making your first detailed observations of the arrangement of leaves on a plant stem. Others will then recognize the plants in the embroidery garden you have created.

With profuse illustrations of stitched gardens, real flowers, embroidered flowers as well as line drawings and how-to diagrams, Ann brings you a lifetime of dedication to embroidery and botany. Anyone who is new to embroidery (as I was) will be successful if they follow her detailed instructions on preparation, colour choice and methods for stitching flowers. Your garden will bloom!

Bridget O’Brien, Guelph ON

This book had me itching to start stitching. The level of detail is wonderful for new stitchers and great for experienced stitchers to help maintain good stitching habits.  She tells us how to do a certain operation and what not to do from her experience. I thought that was great for those of us who do not follow directions very well. Looking forward to your next book.

Marsha Fontes, Cambridge ON

Ann Bernard has written a wonderful instruction book on how to stitch miniature garden flowers. Ann’s instructions are so clear and precise I would have no difficulty in achieving excellent results.

It is plain this work is dear to her heart. The numerous illustrations of her exquisite flowers demonstrate her dedication to achieving extremely lifelike results. They almost look like garden photos that have been altered with special effects, not pictures painted with thread! The book is also very readable and it’s like having the charming, affable Ann in the room; I could almost hear her voice as I read it! Every embroiderer who loves flowers should have a copy of this book in their personal library!

Lilith Muramasa, Guelph ON

This 2nd edition of Hand Stitching Recognizable Spring Flowers is a good book to learn how to create and embroider spring flowers in an easy, free style manner. Included are wonderful, full coloured photographs and examples. Only four basic stitches are used. The beginner stitcher will feel a sense of confidence as she works through the very clear step-by-step instructions. This book is a good investment for the beginner but also for intermediate and other stitchers who may appreciate help in creating designs. The informal conversational style of the contents is engaging. It is, as if you are taking a class, one on one, with Ann in your own living room.

Ann Bernard is to be congratulated for the time and effort put into producing this extremely helpful book. Her teaching and stitching experience come through the words.

Alison Jackson, Cambridge ON

Hand Stitching Recognizable Spring Flowers by the talented stitcher, Ann Bernard, is a wonderful book full of inspiration and easy to follow instruction. As a fibre artist who is a novice to the more traditional embroidery techniques, I found this book provided all of the basics that many other books assume the reader will know.  But what really excited me was that Ann teaches you how to create truly unique embroidery! By learning some basic theory of colour and design, which is presented in an easy to read manner, Ann gives the reader, whether an experienced stitcher or a novice, the courage to ‘grow’ their own unique and beautiful Spring Garden without following a prescribed pattern.

Linda Kittmer Rockwood ON

25/03/2018 by Ann Bernard

These daffodils bring you good wishes for Easter

It is almost Easter weekend when I, and many other people in our northern climate, think that Spring really should be here or, appear very soon.  The Spring Equinox has happened and we hope that Mother Nature will cooperate.

To help you feel ‘springlike’, here are the instructions for stitching daffodils.  They are easy to stitch and make a good card insert.   It is important to have the colours exactly right so that the eye identifies them as daffodils. The DMC thread numbers are included with the instructions.  You can use Clarks or Finca instead but go to a Thread Conversion Chart to get the equivalent colour numbers. The Charts are available online.

You will also notice that ‘Take a Peek Inside’ is now available, or will be in a few days, for the ebooks – Hand Stitch Recognizable Spring Flowers    and   Hand Stitch Recognizable Summer Flowers.  I always like to leaf through a book I am interested in before adding it to my library.

Daffodils

The bright yellow of King Alfred Daffodils makes them the most familiar variety of the daffodils.

As our goal is to create plants and flowers that are instantly recognizable, we will stitch bright yellow daffodils. Note that a daffodil has long straight leaves and stalks, and that the flowers have six petals and a trumpet. We will stitch them frontal view for now. Later, we will return to daffodils and add curved and bent leaves and the flowers in side view. See Basic stitches for stitching techniques.

Green: 320, 987, 989, 895. Yellow: 444, or 307, or 973.

Gold: 972.

Leaves and Stalks (fig. 1 below): Use 2 threads each of 320 and 987 and 1 thread each of 989 and 895. These 6 threads of green are now stranded and mixed and make a blend of greens more like daffodil leaves and stalks than any one of them would be if used on its own. (to strand threads, separate them into single threads and then put them together again).  Stitch a few Straight stitches to indicate some stalks. The stalks need to be in proportion to the flowers and are about 1″ long in the sample pictured below. Start in the center and stitch stalks first towards one side and then stitch the other side. Take the short cut between the stalks on the reverse of the fabric as in the diagram (this is the procedure for all the stalks for every plant). Store that thread by bringing it to the front of the fabric a short distance away.

Flowers : Four threads of any of the yellow threads, stranded but unmixed, to stitch the flowers.

Triangle Stitch: Stitch the inside triangle first with stitches about ¼” long (Fig. 2). Add the second and third triangles outside the first one (Fig. 3). Overstitch a Reverse Triangle the same size as the last triangle (Fig. 4). Note that the points of the reverse triangles are midway along the sides of the first triangles. Increase or decrease the number of the triangles to alter the size of the flower.

[do_widget id=arpw-widget-2]

(Overstitch – stitch on top of previous stitching). Stitch a few flowers at the top of the stalks (Fig. 6). Store that thread and retrieve the green one. Add some more stalks to your plant or group of plants. Then, retrieve the yellow thread and add more flowers. Continue until you have enough flowers to please you. Using the same green thread, add more Straight stitches to fill out the plant with leaves. The leaves of daffodils grow taller than the flowers. Add a few short Straight stitches above the flowers to indicate this. The plant does not look correct unless you do this.  Add more Straight stitches to fill out the plant with leaves.

These diagrams make stitching Daffodils look difficult. It is not. Just place Straight stitches as indicated and you will have no problem. It does take a little practice to make the flower the size and shape you wish, but that is why you have tried them first on your sampler.

Centres: Gold 972 using 1 or 2 threads.

Overstitch a small reverse triangle in gold thread for the trumpet of the daffodil (Fig. 5). You can stitch them as diagrammed here or look at the flowers on the cover photo for an alternative.

Your sampler does not have to be a completed work of art.

Stitch enough of each plant and flower so that you know how the stitches work, the length of stalks and leaves, how the flowers are created, and how their size can be altered.

Once you know this flower, move on to the next plant, Narcissi.

Specially for our friends in Australia, the next posting will be Purple Cone flowers.  I hope that they grow in your area and that they are in bloom right now.

Wishing all readers, a very Happy Easter.

23/02/2018 by Ann Bernard

Introducing free-style, creative Contemporary Embroidery

My thanks to the multitude of you who read the series of 12 blog entries on Embroideries That Record History. Your response has been most gratifying. Doing the research was both interesting and fun though I find the computer technicalities to be extremely challenging. My thanks to Beth and Alexis without whom I would still be adrift in computerland.

Your comments were also appreciated. To reply to one: what are the books you have written and published all about? I am happy to respond. Yes, I will return to Historical Embroideries, but while research wanders and mellows, here is an introduction to the books that you will find on this site.

The Royal School of Needlework taught us how to stitch with precision and speed. The techniques and design were traditional and we followed black lines printed on fabric. This is essential to stitch a design such as the one pictured below.

But my books are different!

They introduce you to freehand, creative stitching. The research is already done and you can enjoy the results.

Many years ago, I had this song on my brain: In an English Country Garden as sung by Nana Mouskouri. I pondered and experimented on how to stitch the flowers in the song using a wider range of stitches than lazy daisy and french knots. I experimented endlessly and from the many attempts to portray recognizable flowers grew the body of knowledge that is contained in my two books,

Hand Stitch Recognizable Spring Flowers and Hand Stitch Recognizable Summer Flowers.

All the stitches used in these books are traditional but are used in non-traditional ways.

Spring Flowers uses only four basic stitches, straight, detached chain, french knots and buttonhole.

Below are Dandelions which were added to our gardens just for fun.

Summer Flowers uses more stitches all of which are well known.

None of this is difficult. The experimenting resulted in simplicity.

What is different is that the stitching is freehand. No black lines to follow and cover so that they do not show up like ring around the collar. Stitching freehand is fun, it is liberating and it is the essence of creativity. Creating something uniquely individual has its own thrill.

But what about a design, you ask? Yes, there is a plan to be made before starting stitching but it does not rely on paper or pencil. Nor is it necessary to be able to draw. It is done with small pieces of coloured fabric or paper that plan the general layout. Photographing and recording this plan is part of the preparation for stitching freehand. I can guarantee that if you put pencil marks on your fabric, you will change your mind and there will be visible lines where you do not want them. With a plan, a concept to start from you can change your mind on specifics later. Changing your mind is all part of the process. Planning the colour layout allows you to start stitching.

This garden was stitched by a student. Look at it closely to note all the different spring flowers included.  Count and identify them.  I come up with between 10 and 12.

My books also contain technical strategies that I learned at R.S.N. or have gleaned over the years. There are tips for experienced stitchers and tips for beginners. Mounting fabric on a frame that is taut is essential. It makes every stitch easier and the results are far more professional than working on slack fabric that behaves like a trampoline.

Summer flowers uses photo printed fabric. I have my photos on file and will forward any of them to you for your own personal use. You may already have some suitable ones of your own. Here are Impatience, which bloom in many colours, and Lupins stitched on photo printed cotton fabric.

These books are published in ebook format so that they are affordable for everyone. You can print your personal copy on your printer or download it onto your Ipad or Kindle and have it close by when you are stitching. EBookIt (Archieboy) is a safe and reliable site.

[do_widget id=arpw-widget-2]

Here are the results of professional training and a lot of experimentation. You will receive the necessary information to be individually creative. You can then create a stitching that is uniquely yours.

Stitching freehand is relevant for contemporary embroidery.

Bravo, Go for it. Venture and discover what you can do when you follow your own ideas.

  • 1
  • 2
  • 3
  • 4
  • Next Page »

Search

Recent Posts

  • Laid Work – Introduction.
  • How to stitch Snowdrops. Quick and Easy!
  • Inspirations, All Stitched Up! from Australia
  • Newsletter Märchenhaftes Sticken – Jessica Grimm
  • Cotton Quartet 1: Preliminaries & First Stitches

Recent Comments

  • Ann Bernard on Prepare your embroidery for the framers – Mount on Foam Core Board
  • SGibau on Prepare your embroidery for the framers – Mount on Foam Core Board
  • Louise Desmarais on Prepare your embroidery for the framers – Mount on Foam Core Board
  • Katherine & Malcolm Bell on Embroideries that Record History
    Queen Mary’s Carpet
  • Ann Bernard on Embroideries that Record History
    Queen Mary’s Carpet

Pretty Chic Theme By: Pretty Darn Cute Design