In the northern hemisphere, we are more than ready for spring this year. In Canada, we have had months of snow and cold but it has not been anything like as difficult as it has been in the United Kingdom. Right now, the snow drops are up but have been eaten by the rabbits. Aconites are just through the ground. Hyacinths have their noses up to sniff the air. They are still undecided.
To encourage spring’s arrival, here is a spring garden project for you. Look at the garden carefully and see how many of the flowers you are able to recognize. Gardeners have an advantage with this.
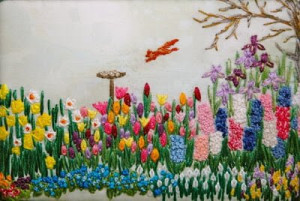
Stitching Spring Flowers
Yes, here is a book that tells you how to stitch recognizable spring flowers. Published as an eBook, you can have it in your computer within minutes of reading this. If you are more comfortable with a printed copy, you can print it and put it in a binder. This is a convenient way to acquire it, it is inexpensive and you will be the owner of the first book on embroidery written and published electronically. As such it is a landmark though I expect there will be more embroidery books in the future. For the author especially, and for the publisher, it was a huge technical challenge.
Stitching Idyllic: Spring Flowers uses only four basic stitches: Straight, Detached Chain, Buttonhole and French Knots. But these stitches have been adapted in new ways to achieve the results needed to portray recognizable plants and flowers. Written with a novice stitcher in mind, the section on preparation will tell you how to bond two layers of fabric to make one stable piece of fabric for the background. It explains how to mount the bonded fabric drum tight on a stretcher bars frame. Stranding and mixing thread colours to achieve the correct colour for each specific flower is included. There is also a simple way of planning the layout of your garden as not everyone feels comfortable drawing a design.
What more can you ask? Make this your Easter gift to yourself or for a friend. If I had not written it, I would be buying one for myself.
To see this book and browse the contents, go to annbernard.com. If you should then decide to purchase, the directions on how to do so are included.


