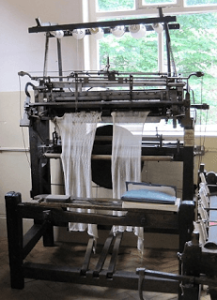
1980s Britain was a difficult time to graduate from university. With a degree in English and no discernible job skills apart from a willing heart and an urgent need to earn my keep I felt very lucky to land a job with a textile company in the Midlands. Filigree Textiles made knitted voile, Jacquard lace, lace insertions and trimmings from Diolen. This polyester thread was used to make the sheer and lace curtains so popular at that time in the UK. They also owned E. A. Richards, a manufacturer of traditional Nottingham lace tablecloths, bedspreads and trimmings using machines that were already over 100 years old.
To take a tour of Leavers lace mill and see a working lace making machine watch the video below. Yes, I noted that it is in Rhode Island.
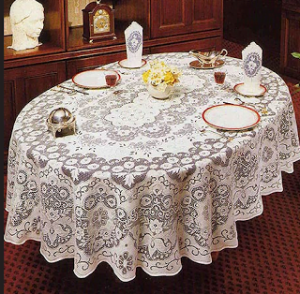
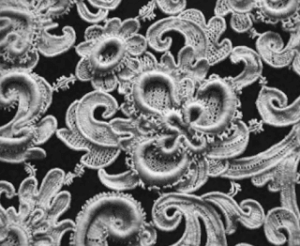
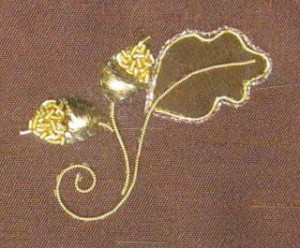
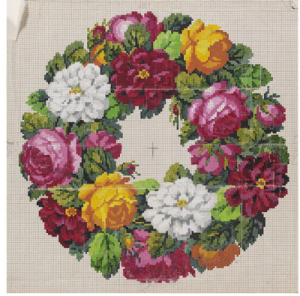
It is still possible to purchase Nottingham Lace. This tablecloth (Aintree design)can be found at the site below. Lace Story, also on this site, contains more information. The Lucilla pattern is 100% cotton and hand made. From cruising the web and reading the advertising, my impression is that there is an increased interest in using lace thanks to Downton Abbey.
http://www.quintessentialenglishlace.co.uk
I had a grand title, Marketing Executive, but in reality my job was a gofer. Officially I assisted in all aspects of our participation in national and international trade fairs. Included were purchasing of sales materials, display stands, packaging and print. Other duties could find me doing anything from cleaning the showroom, ironing samples to fetching and delivering urgently needed goods and trimmings. I felt lucky to have a job and was rarely bored.
I loved living in the Midlands near to Nottingham. We settled in Belper in a tiny cottage on Mill Lane. Our neighbour, Dina, had lived on that street all her life and worked for the local stocking factory, Brettles, where she was a ‘leg straightener’. She pulled the knitted stockings over a leg form prior to them being steam finished and becoming fully fashioned. That is, acquiring a leg shape. We moved and our new next door neighbour was ‘Dina’s other leg’. This means that she worked the other shift but worked on the same leg forms. I don’t think stockings are made like that any more.
If you would like to see a leg straightener at work, watch the following video:
www.britishpathe.com/video/stocking-factory
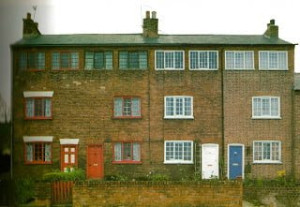
No. 17, was our neighbour on the right. This was an interesting cottage as it had been squeezed into the triangle shape between our house and the house further up the lane. At the front is a brick structure which was a nail makers workshop. As most of the mill workers were women and children, the men needed employment too. Belper was a centre for nail making and there are several nail makers cottages in the town. No. 17 was about twelve feet wide at the front but only three or four at the rear. All the cottages were tiny. I do not know how they brought up families in such small houses.
http://www.rightmove.co.uk/property-for-sale/property-34348430.html
Take a tour of 17 which has been renovated to a desirable residence. The bathroom has a heated towel rack which is an attraction living with the general dampness outside the home. Dina and her husband continue to live in the same house on Mill Lane.
Belper was also home to other manufacturers. Thorntons made wonderful toffee and chocolate and the smell was amazing. Strutts cotton mill and Silkolene had closed by then. Silkolene had developed a conditioner for silk weaving that became Swarfega – a hand cleanser used by mechanics.
I was often sent to Congleton to Berisfords where they made silk ribbon and trimmings. The route took me through the beautiful Derbyshire Peak District by way of Ashbourne and Leek. The countryside bore the evidence of its industrial past. This was mining country. Most of the girls who sewed the sheer and lace curtains were the wives and daughters of miners. The Victorian industrialists had taken full advantage of the confluence of coal, water, steel and a labour force to build substantial factories. This moved knitting and weaving out of the cottages and into large purpose built mills.
Wardles Silk Mill dominated the town of Leek though It was closed even then. The Victorians built those buildings to last. The Wardles had been a prominent family and several of them had been mayors of the town. Many of the mill owners of that time built schools for the children of their workers. This had a radical effect on the social mobility of that class as their children received an education for the first time.
For more pictures of the Wardle and Davenport Mill in Leek, go to:
Refer also to Dyeing and the Silk Industry during the Late 1800s. Posted on this blog Monday, November 25, 2013.
In a way I felt completely at home in that industry. My grandmother had been a mill girl before her marriage and worked as a child (1905-1915 approximately) in a cotton mill as a halftime piecer. Under the looms, she joined together the threads as they were woven into fabric. She worked mornings and went to school in the afternoons. School included a nutritious hot lunch cooked on site. I wish I had paid more attention to her stories. All the local girls worked in the mill. It was much better money than being in service in a large home. Her husband was a chauffeur. Even married girls worked in the mill; their babies were brought to the mill for nursing at lunchtime. My Aunt Edna always credited her scholarship to Grammar School to the excellent education she received at the JP Coates school which used the strict Scottish education system. JP Coates made embroidery supplies. My great aunt Alice stitched the sample tapestries used in stores publicize their wares.
I often thought of the family connection as I drove through these Midlands industrial towns. The UK was in the midst of a hard recession. Company profits were down 20% and manufacturing output was down 15%. Inflation was 17% and unemployment had reached 1.5 million. Evidence of this was everywhere in the closed shops though the area was better off than some. Race riots occurred in the major cities triggered by arson attacks on the homes of racial minorities. The prisons were in uproar too with riots and hunger strikes. Peace camps were set up at Greenham Common to protest the siting of nuclear missiles as the USA slid towards war with Iran.
However Prime Minister Margaret Thatcher who was deeply unpopular, declared her intention to continue her policies announcing “the Lady’s not for turning”, and her Minister of Employment advised people to “get on your bike and look for work!”
One bright spot in all this was that Prince Charles and Lady Di were married and we were all invited to watch on the telly. As she swept down the aisle of St. Paul’s Cathedral, her magnificent silk dress had become a little crumpled from the confines of the glass coach. Perhaps this was a foreshadowing of things to come. The silk for the dress was woven in Suffolk, not Macclesfield. Filigree Textiles designed and produced an official souvenir lace panel to commemorate the occasion which sold very well in Japan.
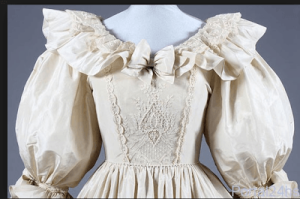
The Lace on the bodice of Lady Diana’s wedding gown.
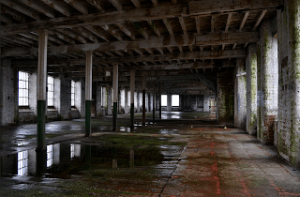
Like Wardles Mill, the factory I worked at is now derelict. Unlike Wardles the modern building did not last a hundred years. Filigree Textiles swallowed up its competitors and centralized its manufacturing into a new factory. I am not sure how much of its lace and voile is still manufactured in the Midlands. Cheap imports of excellent quality textiles from Eastern Europe were already threatening the market even in the 80s. Filigree had begun to buy lace rather than make it.
Information regarding lace keeps arriving:
“Do you know how to tell good lace from cheap lace? It’s the variation of the size of the holes. The more variations, the better the quality. This variation also causes the woven fabric to feel fairly stiff. Manufacturers would starch cheap lace so that it felt like good quality lace”. (Sheila McCoy)
Most of the old mills are derelict or transformed into flats or historic museums for the tourists. Which amounts to a glimpse at Britain’s manufacturing past and a trip to the tearoom.
Each generation of the industry, each innovation seems to have been shorter than the previous ones. Cloth and thread were home produced for hundreds of years. That is, home grown, home spun and hand woven. Many generations would have worn cloth that was produced, cut and sewn within a very few miles of their homes. When the Victorians built the massive mills my grandmother worked in, wearing her clogs, they must have expected this marvellous new technology to last for many generations. The buildings and the machines were built to last. And yet I probably do not own one item in my closet that was made in North America. That is, made from American cotton, woven, cut and sewn all in North America.
In fact probably almost half of my wardrobe has more to do with the oil patch than the cotton patch, sheep fold or silkworm.
And the clogs? Janet has so much to share with the readers of this blog that it has been divided into two instalments. Stay tuned!