Stitching Idyllic

Stitching by Ann Bernard

  • Home
  • Blog
  • Spring Flowers
  • Summer Flowers
  • About Ann

June 27, 2013 by Ann Bernard

Creative Use of Stitches

Meet Frances Fordham. Frances is a friend and a neighbour and has embroidered, quilted and rug hooked sort of forever. She always stitches flowers but look at these flowers closely and see the detail and how effectively she has used the stitches.

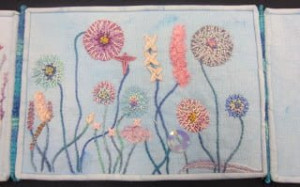
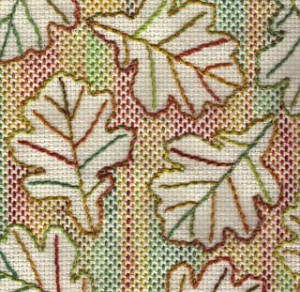
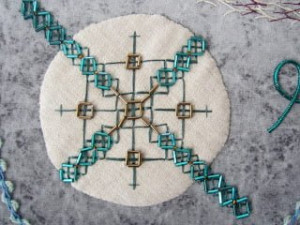
This first one is Running Stitch and French Knots. Frances finished each piece as a quilting square and then joined them to create a table runner.

Running Stitch and French Knots

Running Stitch and French Knots

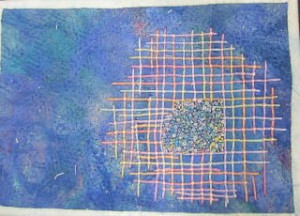
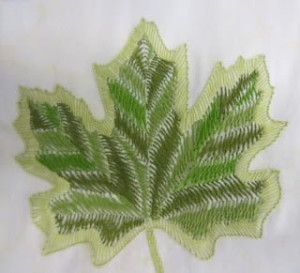
The Lilies are stitched with Chain Stitch and variations.
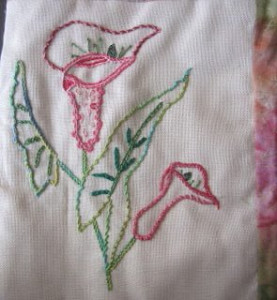
Chain Stitch Lilies

Chain Stitch Lilies

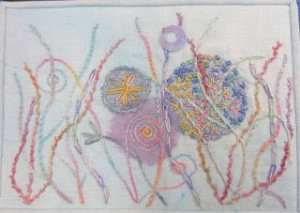
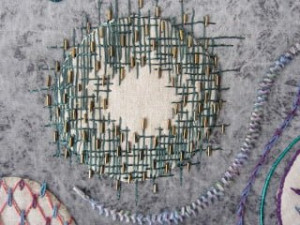
The Pansy is stitched with Stem Stitch and variations, Cross Stitch, Herringbone Stitch and Threaded Back Stitch.
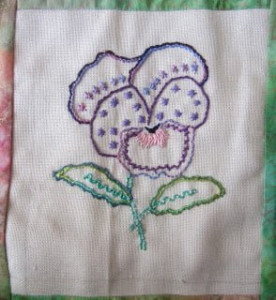
Stem Stitch Pansy

Stem Stitch Pansy

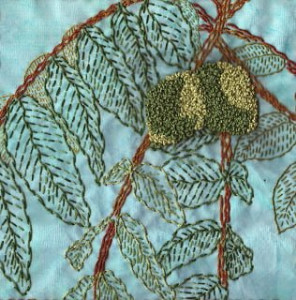
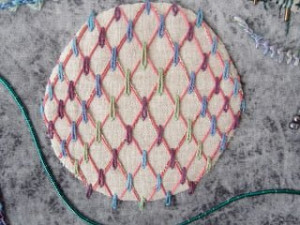
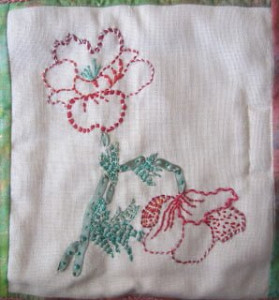
This last one is a Single Dahlia. The stitches are Buttonhole Stitch and variations, Cretan Stitch, Herringbone Stitch, Fly Stitch, Stem Stitch, Chain Stitch, Satin Stitch, Long and Short Stitch, Rumanian and other Leaf Stitches.
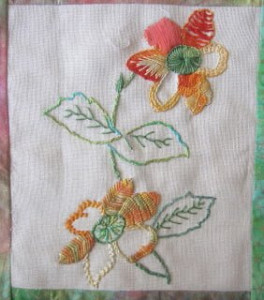
Enjoy a post from the past

  • The Changi Quilts
    During 1942, mainly between March and August, three signature quilts were made by the women interned by the Japanese in Changi Prison …
Single Dahlia

Single Dahlia

The threads Frances used were DMC Coton a Broder and Clarks Anchor Floss with a few extras included as needed.

ShareTweetGoogle +PinterestPocketMail

June 6, 2013 by Ann Bernard

Accordion Book Stitched On Blue Linen

Judy Eckhardt was a member of our class in Guelph earlier this year. I have pleasure in sharing some of her work with you. Judy teaches machine embroidery and quilting but had not been using hand stitching creatively. This class was an opportunity for her to become acquainted with the huge variety of embroidery stitches.

All her pieces were stitched on fine handkerchief linen which she dyed herself. She used Treenway Silk threads wherever possible adding DMC Floss to add a needed colour. She made her pieces into an accordion book.

Blue is Judy’s favourite creative colour and, like Barbara Lee, she chose the challenge of working predominantly with blue on blue plus other colours in a congruent range of tones.

Chain Stitch and Variations plus Sorbello Stitch and Split Stitch

Chain Stitch, Sorbello Stitch and Split Stitch

Chain Stitch, Sorbello Stitch and Split Stitch

Cross Stitch, Stem Stitch, Outline Stitch and Turkey Work
You can see on this one how Judy finished her pieces and assembled them into a book.

Cross Stitch, Stem Stitch, Outline Stitch

Cross Stitch, Stem Stitch, Outline Stitch

Spider Wheels, Couching and Herringbone Stitch

Spider Wheels, Couching and Herringbone Stitch

Spider Wheels, Couching and Herringbone Stitch

The back cover of the book features Trellis Work and French Knots

Trellis Work and French Knots

Trellis Work and French Knots

Enjoy a post from the past

  • Creative Use of Stitches: Part 4, completed
    Here is the completed sampler. It is stretched onto a wooden frame and backed with white felt. A pocket for …

To my surprise, Judy used no machine embroidery anywhere in this project.

ShareTweetGoogle +PinterestPocketMail

May 14, 2013 by Ann Bernard

Leaves to Love: Part 1

Barbara Lee Johnson was a participant in the Creative Use of Stitches class in Guelph, Canada. She chose to use the stitches to portray many different kinds of leaves. Mostly, she stitched green on green. We all know how difficult it is to stitch the same colour fabric and thread. They can result in a camouflage effect but not here. She has already completed eight different samples and has plans for many more. She is as yet undecided on how to present them as a congruent whole. Barbara Lee has a background in art and art history. She does a lot of beading and I was surprised that she did not included beading in this project.

This first one is of Walnut Leaves using Running Stitch and variations with French Knots. The fabric is Quilting Cotton hand painted with Colour Vie pigments. The threads are DMC Floss and Perle Cotton.

Walnut Leaves

Walnut Leaves

The background of this piece is 11 Count Aida Cloth with Running Stitch using variegated Merino Wool leaving the sturdy Oak Leaves as open and negative spaces. The outlines of the leaves are done with Whipped Running Stitch.

Oak Leaves

Oak Leaves

Weeping Willow Leaves are portrayed with variations of Stem Stitch and Cross Stitch on painted fabric. The downward flow of a willow branch is most effectively displayed here. These samplers are as yet unpressed and unmounted and this accounts for the wrinkling in the background.

Enjoy a post from the past

  • All’s well that ends well
    It has been a long time since you have heard from me which deserves and explanation. In late 2014, I …
Weeping Willow Leaves

Weeping Willow Leaves

The Maple Leaf is stitched with Buttonhole edging while the body of the leaf is Cretan Stitch. This picture is a photo rather than a scan which is why it has not reproduced so well.

Maple Leaf

Maple Leaf

ShareTweetGoogle +PinterestPocketMail

May 3, 2013 by Ann Bernard

Creative Use of Stitches: Part 3

After Cross Stitch we moved on to Chain Stitch, another rigid example. I find that stitchers do not like stitching Squared Chain Stitch finding it difficult to manage the sequencing. I was determined to include it so they would have an example of it in their sample books.

Squared Chain Stitch

Squared Chain Stitch

The next two small samples are of Trellis Work. A favourite in Jacobean stitching, it is fun to stitch and dramatic in its impact. I had designed and drafted the first one but had never tried it out in thread. It was a nuisance but interesting to stitch. The density of the darker threads made it look heavy but the scattering of beads lightened it up. I will certainly use this variation again.

The second Trellis Work was also an experiment. I added a thread of glitter to the framework lines and purposely used Detached Chain Stitch as I had not used it elsewhere. Notice that the diamonds and Chain Stitches become smaller towards the outside of the circle.

Enjoy a post from the past

  • Spring has Sprung: Posted on my Front Door.
    Phantasy Flowers. It is Easter weekend and we have April weather.  Chilly rain and wind out there.  It has been an …

All the stitchers had a work book. I asked them to bring a print of each of their samples for everyone in the class. On the reverse side of the print the relevant information was printed including the featured stitch, fabric, threads and the stitcher’s name and contact information. The simplest way to produce prints is to place the sampler face down on a scanner as you would to copy text. Place a medium heavy book on the wrong side of the fabric. Having obtained one satisfactory image, use it to print as many copies as you wish. In this way, all participants have a rich variety of ideas in their workbooks.

Trellis Work

Trellis Work

Detached Chain Stitch

Detached Chain Stitch

The final blog on this project will be about the stitches that connect and integrate these samplers.

ShareTweetGoogle +PinterestPocketMail

April 30, 2013 by Ann Bernard

Creative Use of Stitches: Part 2

This lesson featured Cretan Stitch and Buttonhole Stitch. For me, these two stitches did not blend well together and, next time, I will combine Cretan with the other leaf stitches.

Cretan Stitch

Cretan Stitch

Cretan is one of my all time favourite stitches. It can be so fluid and adaptable. Try listening to or singing the waltz ‘Die Fledermaus’ by Strauss to get the flowing and moving inspiration started. I have renamed this way of stitching it, the Cretan Waltz. The pink and mauve areas are silk rovings needle felted in position while the more solid mauve/purple areas are dyed dryer sheet. The bits of gold and copper are chocolate wrap.

Buttonhole Stitch is much more rigid. It can flow and move though I have not done that on this sampler. It does adapt well for couching. The coiled metallic cord is held in place with straight stitches.

Enjoy a post from the past

  • More Students’ Gold Work
    The Gold Work class held in Guelph, Ontario last spring produced some varied pieces of work. This was an Intermediate …

The third sampler in this edition is Cross Stitch with added beads. I used beads in small amounts here and there to add interest and some sparkle. The light mauve velvet background absorbed colour and did not give contrasts in texture or colour their due respect.

Buttonhole Stitch

Buttonhole Stitch

Cross Stitch

Cross Stitch

The next entry will feature Chain Stitch and Trellis Work.

ShareTweetGoogle +PinterestPocketMail

February 1, 2013 by Ann Bernard

Satin Stitch – Padded, Shaded and Stitch Rotated

As I wished to include all the above features in this Tutorial, my design motif is unbalanced right and left sides. It is 3″ across and 1/2″ wide. This width is about as long as it is feasible to make Satin Stitches without them becoming unstable. 1/8″ is about the narrowest or else it is too pokey.

The fabric I used is 28 count cotton Monaco by Charlescraft. The higher the thread count the easier it is to work this stitch and the result is better, too. I mounted it on a Grip-n-Stitch frame by Fabric Flair and am reviewing this new type of frame in a separate entry. It is essential that the fabric be really taut and mounted grain perfect when undertaking Satin Stitch.

Satin Stitch - Drawing The Shape

1. Draw the shape on the linen, in this case it is cotton, using a pen that will make a very fine line.

2. I used DMC Floss and chose a range of thread colours that were close in shade. It is much harder to shade when there is a marked difference between the threads.

If the final layer of Satin Stitch is to be a silk thread, I would still use DMC Floss for padding for reasons of economy.

Enjoy a post from the past

  • Trestles or Easels Specifications
    Trestles or Easels can be made at home if you have the tools. They are an effective support for large …

Preparation is vitally important
Unless this is perfect, the appearance of your final stage of Satin Stitching will not turn out as you had hoped. Do not short change yourself on this.

Satin Stitch - Preparation

3. Using three threads of the floss, split stitch all round the motif on the marked line. As Mary Corbet has said, using two threads means that they divide when split stitched instead of behaving as split stitching. These stitches must be small i.e. 1/4″ in length. Start and finish threads within the body of the motif. This outline needs to be as solid and immovable as the Great Wall of China. After just a few stitches, test this by going picky, picky with a finger nail to see that the line is solid and immovable. Reduce your stitch size if there is any give in this line of stitching.

4. Padding
All Satin Stitched projects need at least one layer of padding which is usually worked in long Split Stitches within the shape. This padding should cover all the space within the the outline. It will support the Satin Stitches and prevents them from collapsing into the middle of space. Totally unpadded Satin Stitch has a ‘hollow’ look to it.

Satin Stitch - Padding

Padded Satin Stitch has a raised look and needs three or more layers of padding stitches.
Use six strands of Floss for this. The first line is lengthwise. Note that it does not extend to the outline leaving a space. The second line is stitched crosswise. I used the palest of the colours so that this would be visible for you. Normally, I would use the same colour as the other layers. The third layer is also lengthwise and fills the entire space within the outline. Take the shortest route between padding stitches so that the reverse side does not also become padded,

Organize the padding layers so that the final one lies in the opposite direction to the Satin Stitches.

Satin Stitch - Layers #1

Satin Stitch – Layers #1

Satin Stitch - Layers #2

Satin Stitch – Layers #2

Satin Stitch - Layers #3

Satin Stitch – Layers #3

5. Satin Stitching
Make a decision on which edge of your stitched shape will be more noticeable. This is usually the outer edge of the petal of a flower or the edge which is better lit for the viewer. This is the dominant edge and the one that the needle goes down through the fabric.

The needle will come up on the less visibly noticeable edge which is usually towards the centre of the flower. Use one strand of thread only.

Satin Stitch - Dominant Edge

This may seem like an unnecessary amount of stitching but is quicker in the long term.
Two threads, or even three threads will twist and will not give attractive or professional results.

Try stitching with two threads just for the experience. You will find that you will have to separate those threads every stitch and it will make it slow. Slow and frustrating, actually.
One thread is the quick and easy way to go.

Also use the smallest needle you can manage to thread such as a Crewel size 9 or 10. This will help the ease and accuracy of the stitching though some Crewel 9 or 10 can be hard to thread. Bohin needles do not have this problem. The eyes are properly formed and much easier to thread.

Start with a knot (or not) and make a small waste stitch within the body of the padding.

In the centre of the motif bring the needle to the front on the less dominant side of the motif. Take it down to the back on the dominant side of the motif.

This is when your preparation will pay you dividends in ease of stitching and results.
Let the needle find the spot that is closest to that Great Wall of China and make sure that it goes through the fabric absolutely vertically.

And this, my fellow stitchers, is the secret to perfect Satin Stitch. Excellent preparation, stitch with one thread only and make sure that your needle entry and exit is always vertical.

If it is a straight shape, just continue until you reach the other end.

Shading
Shading is a question of getting organized as you move from one shade to the next. Thread another Crewel 9 or 10 needle with one thread of the next colour. Look at the photos to see how the colour change is achieved.
One stitch on the new colour, three of the old,
two stitches of the new, three of the old,
two stitches of the new, two of the old,
three stitches of the new, one of the old,
and then you will likely be ready to use all of the new colour.
These ratios are changeable as appropriate for your project.

Satin Stitch - Shading

Continue stitching maintaining the vertical and parallel orientation to the stitching, changing colours to achieve the shading you wish until you reach the end or the pointed end of the motif. I seem to have lost some of that perfect angling but you will not do that I am sure.

6. Points
If possible, organize your design motif and stitching plan so that the stitches at the point retain their vertical orientation. This creates a far more satisfactory result than trying to place tiny and short stitches across the point. There is nothing like a photo enlargement to show imperfections.

7. Rotating Satin Stitching
That means stitch direction which follows the curve of the motif. As you can see, in this shape, if the stitches remained vertical and parallel, they would become rather longer than the practical maximum of approximately 1/2″. However, the stitches are remaining at right angles to the outer edge of the motif. The dominant outer curve is also considerable longer than the inner curve.

Satin Stitch - Rotating Satin Stitching

Satin Stitch – Rotating Satin Stitching

Here is how
Watch the shape and make an extra stitch every so often so that there are more stitches going down into the fabric on the outer edge than there are on the inner curve. Come up through the padding about halfway across the width of the motif and then go down on the outside edge as usual. The next stitch will be a normal stitch that covers the whole width of the motif. This second stitch will cover the start of the shorter stitch making it undetectable. That half way point can instead be 1/3 or 2/3 of the way across the width. This depends on the shape and curve of the motif.

Watch the shape and the stitch angles and add these extra stitches as needed but always have about three normal stitches between the shortened ones. I apologize for missing taking a photos of this and I am not computer literate enough to add an arrow as an indicator. I am also regretful that the photos are dark on one side.

The point at this end had to be stitched across with several really tiny stitches. I would have been wiser to continue the shape of this half of the motif in a gentle curve to the right which would then have let me finish it with longer stitches like the other end of the motif.

Satin Stitch - Pattern Finished

Leaf Shape with one layer of padding

This leaf is stitched in Perle 5.

1. Plan the shape and the stitch direction making sure that you will be able to complete both the rounded end and the point easily.
2. Split stitch on the line around the leaf using one thread of Perle 5 and ensuring that this line is solid and immovable (Great Wall of China). Use an appropriate sized Crewel needle which is the thinnest you are able to thread.
3. Using two threads of Perle 5, place long split stitches in the opposite direction to the planned Satin Stitch and fill the entire space within the leaf.

Satin Stitch - Leaf Planning

Satin Stitch – Leaf Planning

4. Decide on the designated primary and more visible edge of the leaf and arrange that your needle enter the fabric on that edge and come up through the fabric on the secondary edge. Remember to let the needle find the spot closest to the split stitch edging and that the needle enters and leaves the fabric at exact right angles to the fabric.

Start Satin Stitching in the centre and widest part of the leaf shape placing the stitches at right angles to the padding stitches. This is as you planned in the diagram.
Work towards the base of the leaf first making sure that the final stitch that completes the curve is short in length. This final stitch supports the previous longer one and prevents it ‘falling off the curve’.

Satin Stitch - Falling Off The Curve

Satin Stitch – Falling Off The Curve

5. Continue vertically placed Satin Stitching until you reach the pointed tip. Place the final shortish stitch so that it forms the point. Take the needle down very close the the previous stitch so that this last entry point is not visible.

Satin Stitch - Last Entry Point

Satin Stitch – Last Entry Point

Padded Satin Stitch Small Circle
6. For a small shape, use three threads of DMC Floss to split stitch the outer line.
Use six threads of Floss to form a Double Cross Stitch or Quadruple Cross for the padding.

7. It is your choice to Satin Stitch with one thread of either DMC Floss or Perle 5.
Some circles, such as berries, become too small for the Perle 5 thread. Try Perle 8.

My circle is definitely not round. If you wish for an exact circle, use a template as suggested by Mary Corbet.

Satin Stitch - Circle

This completes this Tutorial.

Hope that you will enjoy and have success with Padded Satin Stitch.

ShareTweetGoogle +PinterestPocketMail

Search the web site

stay up to date. Subscribe to our newsletter!

Name

Email


Connect with us socially

  • Facebook
  • Twitter
  • Instagram
  • Pinterest
  • RSS Feed

Hand Stitch Recognizable Spring Flowers Ebook

Stitching Spring Flowers

Hand Stitch Recognizable Summer Flowers

Stitching Summer Flowers

Recent Posts

  • How to stitch Snowdrops. Quick and Easy!
  • Inspirations, All Stitched Up! from Australia
  • Newsletter Märchenhaftes Sticken – Jessica Grimm
  • Cotton Quartet 1: Preliminaries & First Stitches
  • Hand and Lock. London Craft Week. May 9 -15 2022

Recent Comments

  • Rosemary Norman on How to stitch Snowdrops. Quick and Easy!
  • Ann Bernard on September 20, 1066 The Battle of Fulford Gate
  • Mrs M Moverley on September 20, 1066 The Battle of Fulford Gate
  • Kathleen (Kate) Simeri on Stitches Sampler from The Royal School of Needlework
  • Ann Bernard on The Changi Quilts

Archives

  • February 2023
  • May 2022
  • April 2022
  • March 2021
  • February 2021
  • November 2020
  • October 2020
  • June 2020
  • May 2020
  • April 2020
  • March 2020
  • February 2020
  • January 2020
  • December 2019
  • November 2019
  • October 2019
  • September 2019
  • August 2019
  • July 2019
  • June 2019
  • April 2019
  • February 2019
  • January 2019
  • December 2018
  • November 2018
  • October 2018
  • September 2018
  • August 2018
  • July 2018
  • June 2018
  • May 2018
  • April 2018
  • March 2018
  • February 2018
  • December 2017
  • November 2017
  • July 2017
  • June 2017
  • May 2016
  • February 2016
  • January 2016
  • November 2015
  • June 2015
  • March 2015
  • January 2015
  • December 2014
  • October 2014
  • September 2014
  • May 2014
  • March 2014
  • February 2014
  • January 2014
  • November 2013
  • September 2013
  • August 2013
  • July 2013
  • June 2013
  • May 2013
  • April 2013
  • March 2013
  • February 2013
  • January 2013
  • December 2012
  • November 2012
  • October 2012
  • September 2012

Categories

  • Royal School Of Needlework
  • Stitching Colleagues
  • Stitching Equipment
  • Stitching History
  • Stitching Materials
  • Stitching Techniques
  • Stitching Tutorials
  • Uncategorized

Tag Cloud

Acid Damage And Mounting Canada 150 Chain Stitch Coral Stitch Couched Thread Crewel Designs Cross Stitch East India Company embroidery Jacobean Period Stitching Mary Corbet Masonite Medici Wool Queen Mary RSN Student Shading In Stitching Stem Stitch stitching Water Damage Stitching Worsted Wool Thread

Pretty Chic Theme By: Pretty Darn Cute Design